
With the latest release of Amped FIVE, we brought you an improved Macroblocks filter. The article will focus on the principles of video compression, understanding the filter and how to interpret its results. We will also look at the new “Quantization Parameter Analysis”. Read on to learn more!
Introduction
Those who have been dealing with video in a forensic setting will know how visually detrimental compression can be. Even if the majority of the video properties are of a high standard, when there is a large compression, the overall quality of the video is impacted. Compression can also hinder the ability to ascertain details such as license plates or faces.
We may not like it, but compression is of great value to our industry. Without the ability to substantially reduce the file size of large quantities of surveillance video, we would not be able to store it for very long. We may lose vital video evidence. Compression is also very clever. It purposely discards and/or reduces the quality of information which our eyes are less sensitive to or which is redundant in time.
In forensic video analysis, it is increasingly important to understand how compression affects the authenticity of a video. Whether it adds artifacts or changes the appearance of very small detail (or both!), it is our responsibility to spot issues which may drive a lay person to mis-interpret the contents of a video. With Macroblocks analysis, you have a clear visual representation of how compression impacts your video. The beauty of compression, though, is that it can also help us determine whether a video has been encoded more than once. This way, we can better determine if it is an original.

Compression in a Nutshell
In lossy compression, data can be reduced in both space and time. With spatial compression (which is applicable to images as well as videos), color information is discarded first. This works because our eyes are more sensitive to luminance variations than they are to chrominance variation. Then, high frequency detail is segregated and reduced in proportion to preset quantization tables. Again, this process aims to take advantage of our visual perception and of how our brain better registers low frequency of visual information. Clever, right? But that’s not all.
We can reduce data in time as well. Lots of it. How? In CCTV footage or other types of surveillance footage, the majority of the visual content captured doesn’t change much over time. For example, a static camera overlooking a residential street.
People and vehicles moving in the scene will cause the configuration of pixels in an area to change rapidly. However, pixels depicting other elements in the scene, like the sky, the houses, the trees etc. will not change that much, if at all, from frame to frame. Therefore, these pixels can be simply taken (or predicted) from previous frames, or even subsequent frames, rather than being repeatedly encoded.
Frame Types in Temporally Compressed Videos
This is why in temporally compressed MPEG videos (such as those encoded with H.264 or H.265 codecs for example), we have three different types of video frames based on their pixel content:
- I-Frame (or Intra-Frame) – consisting of newly recorded pixels entirely.
- P-Frame (or Predicted-Frame) – referencing past frames, compensating for pixel movement and residual error.
- B-Frame (or Bi-directional Predicted-Frame) – referencing both past and future frames.
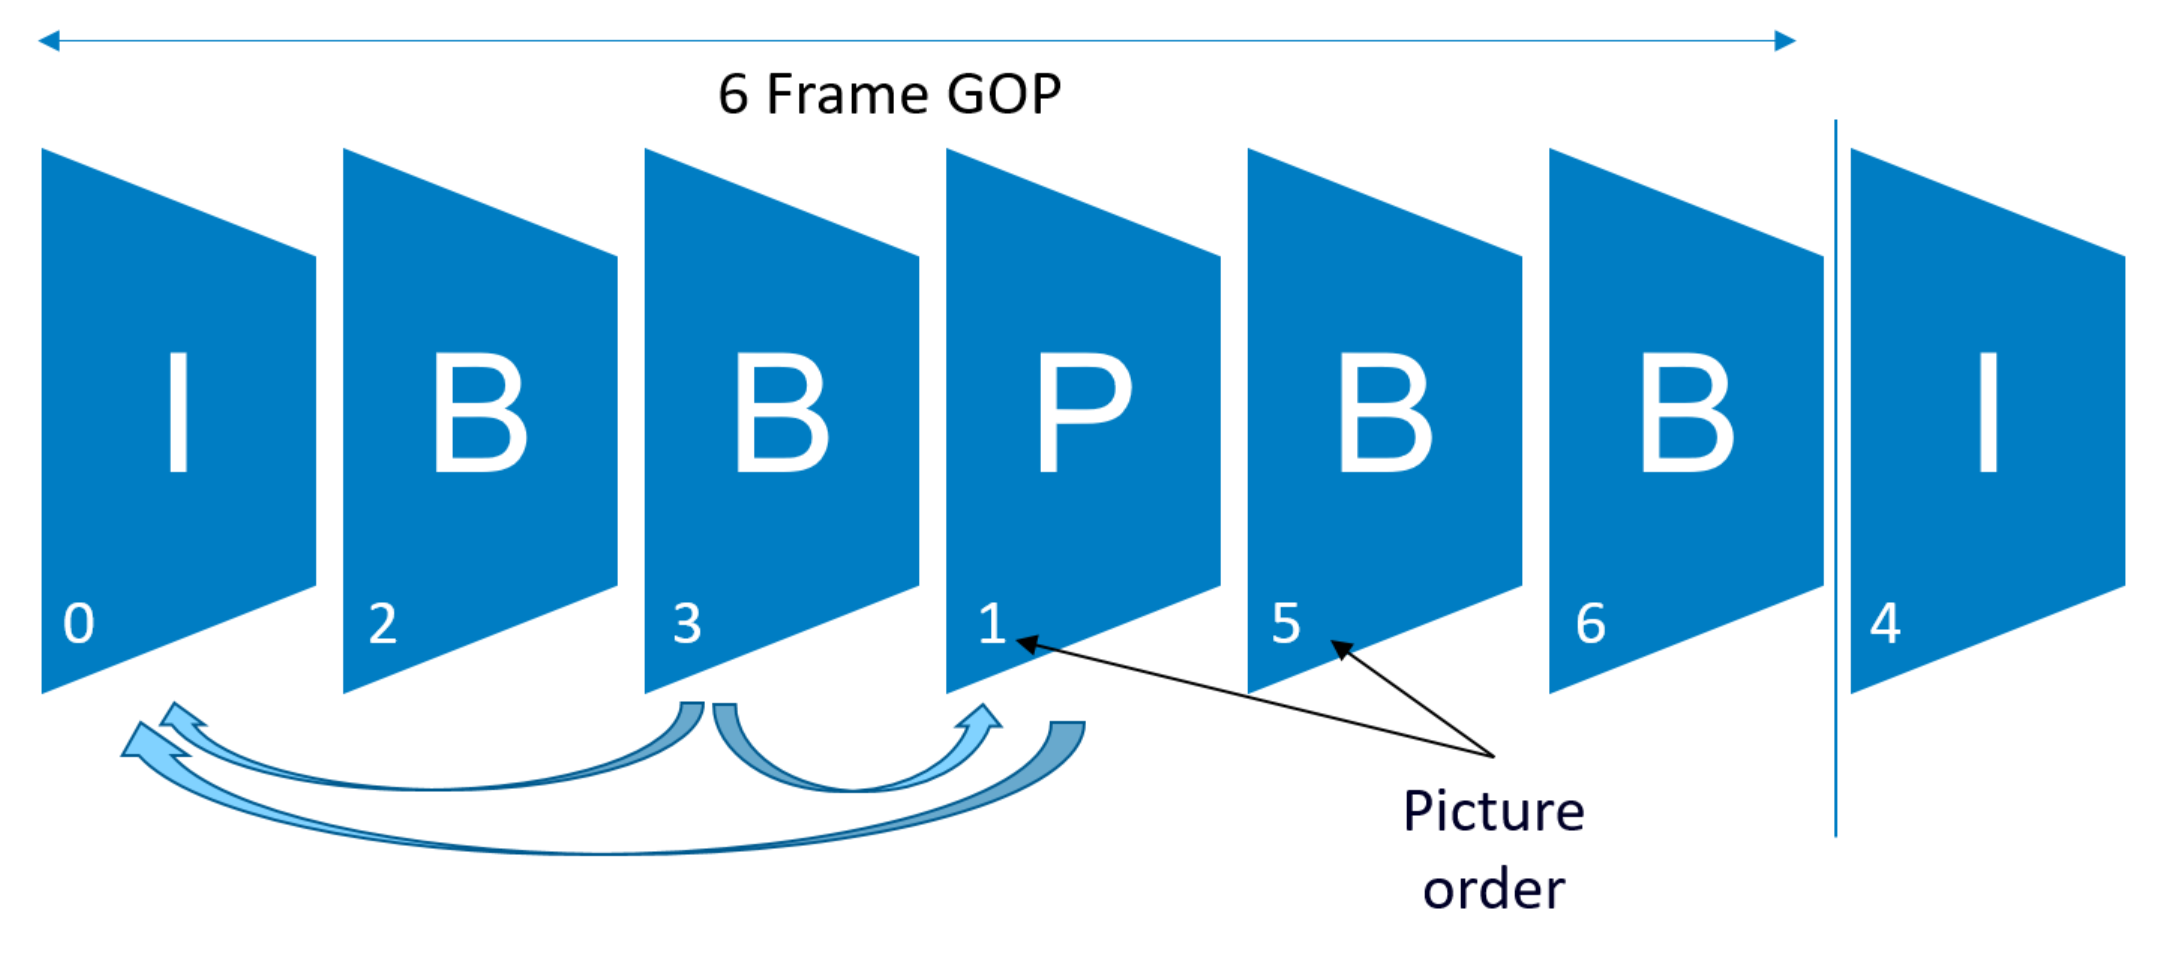
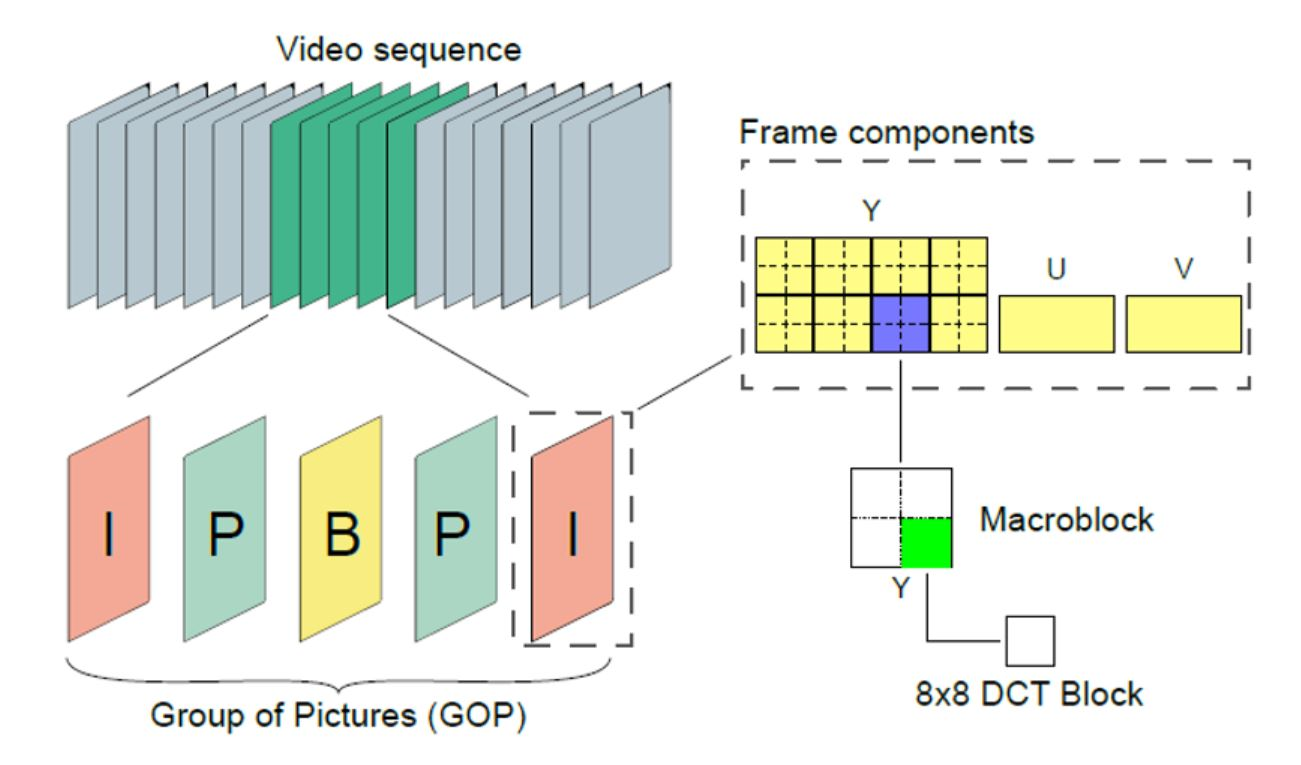
In the common temporally compressed video we have repeating cycles made of one I-Frame followed by a number of P and B-Frames. These cycles are referred to as GOPs (Groups of Pictures). And because B-Frames reference future frames in the GOP, those future frames have to be encoded before. Similarly, B-Frames are decoded after the future frames they reference. Then, we may have a decoding (or picture) order of frames that differs from their presentation (or display) order.
Encoders are very clever in determining which areas of a frame are to be newly recorded. These areas are predicted from previous and future frames or skipped altogether. And they do so in real time while also capturing the information very rapidly!
Frames are broken down into macroblocks, which are square blocks made of four or more pixels. Depending on compression type and method, macroblocks can be of different sizes. A macroblock of 16×16 pixels resolution is the most common type for temporal compression. These macroblocks are made of smaller 8×8 square blocks of pixels. And they derive from the Discrete Cosine Transform (DCT). This is the mathematical function that separates high frequency of detail from low frequency of detail in spatial compression.
Performing a Macroblock Analysis
So, how do we perform a macroblock analysis and what does it tell us? First of all, we all need to be aware that when we have a video loaded in Amped FIVE (or anywhere else for that matter), the information that has been previously discarded, reduced or predicted during the encoding stage, needs to be put back somehow during the decoding stage. This is the stage where frames are reconstructed one by one, pixel by pixel, so that you can seemingly view and playback the clip on your screen. Once this is done, it will be visually possible to determine how macroblocks differ from previous or subsequent frames.
The Macroblocks filter facilitates this process, with a simple and effective color coded overlay which reliably indicates how this information was decoded back. Let’s load a video into Amped FIVE and ensure this is a temporally compressed video. You can now interrogate the video with File Info tool or the Advanced File Info utility. However, you can easily tell just by checking the frame type indicator on the player panel. This ensures that you have I-Frames and P/B-Frames cycling during playback.
Applying the Macroblocks Filter
Apply the Macroblocks filter to your video, which can be found in the group Verify. If you used the older version of the filter you will know how it was necessary to transcode the original video to a new video before the macroblock analysis could be performed. This is no longer necessary with the updated filter. All you have to do is add the filter to the chain to have an immediate view of the macroblock analysis.
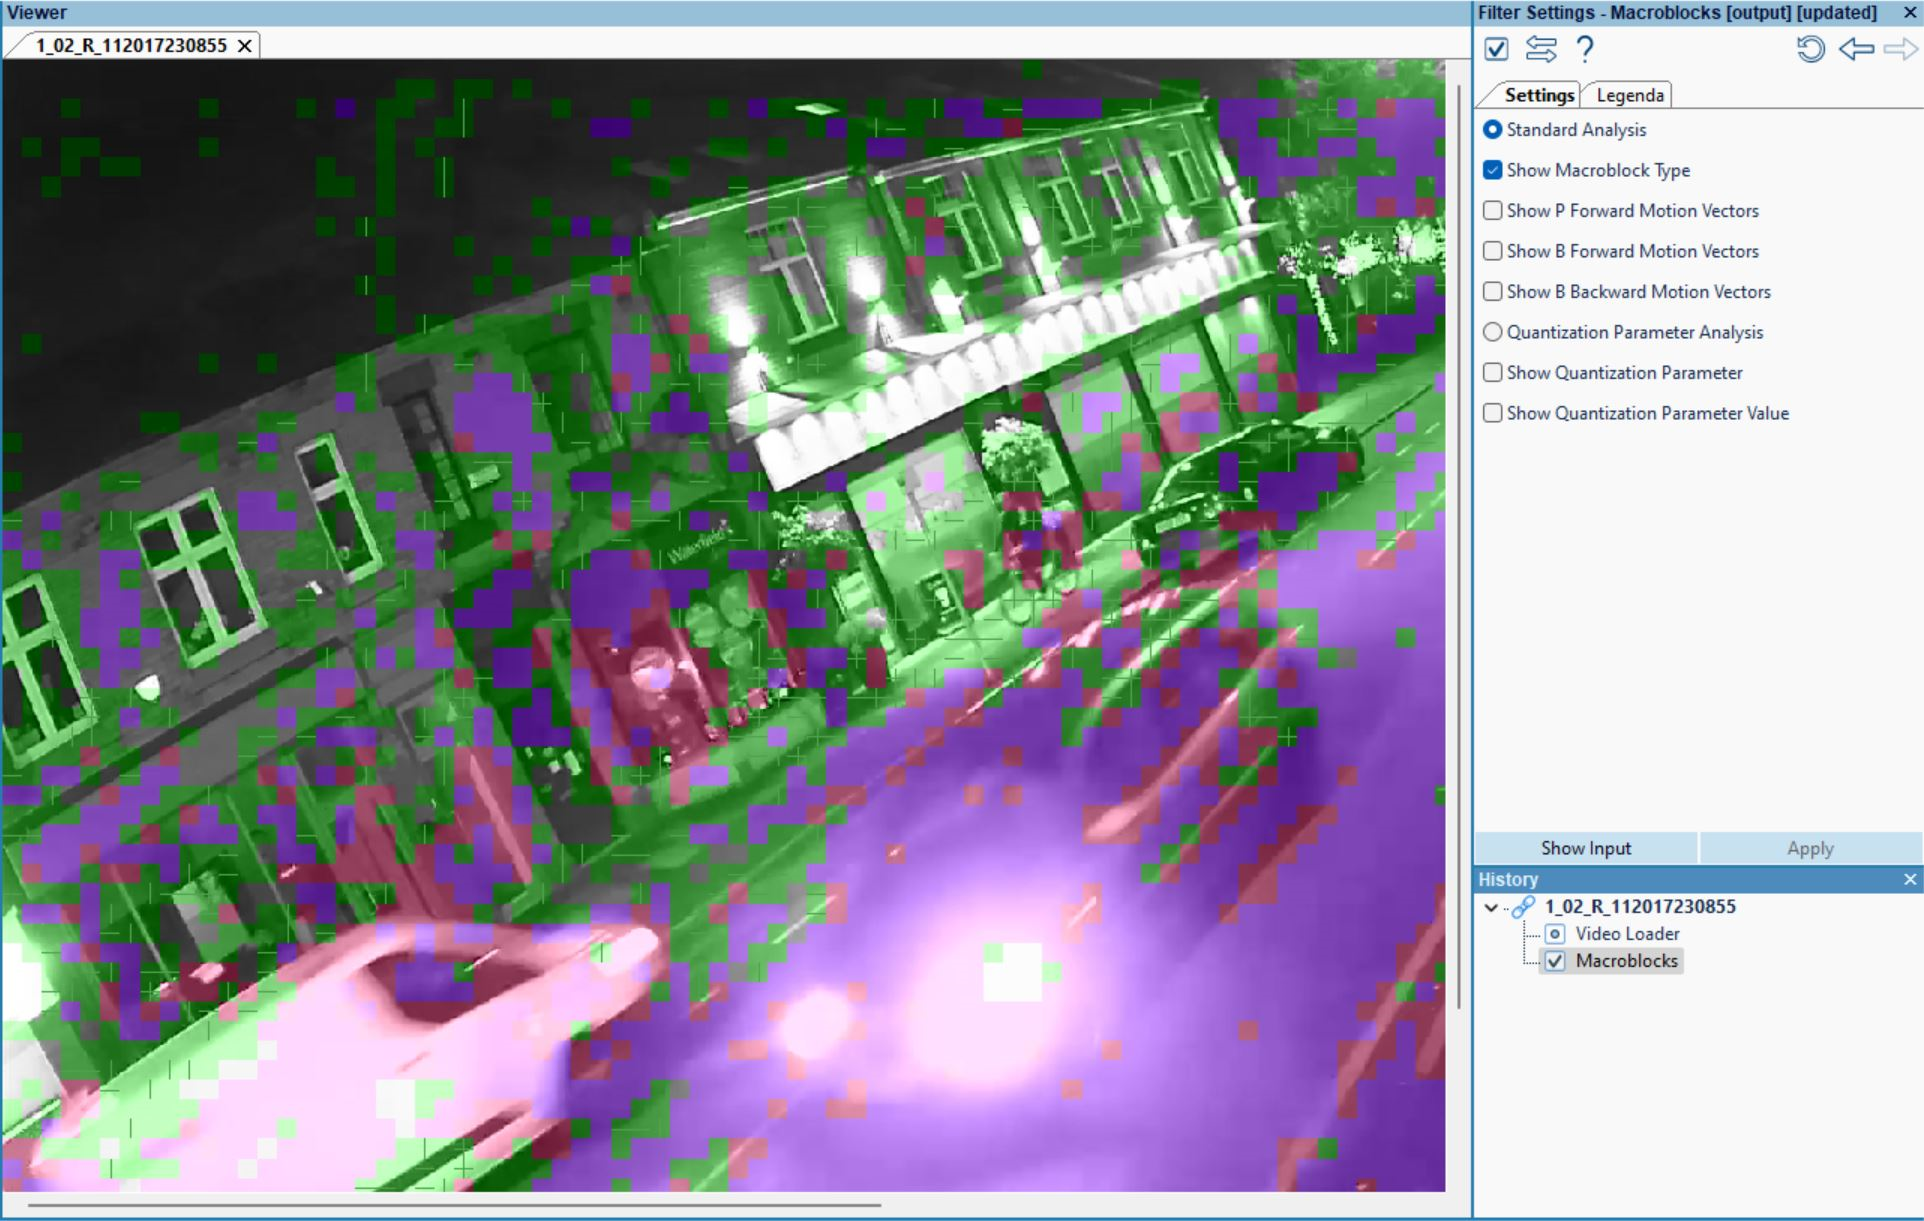
Understanding the Color Legend
By default, the filter will conduct a “Standard Analysis”, which is automatically ticked within the filter settings. We now have a graphical representation of the macroblock types, overlaid on the video. It has also been rendered in greyscale to facilitate the view of the color-coded blocks. Let’s go and have a look at what the individual macroblock colors indicate:
| PCM | Lossless sample with no prediction. |
| INTRA 16×16 | Full 16×16 macroblock encoded with intra prediction. |
| INTRA 4×4 | Macroblock divided by 4×4 macroblocks encoded with intra prediction. |
| DIRECT | No motion vectors are sent. B-Frames only. |
| GMC & SKIP | Skip full 16×16 macroblock. P and B-Frames only. |
| GMC | Global Motion Compensation. |
| USES LIST 1 | Referenced from a past frame. |
| USES LIST 0 | Referenced to a future frame. |
| LIST0 & LIST1 | Referenced to a future and past frame. |
| NULL | Skipped 16×16 macroblock altogether. |
The Difference Between New, Skipped and Predicted Blocks
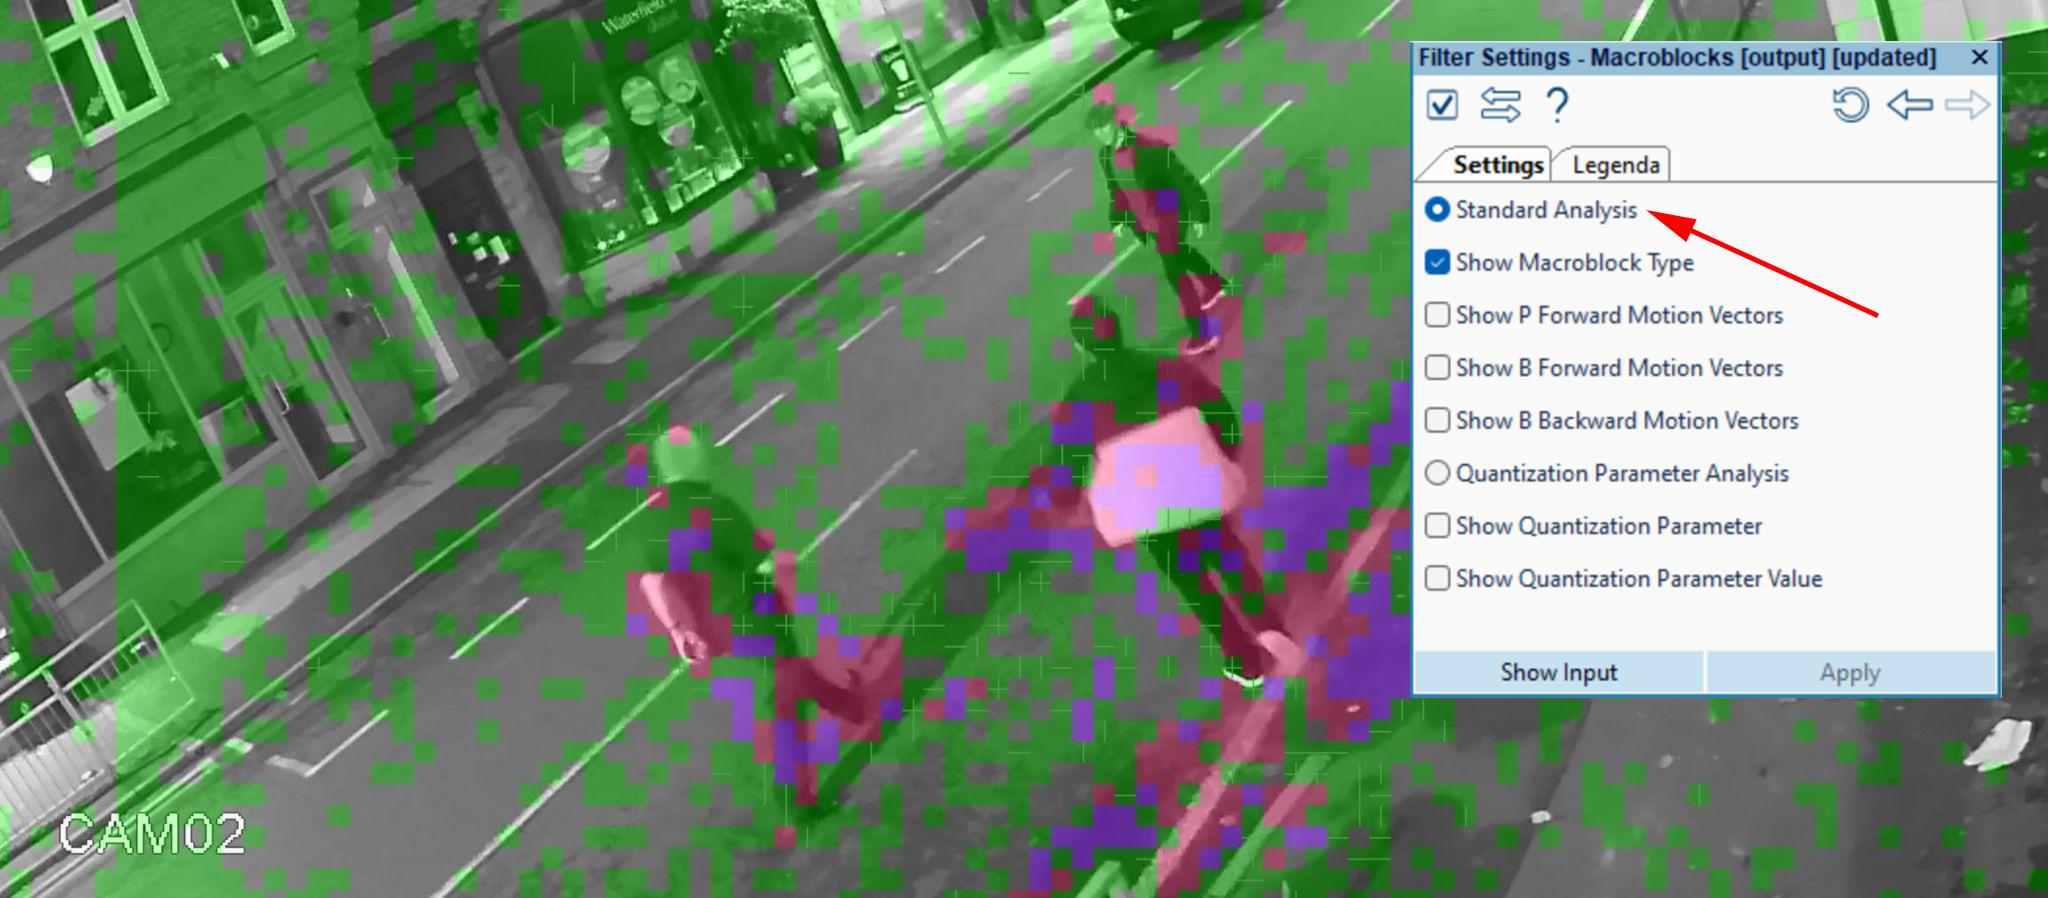
But let’s also have a look at what these color codes mean in practical terms. In the image below, we see three people on a road. They are moving slowly towards each other (an altercation is about to commence) but the shot is static and the rest of the scene is not changing much from frame to frame. The Macroblocks filter shows us how this particular P-Frame (this video has no B-Frames) is made of macroblocks fully and partially encoded within the areas where movement is detected. These areas are represented with pink and purple color coded blocks.
The filter also identifies macroblocks predicted from previous frames and macroblocks totally skipped in areas where small or no movement is detected. The green color coded blocks are predicted, whereas the gray color coded blocks are skipped. As well as movement, the encoder also considers other criteria when creating or predicting data. On the main, it is dependent on a threshold for residual error and whether or not altering data would consume more storage than creating data.
The Motion Vectors
In regards to the green blocks which reference past frames, a question may come up: what is the direction of movement of these blocks of pixels from one frame to the next? Well, we can determine this simply by enabling the motion vector view from the Macroblocks filter settings. We can show motion vectors for both P and B-Frames. However, as this video only contains P-Frames, we will tick the “Show P Forward Motion Vectors” option in the filter settings, as shown below.
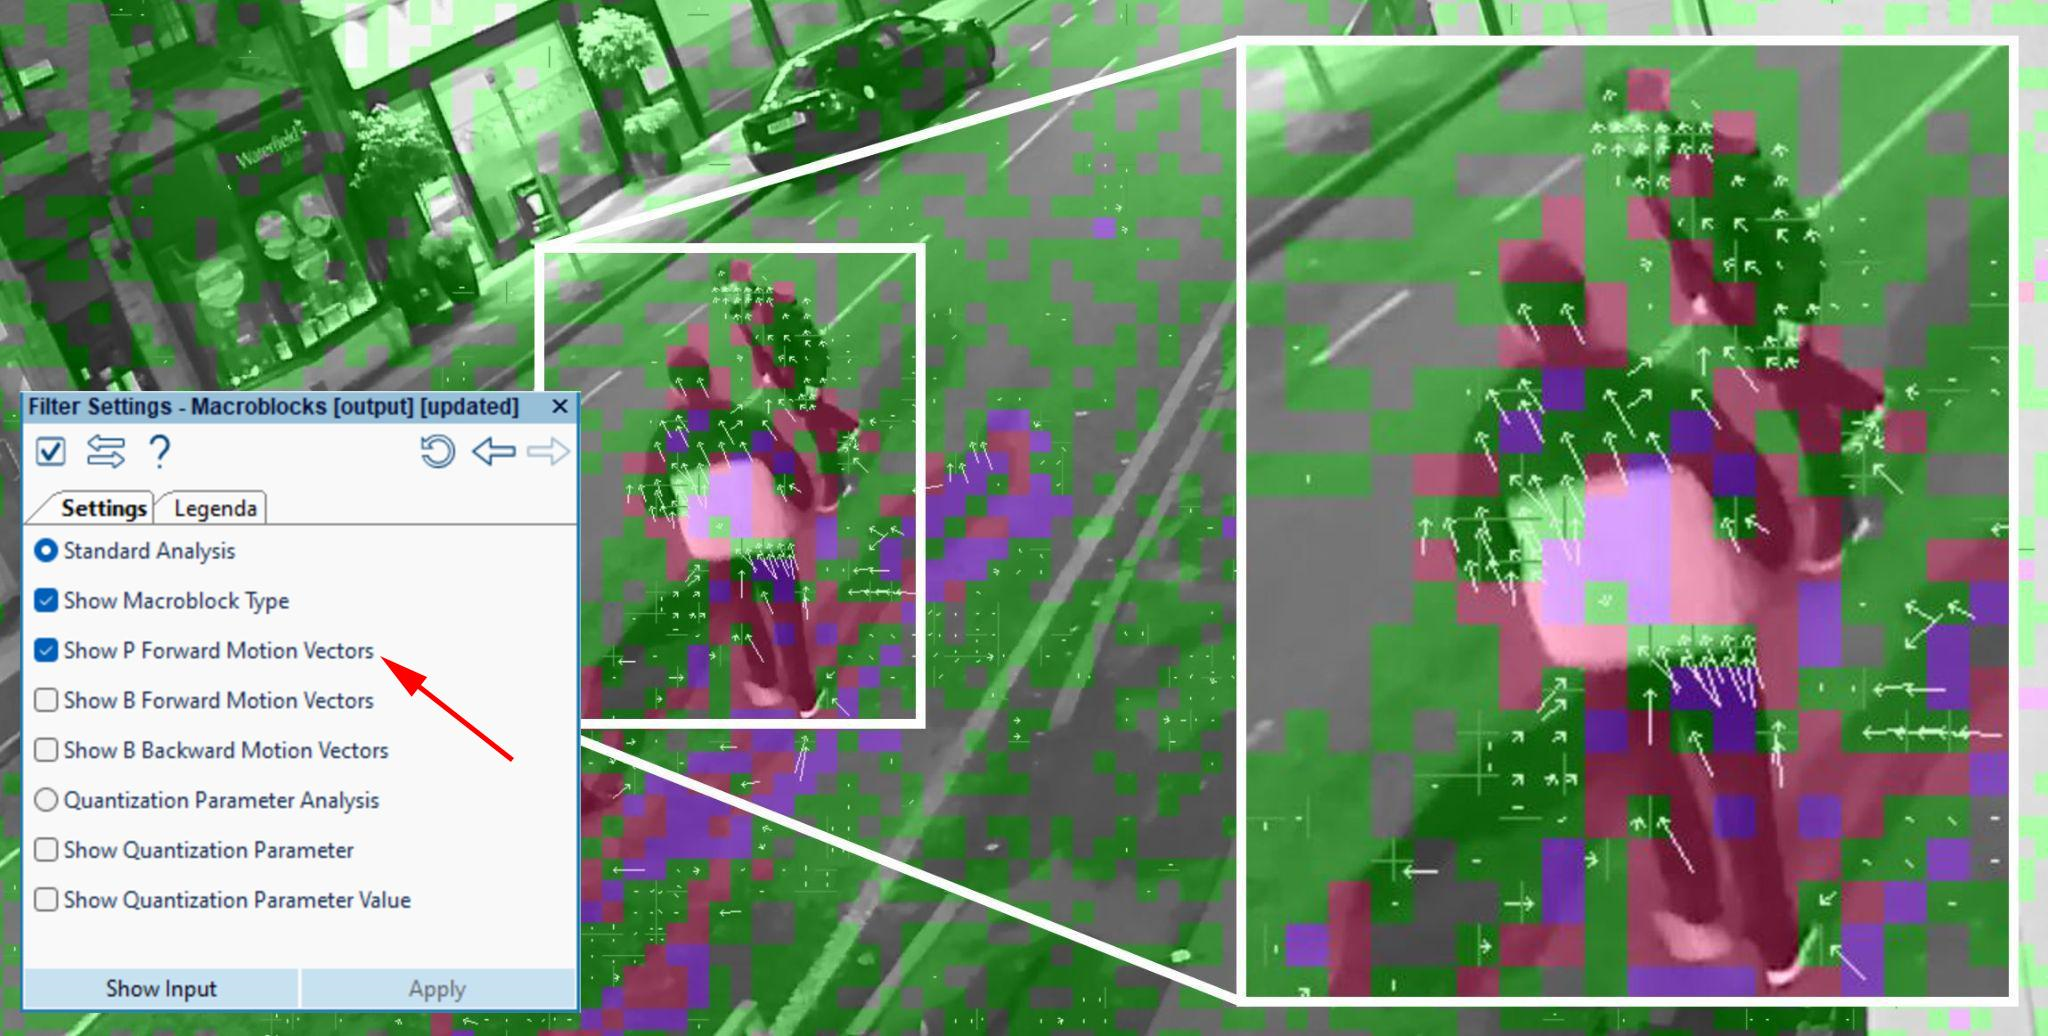
Now we can clearly see arrows indicating where the macroblocks are coming from in the previously decoded frame. These blocks, instead of being newly encoded, are being adjusted and re-positioned in the direction indicated by the arrows.
Detecting Double Encoding with Macroblock Analysis
Now, who’s to say that compression is just bad? We can actually use traces of compression left behind from previous encodes as an effective tool to establish if a video has been re-encoded. This, in turn, can help us establish if a video is or isn’t the raw and original evidence. How? Yes, you guessed it. By using the Macroblocks filter, of course.
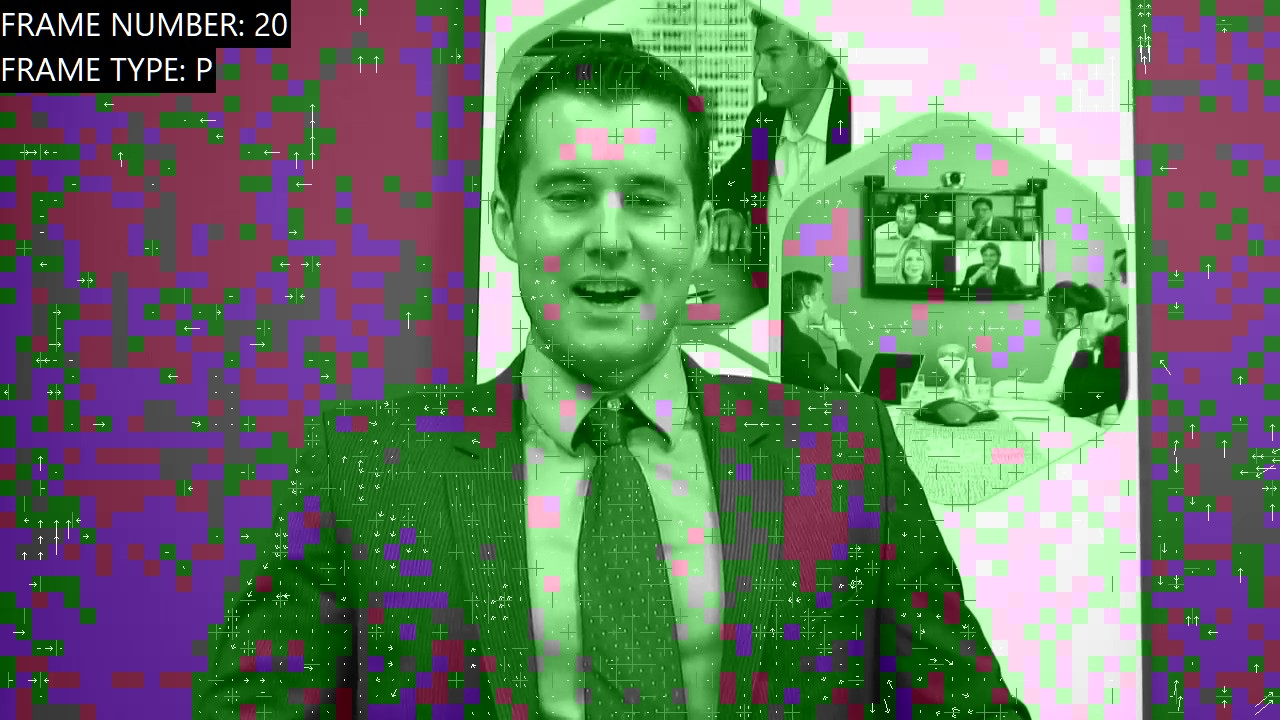
Have a look at the image below. This shows two frames (an I-Frame and the following P-Frame) taken from a news broadcast – encoded with H264 compression – where the presenter is pretty static in the scene. His lips and parts of his head are moving, of course. We have applied the Macroblocks filter to the video with the “Standard Analysis” mode enabled in the filter settings.

Using GOP Analysis to Detect Double Encoding
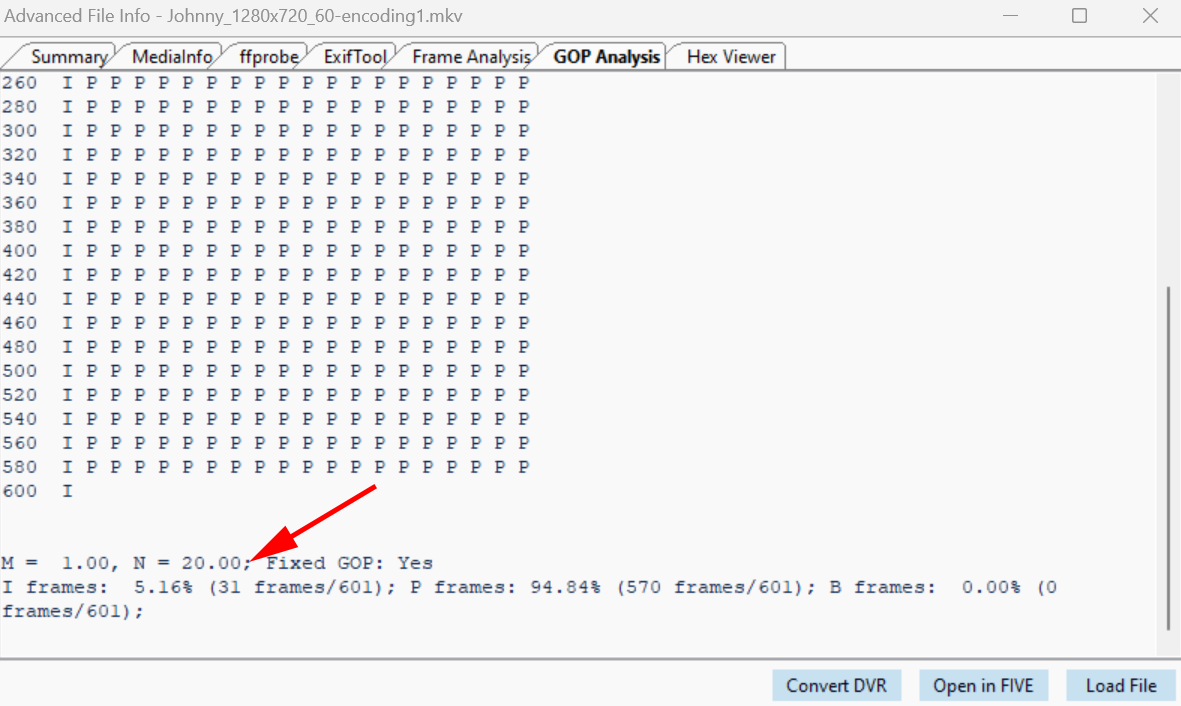
The I-Frame is made by newly recorded macroblocks (pink and purple color coded blocks) as expected. The P-Frame is made of a vast majority of skipped blocks (gray color coded blocks) and some predicted blocks over the mouth of the presenter as well as some parts of his head and jacket. There are a very small number of newly encoded blocks scattered throughout the scene. Nevertheless, this is what we would expect from an H264 video that has been encoded just once. The macroblock types are consistent with the movements (or lack of) in the scene. If we perform a GOP analysis (by opening Advanced File Info and clicking on the GOP Analysis tab) we can also establish the size of the GOP in this video, which is 20 frames.
Finding the Original I-Frames in a Re-encoded Video
Next up, we have transcoded the video above, using H264 compression. We have not performed any processing whatsoever, but just re-encoded it using the same compression standard as the original video. We’ve dropped it into Amped FIVE and applied the Macroblocks filter again. We have had a closer look at a P-Frame which was originally an I-Frame in the previous encode.
Even though we used the same H264 compression method, the GOP size and structure of the transcoded video are completely different to those of the original. However, the re-encode has left behind traces of previous compression in the frames that were originally I-Frames. There are almost no skipped blocks whatsoever here. There are a lot of predicted blocks in areas that had minimal movement from one frame to the next (such as the static illustrations behind the presenter).
However, more crucially, there are newly recorded blocks in areas of the scene where there is no movement whatsoever. This is inconsistent with the developments in the scene and gives us some factual and demonstrable evidence that the video has been encoded more than once. Congratulations, you have now taken your first step into the wide world of video authenticity analysis. It’s important to note that this kind of analysis is at the core of Amped Authenticate’s Variation of Prediction Footprint (VPF) analysis.
The Quantization Parameter Analysis
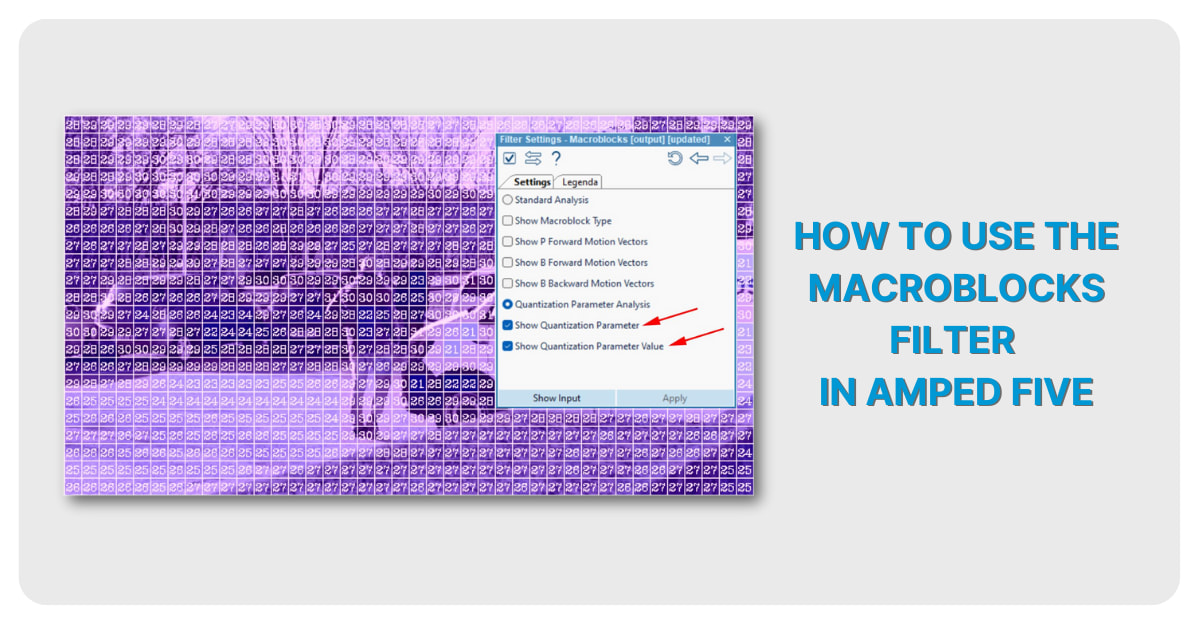
With the new Macroblocks filter we have also added a new analytical feature: the ability to perform a “Quantization Parameter Analysis”. This measures the “aggressiveness” of compression in each of the macroblocks to indicate how reliable the data is in specific areas of the picture. What do we mean by “aggressiveness”? We mean the amount of high frequency detail in proportion to low frequency detail which has been discarded during the encoding. The specific amount of loss is dictated by quantization parameters which use known mathematical algorithms.
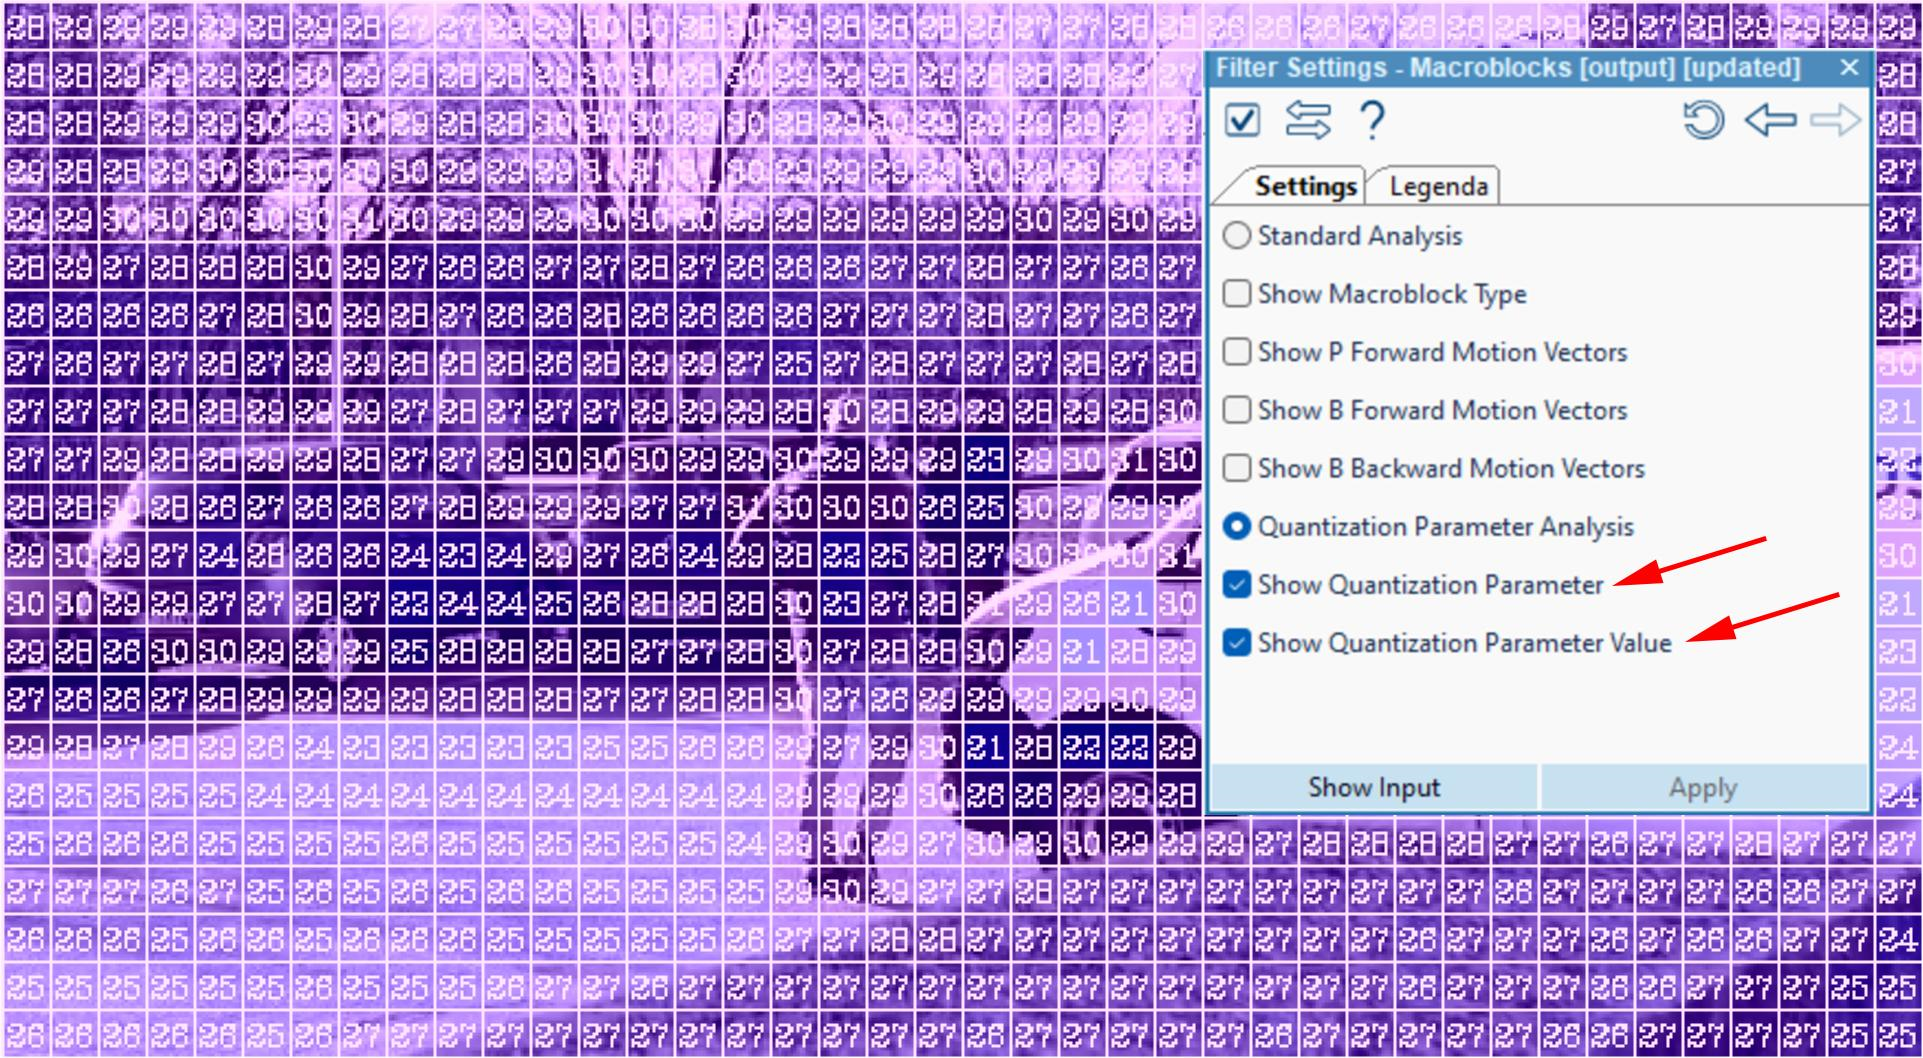
Let’s have a look at the sample illustrated below, for example. This is another H264 video to which we applied the Macroblocks filter. Only this time we ticked the “Quantization Parameter Analysis” option within the filter settings, which, in turn, will deactivate the “Standard Analysis” mode we applied earlier. The filter will show the QP amount in each of the macroblocks. It can do so by overlaying color coded blocks and/or by adding the actual QP numerical values inside the individual macroblocks. However, please note that these colors are unrelated to those previously discussed in “Standard Analysis”. These preferences can be enabled or disabled by clicking the “Show Quantization Parameter” and “Show Quantization Parameter Value” options, respectively, within the filter settings.
Understanding the Quantization Parameters
The QP parameters range from blue to red, indicating low compression and high compression, respectively. The higher the compression (and therefore the redder the macroblock), the lower the quality of that particular macroblock. The QP parameter values range from 1 to 51. The lower the QP value, the lower the compression (and therefore the higher the quality of the macroblock).
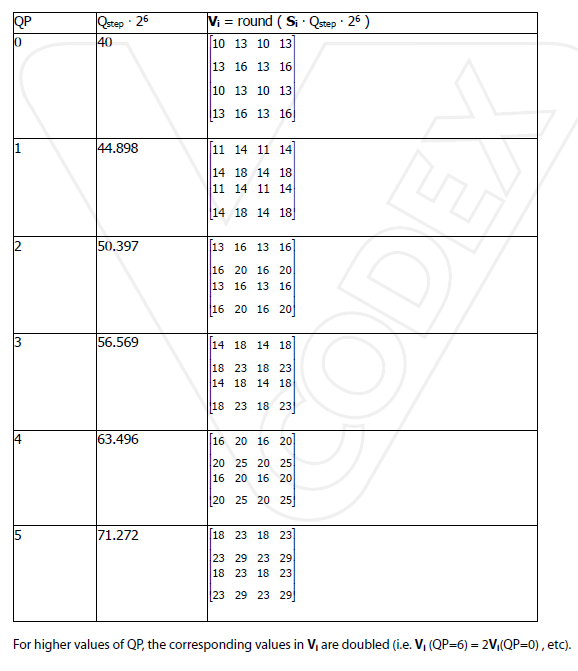
Explaining how the numbers are obtained is beyond the scope of this article. But, the table below gives you the idea. You can also find specific details about the math at this link: H.264/AVC 4×4 Transform and Quantization – Vcodex.
Conclusions
We hope that this article has given you more food for thought on how you can use the new Macroblocks filter in Amped FIVE. Digging deep and fulfilling your inquisitive mind is always a commendable thing to do in our industry. When you have the right tools to do so, you will gather important data about your evidence, and will have learned something new in the process. As always, we would love to hear your comments on Discord. So, don’t hesitate to hop in there to discuss this new filter or if you have any questions.


