
Welcome back to our continuing blog series on CCTV acquisition. In this post, we will concentrate on closed-box CCTV acquisition using network access.
We have covered many aspects so far. In the last post, we learned that a closed-box acquisition does not require a screwdriver, in that we won’t be opening up any devices! We also detailed the most common acquisition method, the use of a temporary storage device.
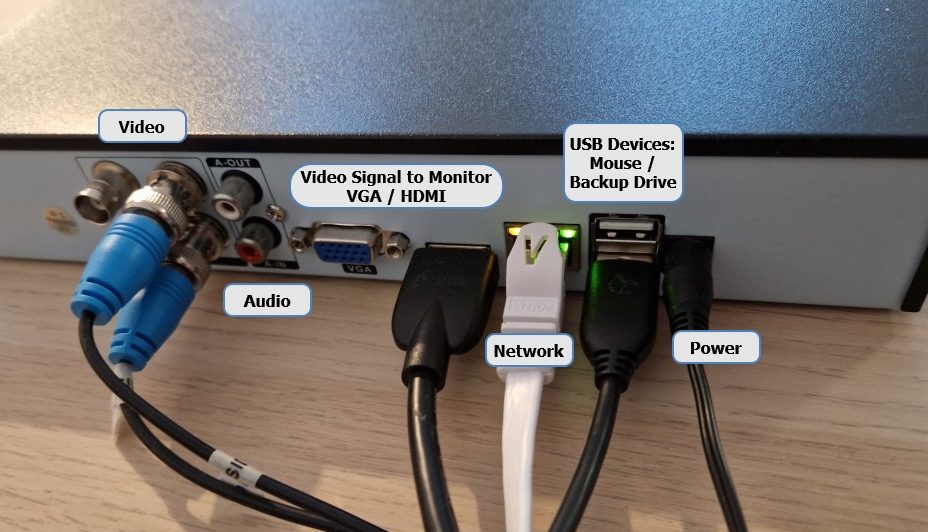
Most modern DVRs and NVRs will have an ethernet port to allow inclusion into a computer data network. As such, this data path can often also be used to transfer data from the device to a computer.
It may be that the USB port on the device is broken. It may also allow a faster acquisition, especially on older DVRs with only USB2. You may also encounter times when the USB will only support a transcoded format backup. Whereas, the network will allow native acquisition.
The first scenario that may be encountered upon attendance at a scene is that network access is already enabled. The owner or staff may be present and they will control a recording device perhaps from their office computer. They may be able to conduct the acquisition on the investigation’s behalf and we detailed this in a previous post.
However, there is a very important consideration that must be made here. That is, to ensure that what is being downloaded, is in the native, original format. After we have set up a new network connection, we will come back to this important question.
The scenario we will now look at is when there is no network access enabled.
Setting up a Network
The first decision is how to physically connect to the video recording device. The simplest method is a single crossover network cable from the device to your computer. This avoids other hardware such as network switches or routers. However, there may be some considerable distance between the device and where you have a laptop. The device may also be in a difficult position. In this post, we will be using a router in between but will mention some differences if using the direct crossover method.
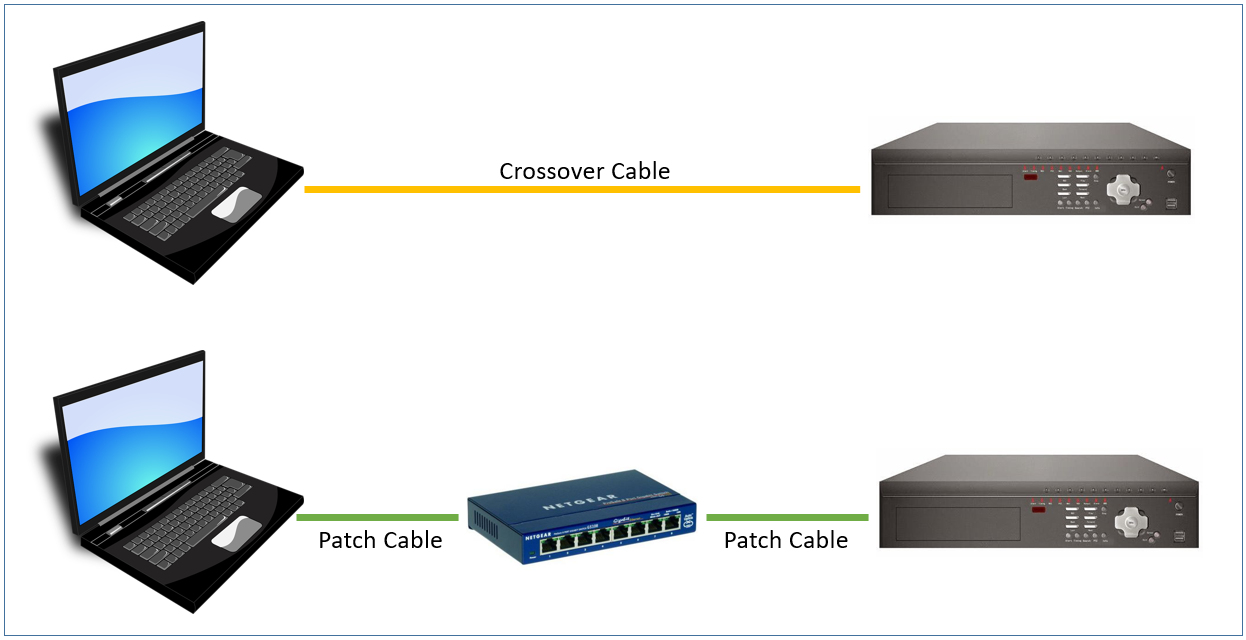
Crossover cables and patch cables differ by the order of the paired internal wires. It is worth having different color cables to aid identification.
Now that we have a physical connection to the device, we must identify the device’s address. For this, we must either have the details already, or we must access the device and identify them. For stand-alone devices that have never been connected to a network, you will need to enter new details.
There may be cases where the device is physically connected to a network, but accessing it to identify the address is difficult. In those circumstances, you may need to scan the local network to identify any device presenting itself as an unknown or DVR device. We will do this a bit later when we have the device connected.
Within the menu of our test DVR we have a network settings option.
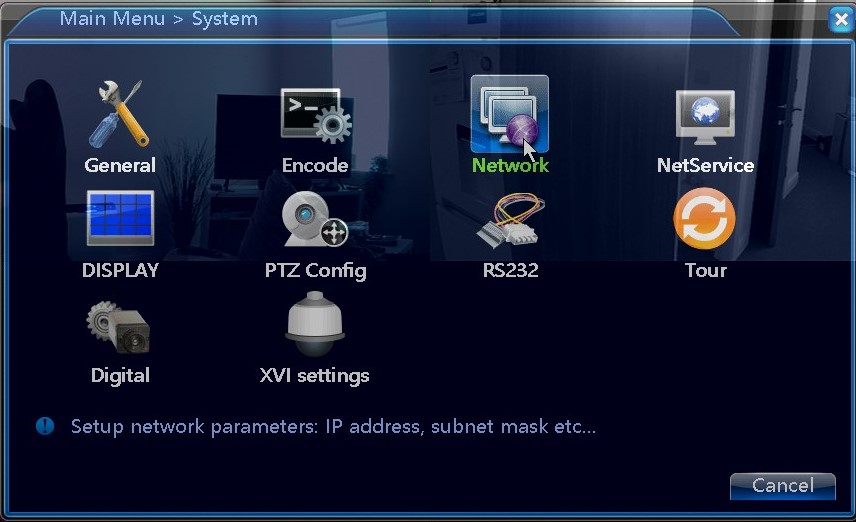
This is where we will likely find the device’s settings or have to enter new ones.
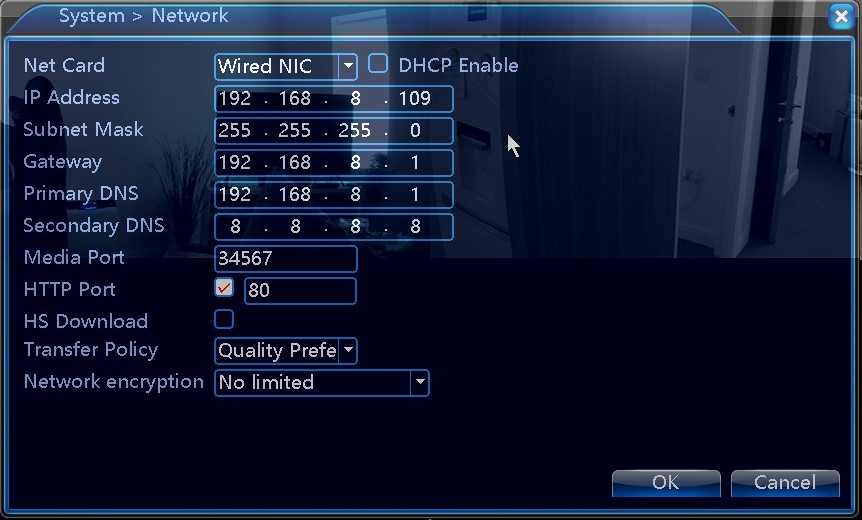
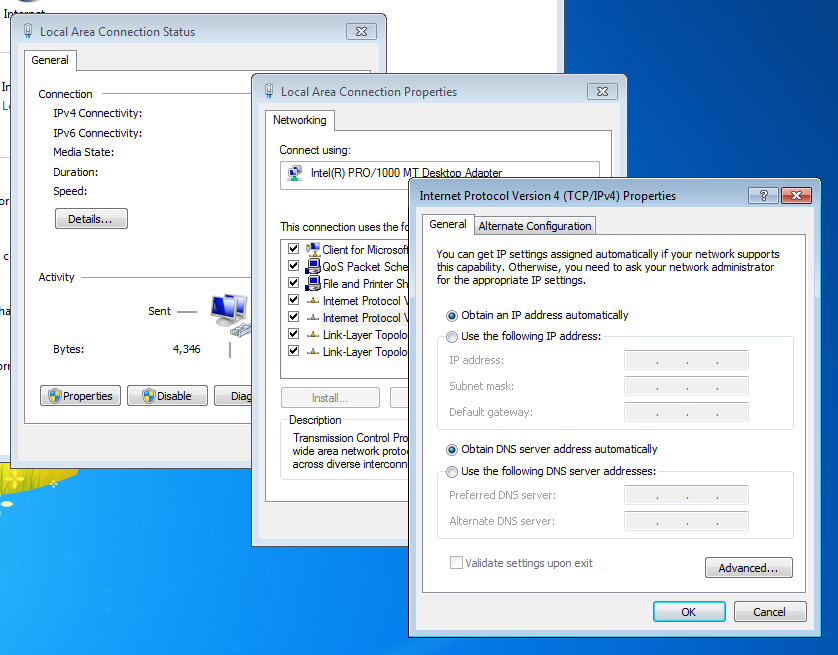
As can be seen, this device already has settings applied. If direct communication to the device was intended, via a crossover cable, then I would need to note down the IP Address and the Subnet Mask, and also remove the gateway. It’s not possible to go fully into technical networking theory within this post. However, you may find some information here for help.
If the intention is to change the details within the DVR, to communicate within a network or directly to a computer, then note every setting carefully, or take a picture, to ensure it can be returned to the original state.
When in menus, pay particular note to settings like this.
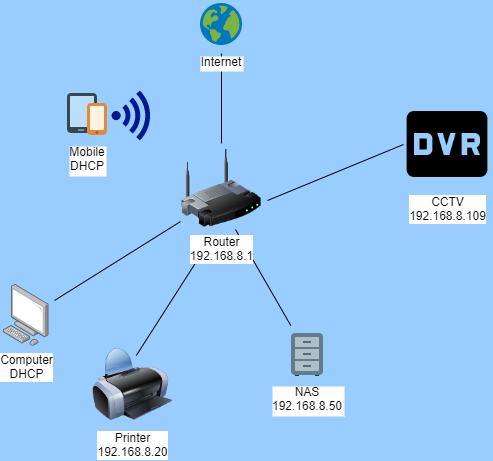
You may need to research what these are, and how they affect any data being transmitted. Whether going direct, or through a gateway router, the key to this is understanding that for a computer to be able to talk to the DVR, it needs to be in the same family but have a different name. Here is our network:
Computer Settings
The Router/Gateway has an address of 192.168.8.1. The computer, and the cellphone, get allocated an IP Address dynamically via a protocol called DHCP (Direct Host Controller Protocol). The others have their addresses set, which is known as Static. You will note that the first 3 parts of the IP address match. They are all in the same family. The last part is unique.
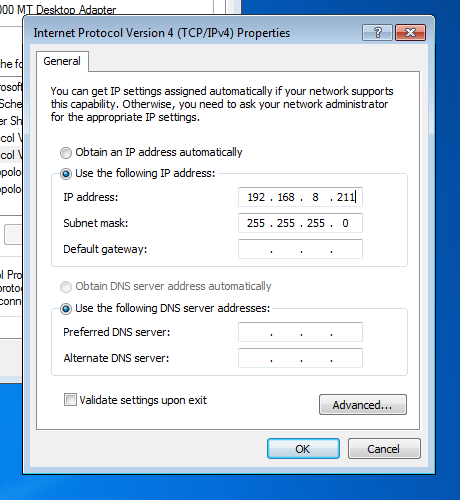
If going directly to the device via a crossover cable, you will need to set the address of your computer.
In Windows 11, the settings menu will appear like this.
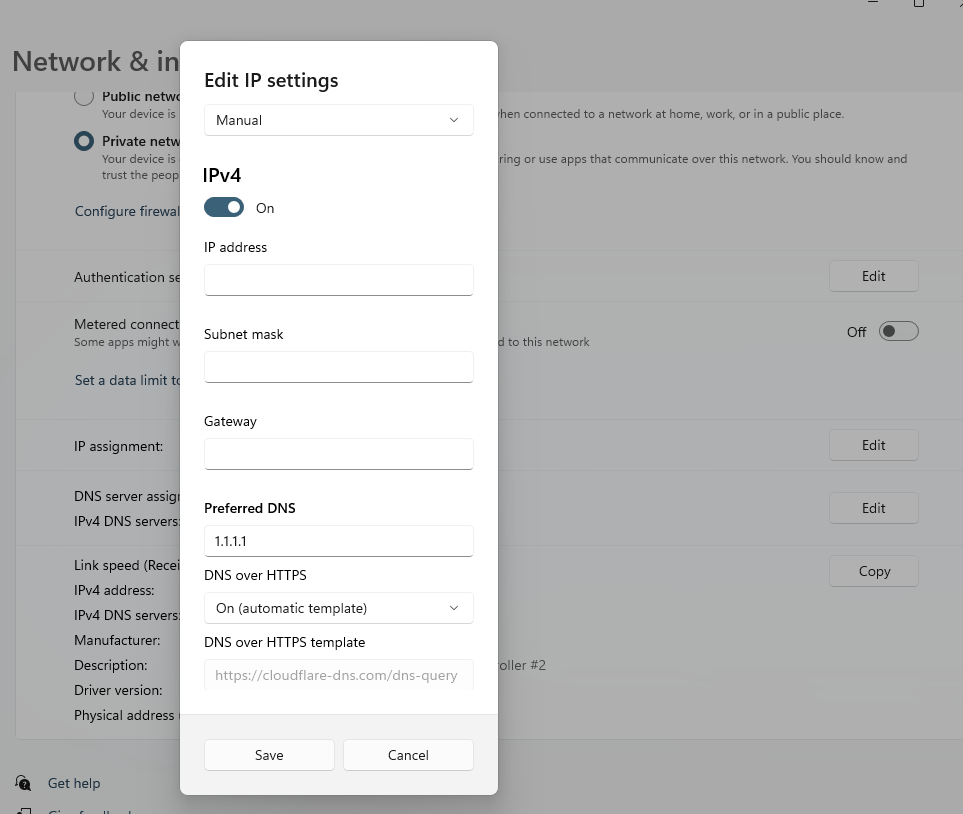
For this article, we will use Windows 7.
So, why do we need to use an older version of Windows? When conducting a closed-box CCTV acquisition using network access, it may be necessary to download and install network clients or components. Some of these may not be compatible with more modern operating systems and may conflict or harm a working machine. Therefore, an older computer, that is easily refreshed and used specifically on scenes or in a lab for networking, can often be a safe decision.
If going direct to the DVR via a crossover cable, you would need to change the IP settings of the computer, ensuring that the final part was a different number between 1 and 254.
As we are going through a gateway, and have DHCP enabled, we will leave our settings to obtain an IP address for the computer automatically.
Searching for CCTV Devices on a Network
Before we move on to test the communication between the computer and DVR, what about the times when you know the network cables are connected, but you cannot easily access the device to identify its address? Using software such as NMap, may help.
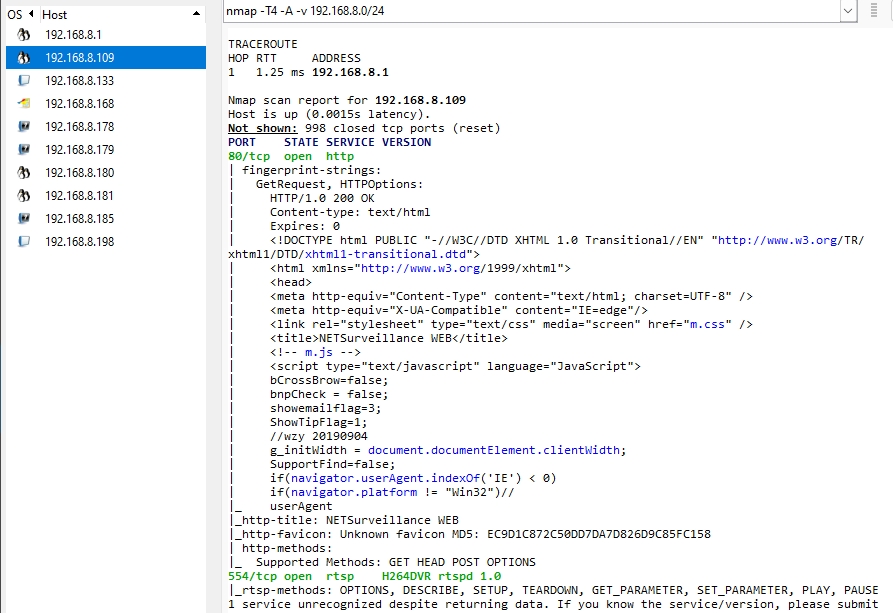
In this example, we have searched for all devices in the network. Of all the devices located, it has found one with the address 192.168.8.109, and it has two active ports:
- Port 80, (HTTP), is transmitting a web page titled NETSurveillance WEB.
- Port 554, (RTSP), is presenting H264DVR, with media streaming controls.
If we knew the device was connected, but didn’t know the address, we do now!
Let us summarize where we are:
- We have identified or entered the DVRs address
- The correct cables attached
- We have the correct details entered into our computer
- It is now time to test the connection
Testing the Connection
To do this, we need to wave to the DVR and hope it waves back. Not literally, you will look very funny standing in a shop waving at the DVR! To do it digitally, you need to send a “Ping”. It’s easy to do. Simply open up a command prompt in Windows and type ping and then after a space, the IP address of the device you want to wave at.
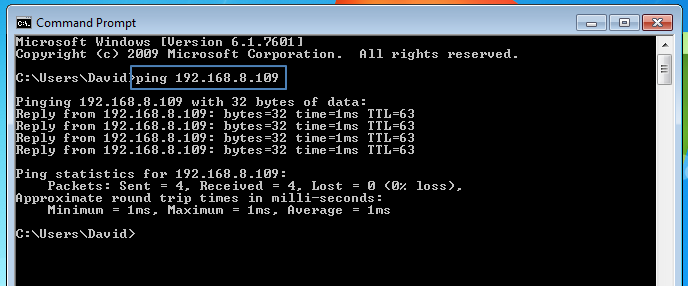
As you can see here, we had 4 packets sent and 4 packets received. It waved back! From here on, every device will act slightly differently and require different settings, but there are some general tips.
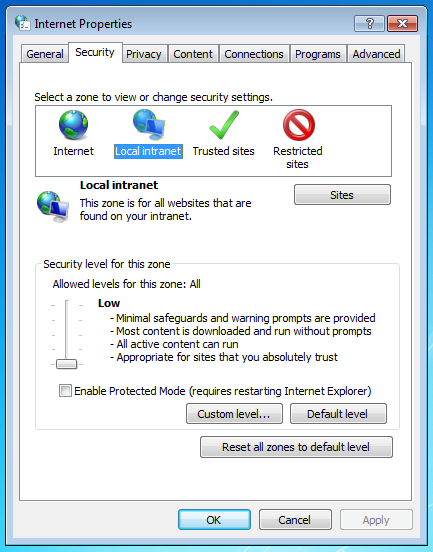
Ensure that local Intranet properties have a low-security level. This will allow the devices to talk to each other, and use unsigned content.
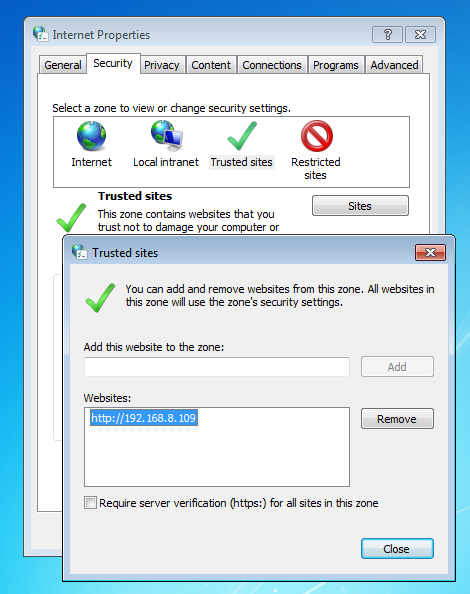
You may need to add the DVR to a trusted site.
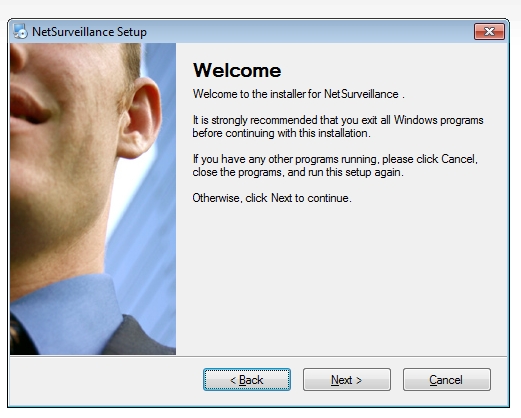
After entering the IP address into a web browser’s address bar, you may need to download some controls or a specific network client.

After downloading, either from the device itself or from the Internet, those controls or software will need to be installed.
In our case, the installation was of some ActiveX controls, so we stay within the web browser. If you had downloaded a client, it’s common to then have to enter the IP address details of the DVR into the client software after installation. If the software was downloaded from the device, check to see if there are any updates of this software online, to ensure the latest version is used.
We are now presented with a screen asking for a username and password.
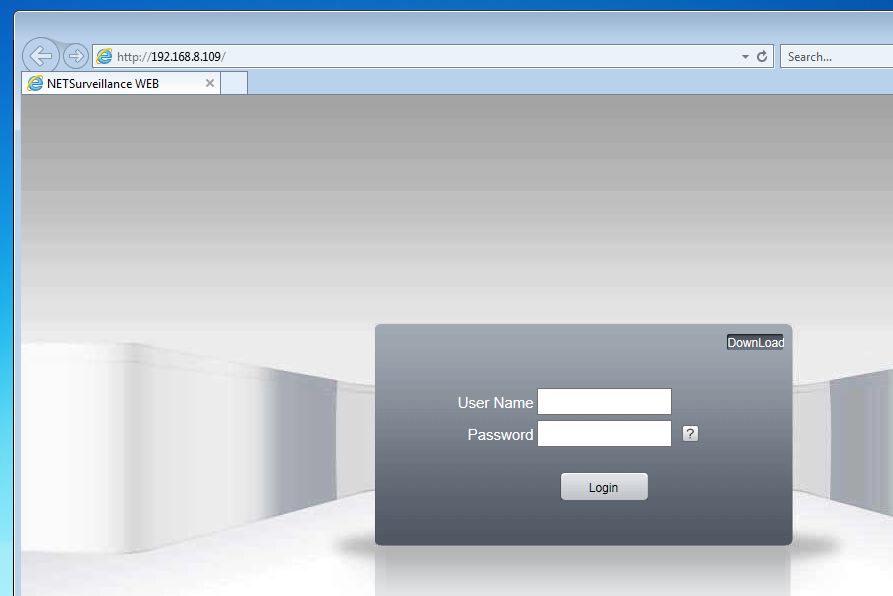
Then, finally, we have access!
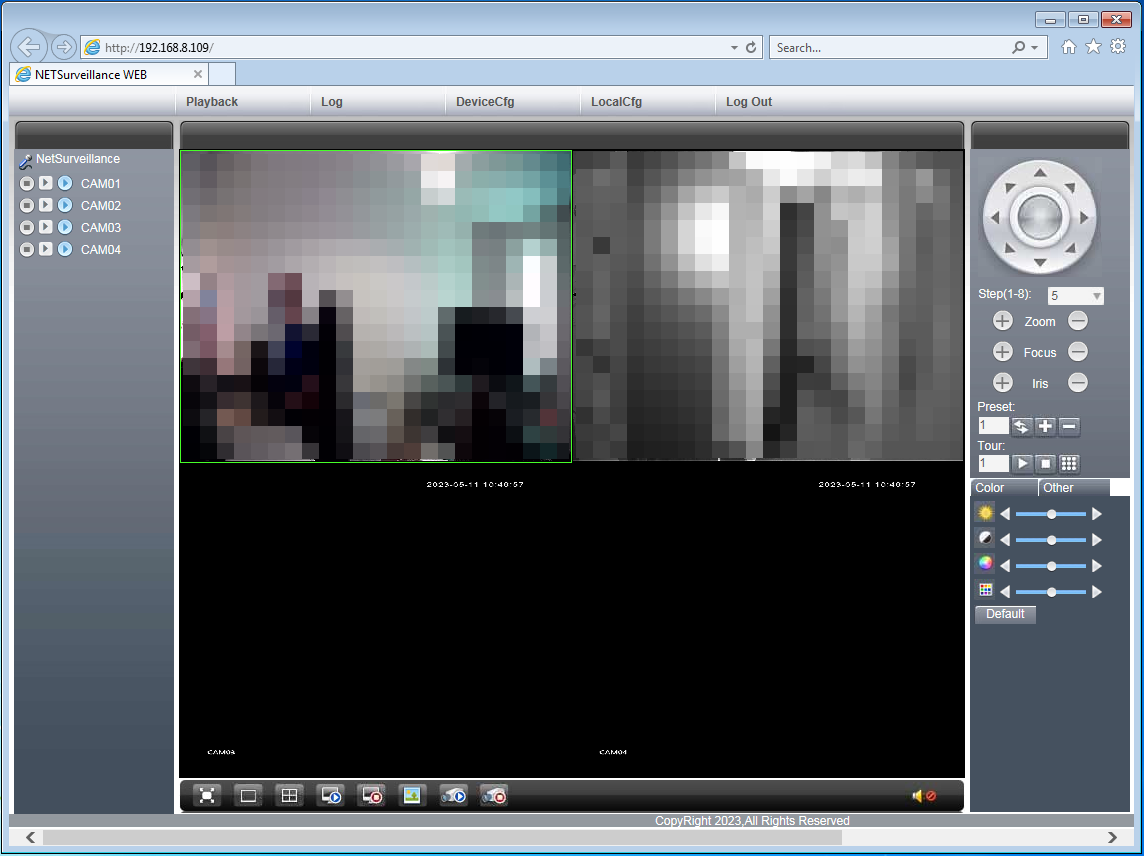
Evaluating the Software or Web Browser Capabilities
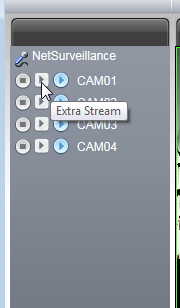
Once a connection is established, it is important to get an understanding of the application. This may take a few minutes of research and navigation. Whilst doing so, we quickly identify that there are two methods of viewing footage. The full main stream, and then the low-quality extra sub-stream.
Many places will use the low-quality sub-stream to avoid network issues but, if they then playback this footage and record it locally on the computer, this will be considerably worse quality, with low resolution and fewer frames. It is intended for playback and review, not evidential use. This can easily be tested perhaps with this snapshot button.

Two images, taken moments apart, but one from the main stream and one from the sub-stream.

Look at the resolution and file size! So many images and videos are now submitted to law enforcement as original CCTV when, in reality, they are the low-quality sub-stream. Imagine if they were saved as JPEG!
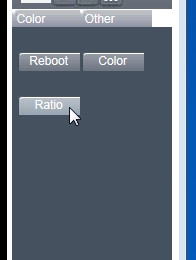
To view the main streams correctly, the aspect ratio needed changing. This setting proved a little tricky to find.
Adding the Download Directory
Along the top was a menu, that allowed various settings to be configured. Within the local menu were settings to store where files were to be saved.
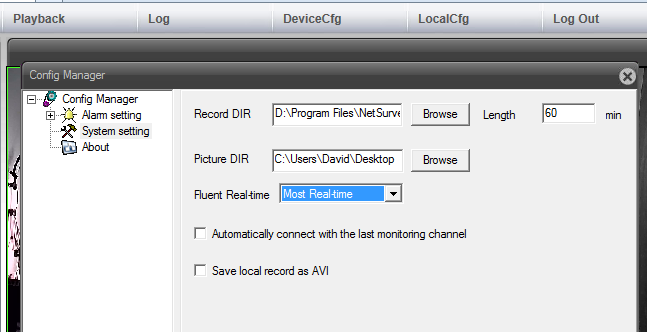
Note that the saving to AVI has not been selected. You may remember that when conducting USB downloads, we identified that saving to AVI did bring some complications. Therefore, we have not selected this option. However, if this was an initial acquisition, we would need to conduct tests and perhaps recover different formats to identify the best option. Within the device configuration, it was possible to observe system settings, recording options and also the internal logs. Again, if this was an initial acquisition, it would be necessary to record all the system settings and make notes of the recording options. We went over many of these settings when reviewing the device in the previous acquisition post.
Next, we have playback and this is where things can get a little interesting.
One of the issues we are about to highlight, during a closed-box CCTV acquisition using network access, emphasizes the importance of testing and evaluating all options. It also again raises the alarm bell that what you may receive from a member of the public, and placed into some digital evidence storage system, may not necessarily be the native evidence.
This system does allow local playback of previously exported .h264 files but for our purposes, we will stay with remote playback.
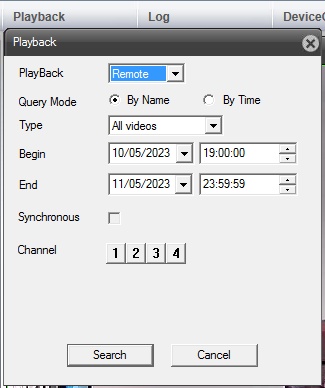
The first decision here is how to search, by name or time. Most users may perhaps use time.
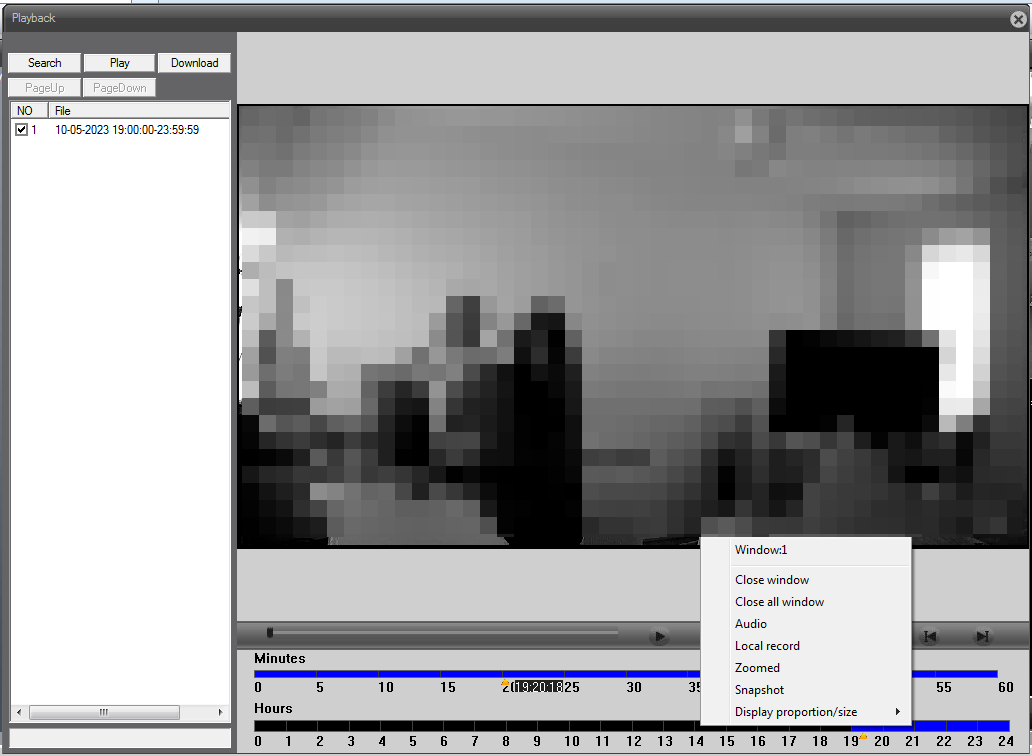
This brings the time range into a single file. There is a button to download, but also the ability to playback and record a selection locally.
Alarm Bell
Remember that we mentioned earlier about the importance of ensuring that the CCTV owner is really acquiring native data? If the user of this system located an incident, and then selected “Local record”, they would be recording the video signal being received. They would not be downloading the original digital data stored on the DVR. This could dramatically change the structure and timing of the file being acquired.
Selecting name in the playback options reveals the individual 1hr files and, of interest, the size of each one is also given at the end of the date and time range.
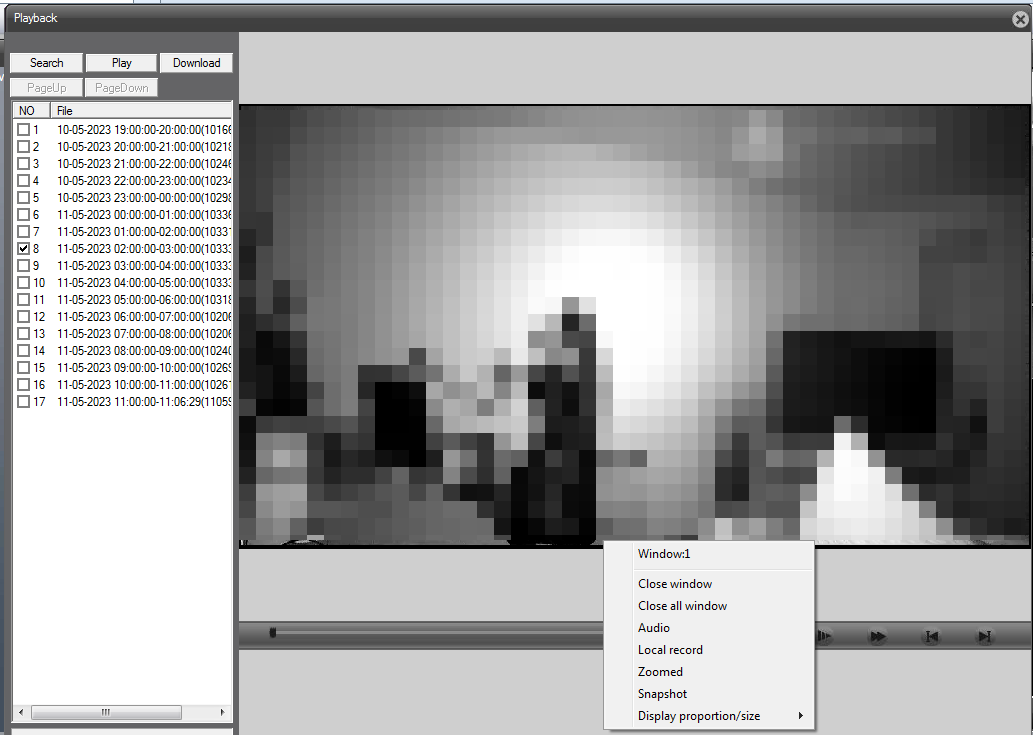
Users also have the option here of recording locally, but as we now know, this would not be the best option. After system evaluation it will be time to identify the incident or the time range to download, depending on the acquisition requirements.
Downloading Files
Rather than a multiple-hour time range, and then a problem happening, it may be beneficial to download several individual single-hour files.
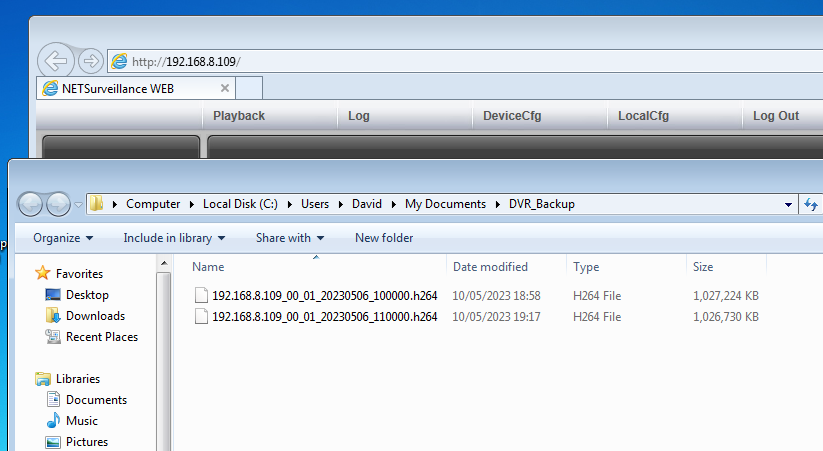
For this post, we downloded two files using the closed-box acquisition using network access.
If device or network access was part of the acquisition parameters and priorities, then we could also obtain the logs. Just the same as when using a temporary storage media directly from the DVR, before leaving the scene, it would be worthwhile conducting some evaluation on the files.
For this purpose, either conduct a backup copy, so you are not working on your evidence files or download another non-evidential file. A non-evidential acquisition is often a good habit to get into. For file analysis, you can use the non-evidential one, rather than copies of evidence.
You may remember that in the last post, we downloaded .h264 files directly from the DVR onto USB. When placed into Amped FIVE, or Amped Replay, they would be analyzed, the h264 data cleaned, the timestamp extracted, and then the clean h264 data placed into the media container selected. This evaluation and cleaning stage is vital to ensure that you can interpret the data and decode the video correctly.
Loading the two .h264 files downloaded via the network revealed some issues.
Comparing Files
To aid in explaining these issues, and to present some other differences, let us work side by side with a USB download from the same period.
To start with, look at the difference in the file naming convention.
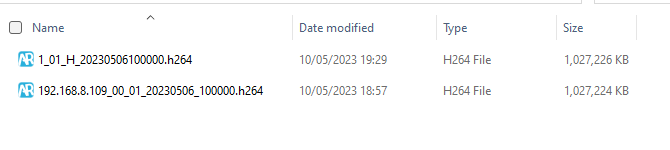
The top file is from the USB, and the bottom file is from the network. Next, look at the file size, there is a very slight difference.
If you download file A using USB, and you download File A using network access, you would think they would be the same file. Wrong! The USB file cleans correctly, with the time file extracted. The network-acquired file reveals the same amount of frames but there was very slight distortion in the bottom row of macroblocks. Oh, and the timestamp was very wrong!

This is all quite normal. Remember, the many thousands of CCTV manufacturers do not inform Amped Software of a new format variation. Yes, it may be based on a standard video codec, and it may have a rather generic .h264 file extension, but how the data is formatted internally makes a lot of difference. In this case, our team of format engineers had never seen this variation before. As such, the Amped conversion engine did its best, but the cleaning algorithm was not quite right.
Could you use the files for investigation? Yes, of course. The time to the second is imprinted in the pixels. The extracted data timestamp only adds further accuracy and allows for timing differences or anomalies to be identified and compared with the frame timing data. The imagery is only distorted in the bottom 16 rows of pixels. So again, most of the image is perfect. In this case, to get a completely clean image, fallbacks may also assist.
Amped Support
So, whilst working with what you have, you would submit some files to support. Amped Support would then evaluate the errors and identify a new cleaning algorithm for this newly discovered variant.
For this variant in particular, the amazing codec team at Amped Software had this solved very quickly.
It was interesting to see the differences in structure. Using Advanced File Info within Amped FIVE, it was clearly visible in the hex, with very different file headers, even though each frame was the same.

The errors occurred due to how the network-acquired formatting was being cleaned and decoded. After the new variant was added, frame and pixel comparisons were evaluated using the Video Mixer. Click here to learn more on using the Video Mixer for this purpose. Each frame, each timing reference, and each pixel was exactly the same.
Summary
We set out in this post to detail a closed-box CCTV acquisition using network access. We hope it has highlighted that it can be a valid method of data recovery, and, in many circumstances, may be the best option.
The importance of evaluating all acquisition options, and selecting the best one for the situation is also evident. CCTV acquisition and the obtaining of digital evidence must not be left to owners that do not understand the many issues that we have come across here. By doing so, they unknowingly jeapordize your investigation.
Finally, the errors identified in the decoding of the network-acquired files should also be a timely reminder that without your help in submitting files to Amped support, we cannot decode all the thousands of variants. By working together, we can ensure that the struggles of proprietary video analysis, conversion and decoding become resigned to the past.
There are many other issues to take into consideration when conducting a closed-box CCTV acquisition using network access and this post could easily have been stretched over two articles. Before we sign off though, there is one last recovery type to consider.
Copy & Paste
There are many systems that store all their recorded data on file-based drives. As such, when that drive is accessed using a network protocol, the files can be seen and copied.
The process of time-period and camera identification is then usually completed by directory name and filename. It may be slow to go through directories, locate files and then copy them to your system. However, it can be a lot quicker than attempting another type of acquisition, especially if the user interface is complicated to use.
Next time in this series we will be looking at CCTV Device Removal and Replacement. Until then, stay safe.


