
Hello dear friends and welcome to the very last article in our “Learn and Solve It with Amped FIVE” series. We hope you enjoyed the variety of content in this series and that you have learned something new. In this final article, we will discuss how to correct the aspect ratio of CCTV footage.
Aspect Ratio in Video
Aspect Ratio is quite literally the ratio between the width of an image and its height. No rocket science here. Take an HD video, for example, which has the dimensions of 1920 horizontal pixels and 1080 vertically. If you divide 1920 by 1080, you will get 1.77. If you divide 16 by 9, you will also get the same number. That’s why HD videos are referred to as having an aspect ratio of 16:9. With still images you can get various aspect ratio standards, depending on the imaging device. In contrast, with video, there are only three main aspect ratio standards that are most commonly used: 1:1, 4:3, and 16:9. The square aspect ratio (1:1) often derives from cellphones or proprietary recording systems, but is beginning to appear in more digital CCTV systems. Let us concentrate on the other two.
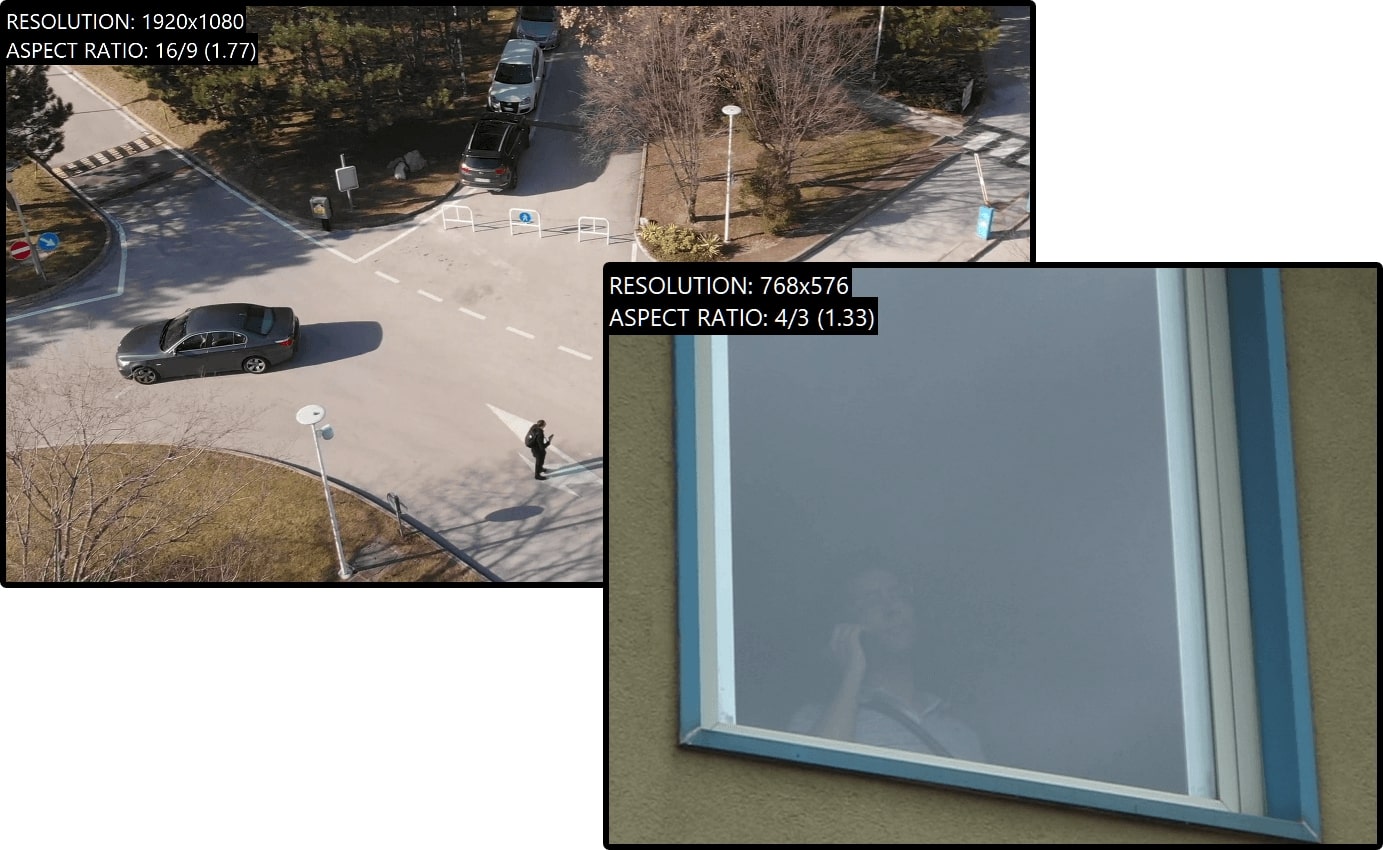
In the image above we have two different video resolutions, usually described by using the number of pixels horizontally and then vertically. Many resolutions have specific names. The larger, 16:9 image, could be called “Full HD”. However, neither of them started with those sizes or those aspect ratios. They have both required some processing to ensure that the scene and objects within it are authentic.
The 4:3 aspect ratio originates from the PAL/NTSC analog video signal. 16:9 however is the common aspect ratio for resolutions born digital. This means that there was no analog-to-digital conversion process involved in its creation.
Things Simply Don’t Look Right
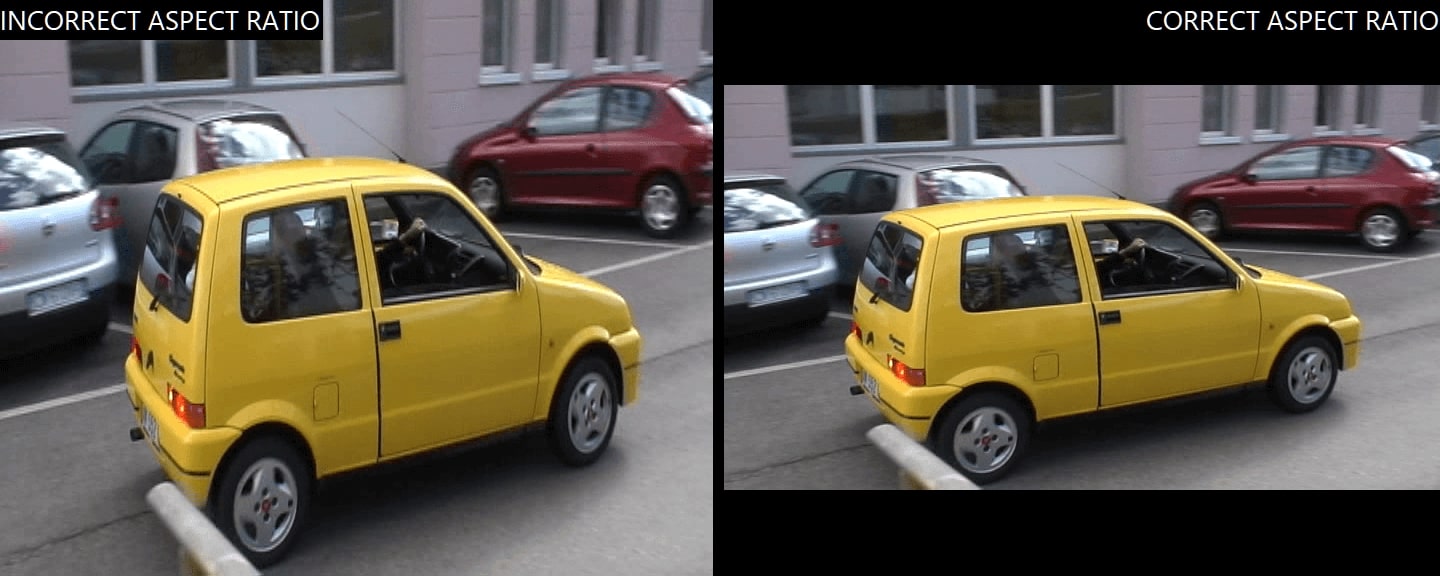
When the aspect ratio is not correct, the presented image is not authentic, and this can cause many problems from an analysis, measurement, and presentation perspective. The true size and dimensions of any subject or object depicted in the scene will be compromised. People will look slimmer or larger than their real-life counterparts, and vehicles will be wider and narrower than they should be. Say that we have been asked to identify a vehicle from low-quality surveillance footage with an incorrect aspect ratio. If we don’t correct this, we may make serious errors in any conclusions.
Now that we know that an incorrect aspect ratio can cause us problems, why do videos suffer from this issue?
Aspect ratio issues will usually arise from one of these reasons:
- An analog signal has been digitized.
- The data that forms the image has been reduced in horizontal or vertical lines to save data and transmission space.
- No data is held within a proprietary format to control the correct aspect ratio.
That’s a start, but how do we know what the correct aspect ratio should be and when should we change it? Well, that’s what this article is all about.
Initial Analysis
Amped FIVE will only do something to the pixels with your intervention. There are many times when the pixels must not be changed, so to have an application automatically alter the pixels may not be a good idea within a forensic environment. It is also important to control changes depending on your requirements.
As Amped FIVE allows you to work on video in many different ways, it is straightforward to correct the aspect ratio in one chain, but not in another. It would all depend on the form of analysis required or the task to be completed. If a small detail is required to be evaluated, correcting the aspect ratio could change that detail so the decision not to correct it may be considered.
The initial, structured analysis of any video evidence is vital to ensure you have all of the information required to identify processing requirements or inconsistencies.
Integrity, Metadata, and Visual Analysis
The first stage, integrity, will allow you to identify if the video has gone through unknown or perhaps incorrect processing before you received it. The correct, native acquisition of evidence, and then the forensic handling of it, is vital in ensuring you are not starting with data that has already undergone a transformation. If you use the metadata to form your decision on aspect ratio correction, using data added incorrectly could be very dangerous.
The next stage is the analysis of that metadata. There is a huge amount of valuable information that can be extracted using the tools within FIVE. We are passionate about data analysis at Amped, and you will see much more being added in the future. We will look further at some of this data in a moment.
The final stage is the visual one. What is being displayed, and how? Sometimes it is effortless to spot that the aspect ratio is all wrong, but in others, it may take analysis and a return to the scene to acquire test footage.
Now that we have conducted our initial analysis, and have confirmed the integrity of the files being examined, let us take a closer look at the data, as it pertains to aspect ratio.
Analog to Digital
Even though we have firmly arrived in the digital age, the remnants of the analog world remain. The tricks learned by video engineers when dealing with digitization are still being used, and it will take many years for the old analog infrastructures to be replaced fully.
In Amped FIVE Update 7620, we introduced the Aspect Ratio filter. We followed this up with two further blog posts that take a deep dive into the many complexities involved. These will be linked shortly to give you some further reading.
In summary, the analog video signal is controlled by timing. When an entire signal line is divided, to perform the digital sampling stage, each part doesn’t fit evenly into a single picture element, the pixel. For the PAL video standard, it’s wider, and for NTSC, thinner.
This means that some interpolation is required to add or remove pixels, thereby ensuring that the scene originally captured as a video signal, retains the original aspect ratio. This interpolation is the key stage, as you, the analyst, must decide how that is achieved.
Storage, Sample, Display, and Pixel Aspect Ratios
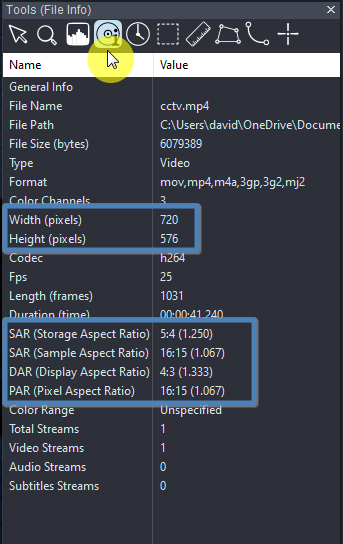
Within the File Info Tool panel, you will see a summary of the data held within a file.
This data may be placed into the metadata at the time of encoding.
Important Note:
The reliability of this data must be assessed. It is not uncommon to find very generic settings placed into a video container during the acquisition process from a Video Surveillance System. Especially when the manufacturer or an acquisition application has placed the proprietary data into a standard video container.
This data informs us that we have a Storage Aspect Ratio (SAR) of 5:4 or, 1.25 in decimal.
As you may note, the resolution is 720 x 576.
720 / 576 = 1.25
This is the aspect ratio of the stored image.
Next, we have the Sample Aspect Ratio (SAR) of 16:15.
Width (720) x 16 = 11520
Height (576) x 15 = 8640
11520 / 8640 = 1.3333 or
4:3 when displayed as a fraction.
The Sampling Aspect Ratio, when applied to the stored resolution equals the Display Aspect Ratio (DAR). This is how the image should be displayed.
Finally, you will see the Pixel Aspect Ratio (PAR). You may note that, when displayed as a decimal, the width is just a little wider.
For NTSC, you may see it as 0.911. It’s just a little thinner. Remember the signal timing we mentioned earlier?
As we have ensured the reliability of the data, we can go ahead and use this to correct the image using the Aspect Ratio filter, which is found within the Edit category.
Using the Filter
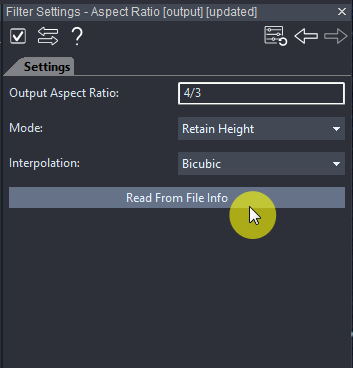
First, you will note that the parameter to change the aspect ratio is named Output Aspect Ratio. With so many different data sources, we simplified them by allowing you to enter any ratio to affect the output of the filter.
You will also see that you can decide on what axis to retain, the horizontal or the vertical. Finally, is the method of interpolation. How do you want to add or remove pixels?
The mode and interpolation method will be down to you, depending on your requirements. Also, perhaps, what other filters have already been used, such as linear deinterlacing or line-doubling?
The metadata available can be read and loaded automatically by using the Read from File Info button.
So far we have looked at the digitization of an analog signal, the first of our three possible causes for aspect ratio issues. The next is a trick that many manufacturers play to reduce the data size of the footage.
Watch the video below to learn how to correct the aspect ratio of a video with Amped FIVE.
Reducing the Height
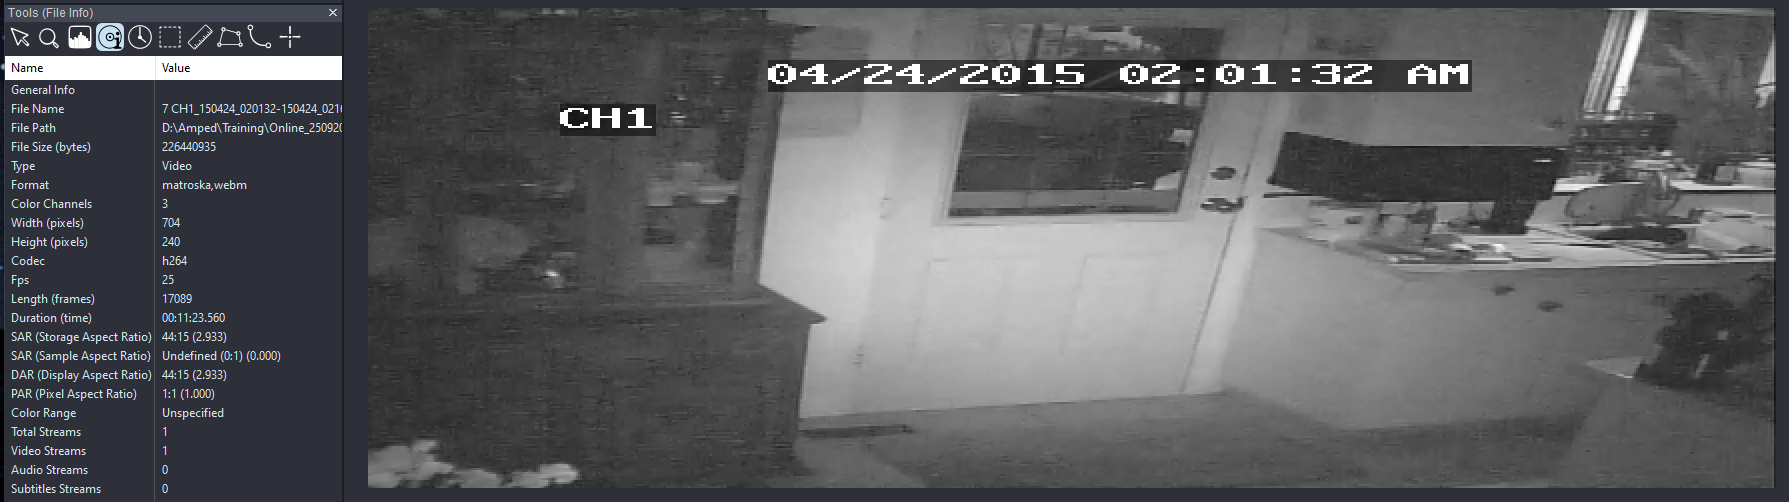
Here we have a video that is 704 pixels wide by 240 pixels in height. There is no other information as this was proprietary data extracted through Convert DVR and then formatted into a video container.
704 is the digital active area from an analog video signal. There is no point in using 720 as the extra pixels are the signal buffer and are hidden on older Televisions behind the overscan area. Those extra 16 pixels take up space!
240 is the number of lines in a single NTSC analog field. If both fields were present, we would have 480 lines but the footage would be interlaced.
To save space only one field has been retained and, therefore, we have a single field-based recording. We can use the Line Doubling filter, within the Deinterlacing category, to increase the vertical lines. Remember that this is different from resizing as it only interpolates every other line.
We can follow this with the Aspect Ratio filter to manually enter the ratio of 4:3, and thereby decrease our width to 640 x 480. We now have an authentic image.
Remember that you can increase the height, to avoid removing pixels, by changing the mode in the filter.
You may often come across a 720-pixel wide video where the active area is seen. The result will be black bars down the sides.
This is where the Center button within the Selector tool helps when using the Crop filter.
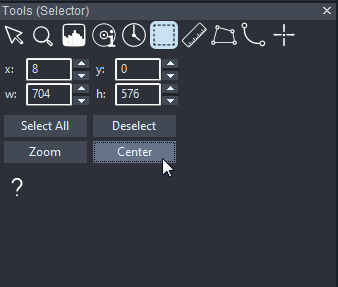
Completing a centralized crop to the 704-pixel wide active area before adjusting the aspect ratio may often ensure a more accurate adjustment.
Reducing the Width
The next example involves a reduction in width.
Some of you may remember that we looked at this during our series on CCTV acquisition. The native footage was recorded in a size of 944 pixels by 1080 pixels.

When exported as an AVI, the container included the Display Aspect Ratio of 16:9.
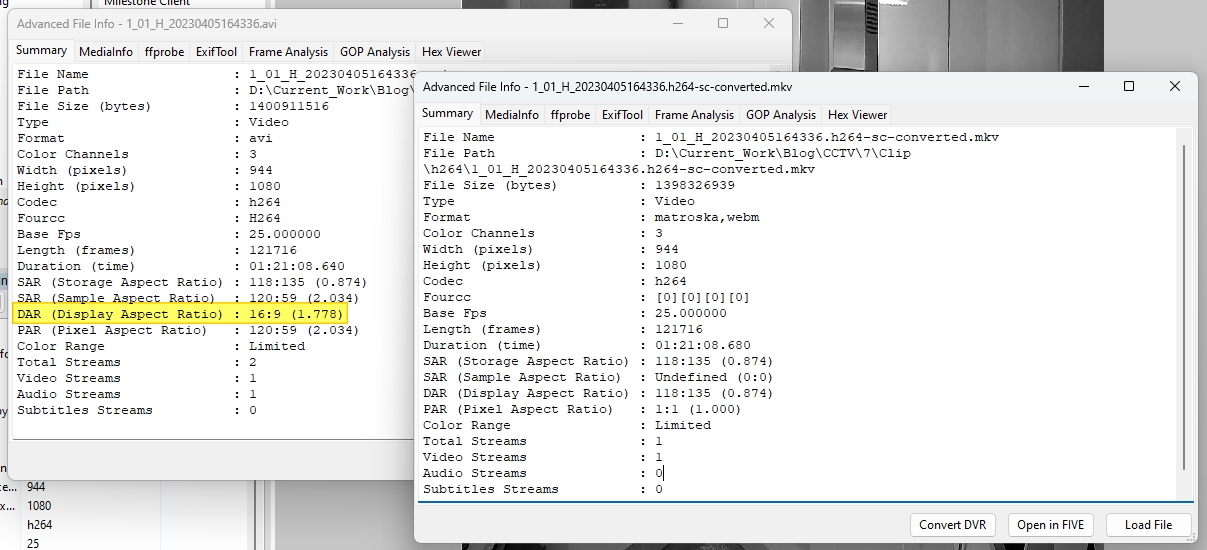
By only storing half the width, the system is doubling the amount of space available within the DVR and allowing faster transmission of the data over the network. If a standard video player or editor was used, the footage would be stretched to 16:9, using an often unknown interpolation method.
Who has quickly done the math?
Well, adjusting to 16:9 would give us the Full HD resolution of 1920×1080. All sounds reasonable.
However, 944 x 2 equates to 1888. That’s 32 pixels less.
Visually there is very little difference, but those extra pixels could cause some problems if attempting to compare the frames with real-world measurements. This is then where we need to do some validation testing.
Validation
If there is lens distortion, this must be corrected after changing the aspect ratio, following the Image Generation Model.
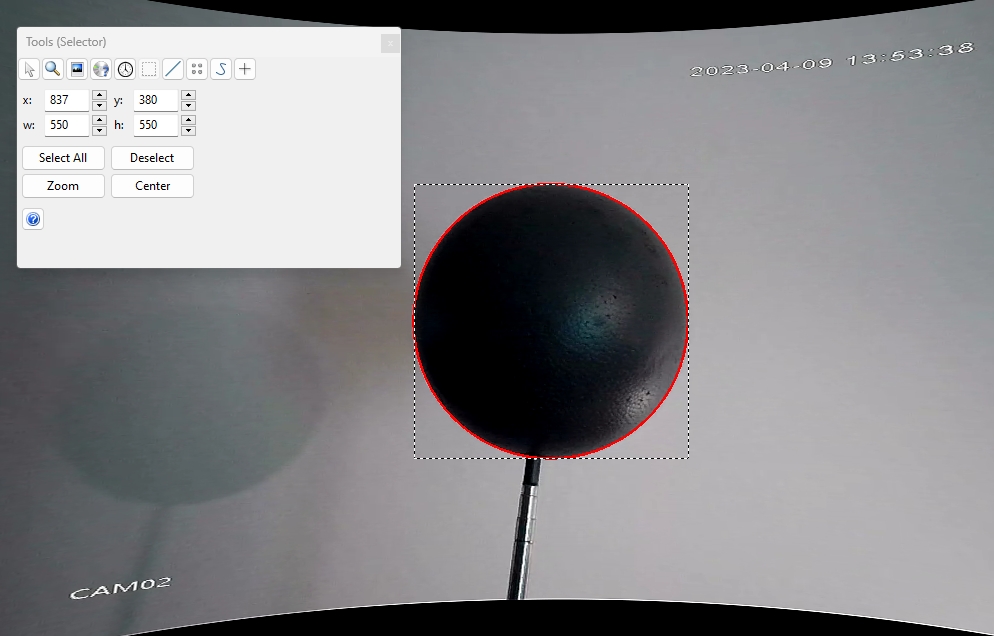
By returning to the scene, placing a sphere into the field of view of the camera, and then completing an acquisition using the same method, we will have a known object to evaluate.
A sphere in the 3d world will be a circle in the 2d world of video. As we can see from above, by using the Add Shape filter with equal width and height, the sphere is perfectly replicated. We have now validated that although the aspect ratio is set to 16:9, that is only good for general purposes. For authenticity, the width should be doubled to 1888.
The last point then, before we wrap up with one last aspect ratio peculiarity, is what to do when we have no data to work with.
Understanding the Standards
The key points here are your knowledge of the standards in video and research on the data you are dealing with. With digital resolutions, most are capturing and storing at the same pixel depth, but as we have seen above, even a Full HD video wasn’t, in reality, Full HD!
If a proprietary player has been obtained during acquisition, then how is that displaying the footage? Does it export images differently? All of these can be compared and contrasted.
During acquisitions, making notes of the recording sizes being used can also help. It’s important to consider that in many cases now, we must obtain a lot more information from the system than just taking notes of the time offset.
Always consider though, that things can go wrong. Settings can conflict and exports can change data. We have even seen PAL signals being ingested, but the recording settings were NTSC. With research, objective decisions can be made to ensure you can authentically present the material.
960H
Finally, we have this resolution which is 928 or 960 pixels horizontally with 576 vertically. These are tricky due to them appearing widescreen, but they are not. However, they could be!
Told you they were tricky.
It all depends on the setup, the cameras used, and then the recording configuration. Very often, the cameras installed are standard 4:3, but the DVR is set to record Widescreen.
It looks like you have a wider image, but in reality, they are just stretched. It is vital, therefore to question, test, and validate. Aspect Ratio can often trip people up.
Finally
Remember we said there were some more articles on aspect ratio for those wanting to take a deeper dive into this fascinating subject? Well, here you are:
That is it! Together, we have gone through many of the workflows you will most likely encounter in Amped FIVE.
We hope that you enjoyed this series and that you have learned some things to help you in your day-to-day work. All that is left for us to do is to wish you the best Christmas ever and a fantastic New Year! We look forward to seeing you again in 2024 for another series.
Please do give us feedback here and tell us what you would like to learn in the new year to come. Until then, my dear friends and colleagues, take care and stay safe!


