

Good day dear colleagues and welcome back to another article in our “Learn and solve it with Amped FIVE” series. This week we’ll talk about photogrammetry and in specific, we’ll learn how to measure heights from surveillance video.
Dealing with Perspective
When measuring in a two-dimensional representation of the real world, perspective becomes a major issue. It can hinder accurate measurements of objects and subjects depicted in the scene. However, we will use mathematics (as always!) to get us out of trouble. How? By using two known and forensically safe methods in our geometrical calculations of the two dimensional scene: the Single View Metrology and the Reverse Projection. We can then cross validate our results by comparing them within the two methods and ensuring they are as similar as possible.
The Single View Metrology
The Single View Metrology (or SVM) relies on the physical principle that any lines that are parallel in the real world will usually converge into a single point in an image. The converging points are also known as Vanishing points.
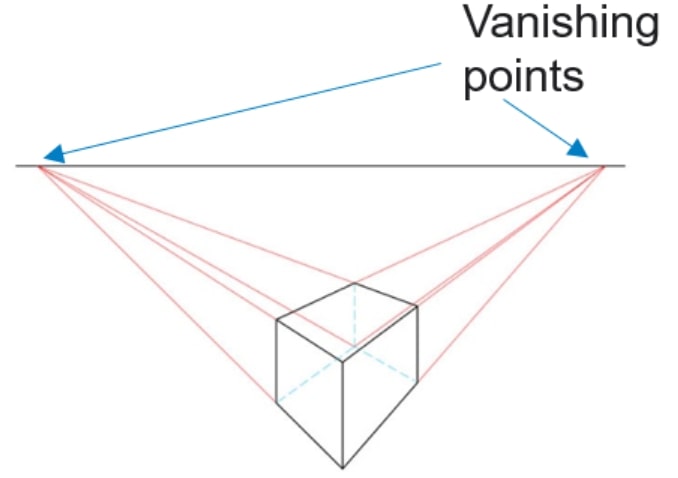
The three vanishing points (one for each of the three real world dimensions) can converge inside the image itself or outside the canvas. The mathematical calculations of the scene will rely on the position of the vanishing points in respect to the image and their distance from each other.
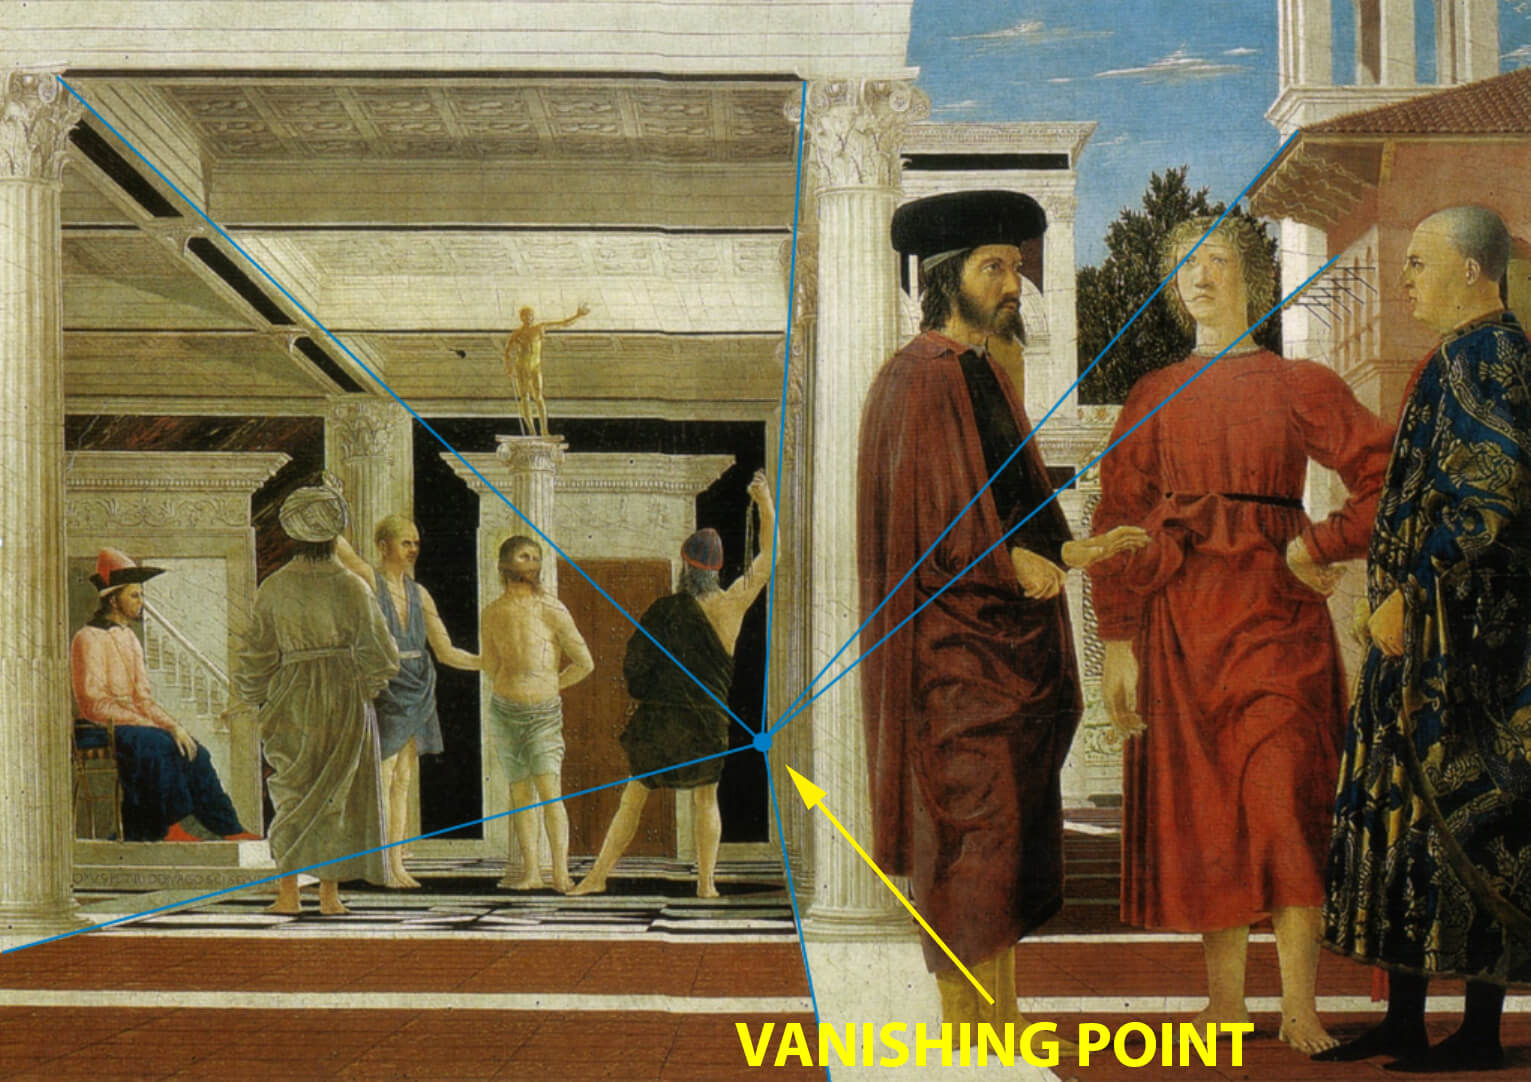
Believe it or not, single view metrology was well known right from the beginning. Ancient art often accurately depicted the geometry of a three-dimensional scene. Paintings would carefully consider vanishing points, ensuring an accurate representation.
Once the scene’s geometry has been calculated, we only need one more piece of data. This data is the real-world dimensions of a reference object in the scene. For example, it could be the height of a post or the width of a window frame. Without a reference measurement, any other measurement in the scene would not be possible. We simply need a starting point.
The Reverse Projection
The Reverse Projection methodology is more simple to explain. However, it requires a more complex scene reconstruction than the SVM does. It relies on the principle that the pixels of two objects or subjects will measure the same if they are at the same distance and angle to the camera.
With this principle in mind, we can return to the scene. We place an object showing clear measurement markers (such as a datum pole or calibration board) in the same position and at the same angle to the camera to our target object or subject.
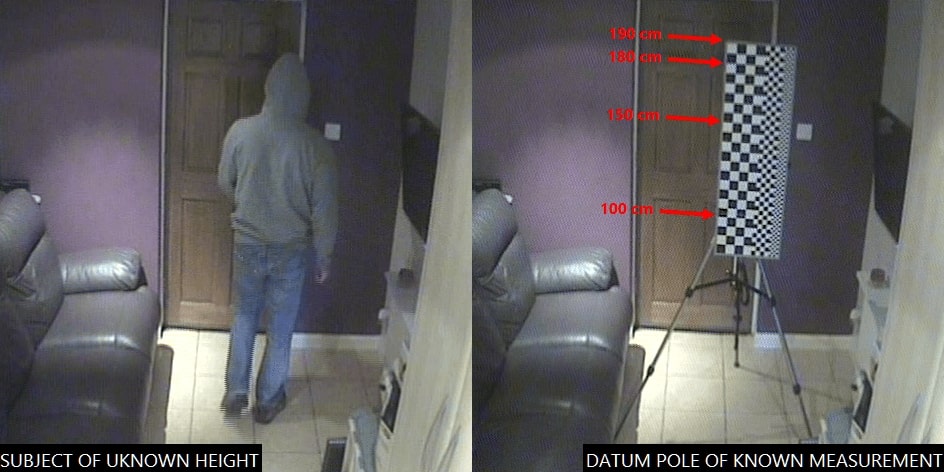
Using an image processor, such as Amped FIVE, we can then overlay the two images together. The height of the unknown target can then be read directly from the markers of the datum pole.
One prerequisite of this method being successful is that the recording camera must not have moved. Any movement of the camera, or differences in the way the recordings are presented (resolution, aspect ratio etc.) will have a negative effect on the accuracy of your measurements.
Measuring using this technique, or indeed the reverse projection method, is prone to other errors. For starters, it is not possible from an image alone to determine, for example, the top of a suspect’s head.
Headgear (like in the example above), hair thickness, posture and stance will all have a bearing on accurate measurements. A subject running, for example, may and probably will measure differently than the same subject standing static, with their spine totally erect.
It may also be difficult to place the known object of measurement in the same exact position of where a subject stood. Any inaccuracy in the placement of this object, will cause errors in the measurements. More on this later.
Performing a Single View Metrology with Measure 3D
Let’s fire up Amped FIVE and start measuring right away! In order to measure the height of a subject using Single View Metrology, we will use the filter Measure 3D. It can be found in the Measure group of filters. Let’s load an image containing a subject we want to know the height of.
The first thing we need to make sure of, is that our imagery is not distorted in any way. Lens distortion causes lines that are straight in the real world appear curved. Because of this, the shape of objects and subjects depicted in a distorted image, will not be completely authentic to their real world counterparts. And, more to the point, lines that are parallel in the real world would not converge anymore to a vanishing point. Check our article from the Video Evidence Pitfalls series if you wish to learn how to deal with distorted images in FIVE.
Registering the Parallel Lines
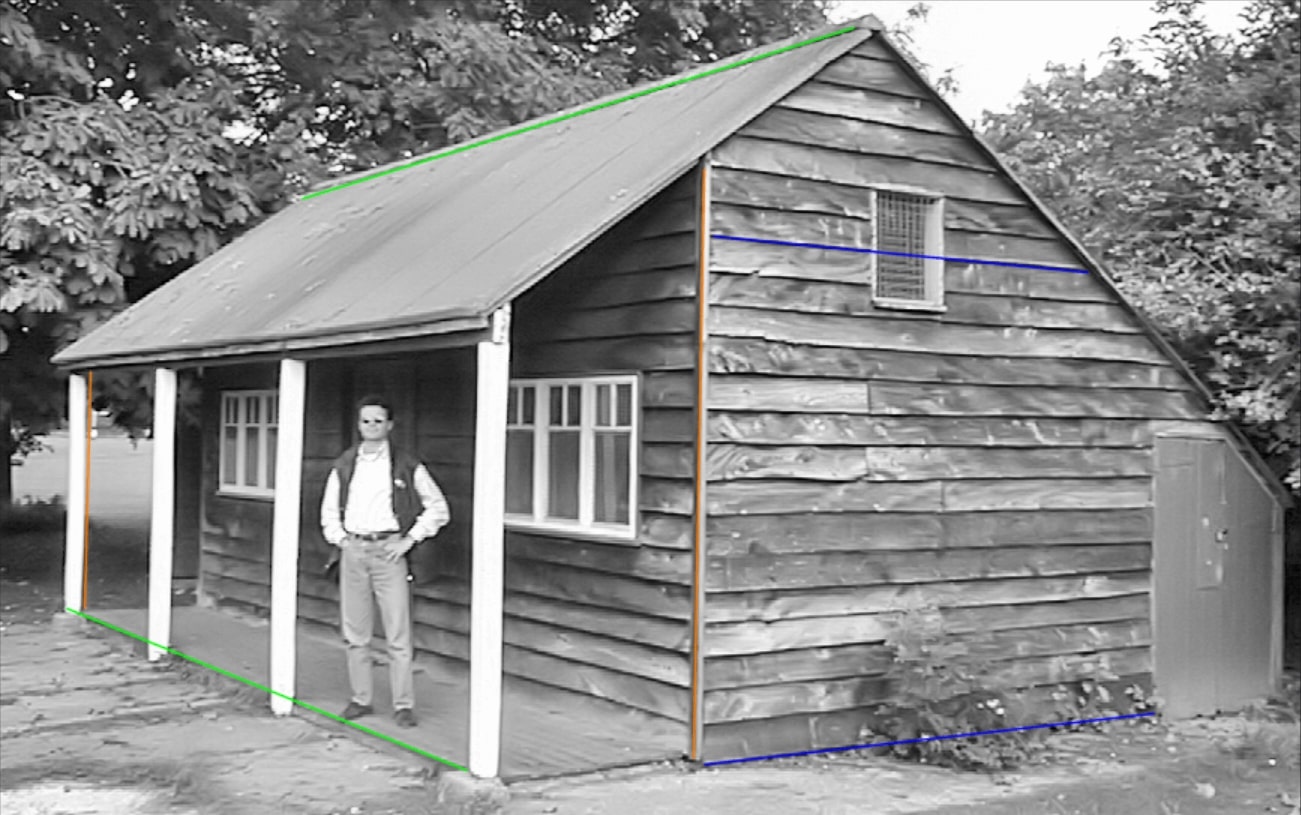
Once we have dealt with distortion, go ahead and apply the Measure 3D filter to your chain. For the main, we will work through the tabs of this filter in order. With the first three tabs, we will register the parallel lines for each spatial dimension (X,Y and Z) by drawing them in the image. For each dimension, all lines must be mutually parallel. In the example below, it would be incorrect to register the lines of a large box placed on the ground in conjunction with the house’s. This is only true if these two objects were mutually aligned.
The ruler tool will already be selected for you. All you have to do is to draw the lines (at least two per dimension). Press the U key on your keyboard (or the Add (U)) button after you have finished drawing each line. The lines’ coordinates will populate the tab text box when registered, as shown below.
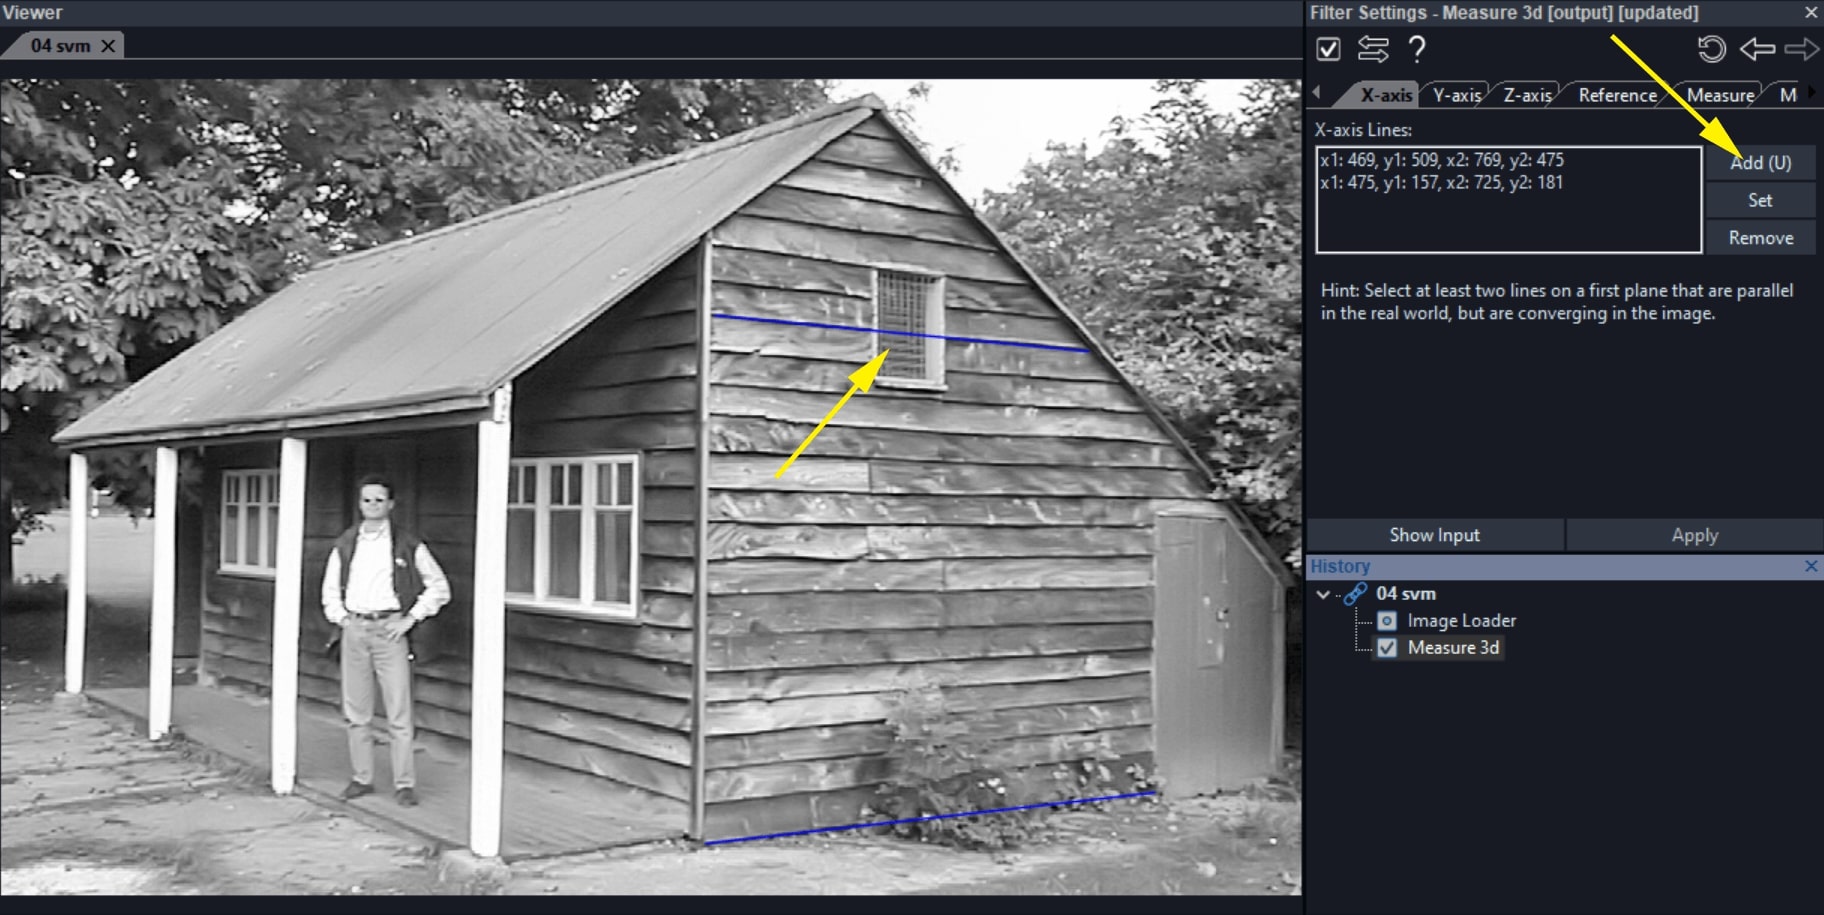
Be accurate when drawing, ensuring lines are as long and separate as much as possible, as shown below. Remember, you have to be sure they are parallel in the real world.
Registering the Reference Object
When you have drawn the minimum required number of lines (six in total), you are then ready to register the measurement of the reference object. Click on the Reference tab and draw a line alongside the reference object. In this case, the wooden post connects the terrace of the property to the roof. It’s important to note that the metal joint beneath the roof line is excluded from this connection. Enter the number in the Reference Length text box. Entering the Unit of Measurement is solely for presentation purposes. This means that the unit used for the reference object will also be used for our suspect’s height.
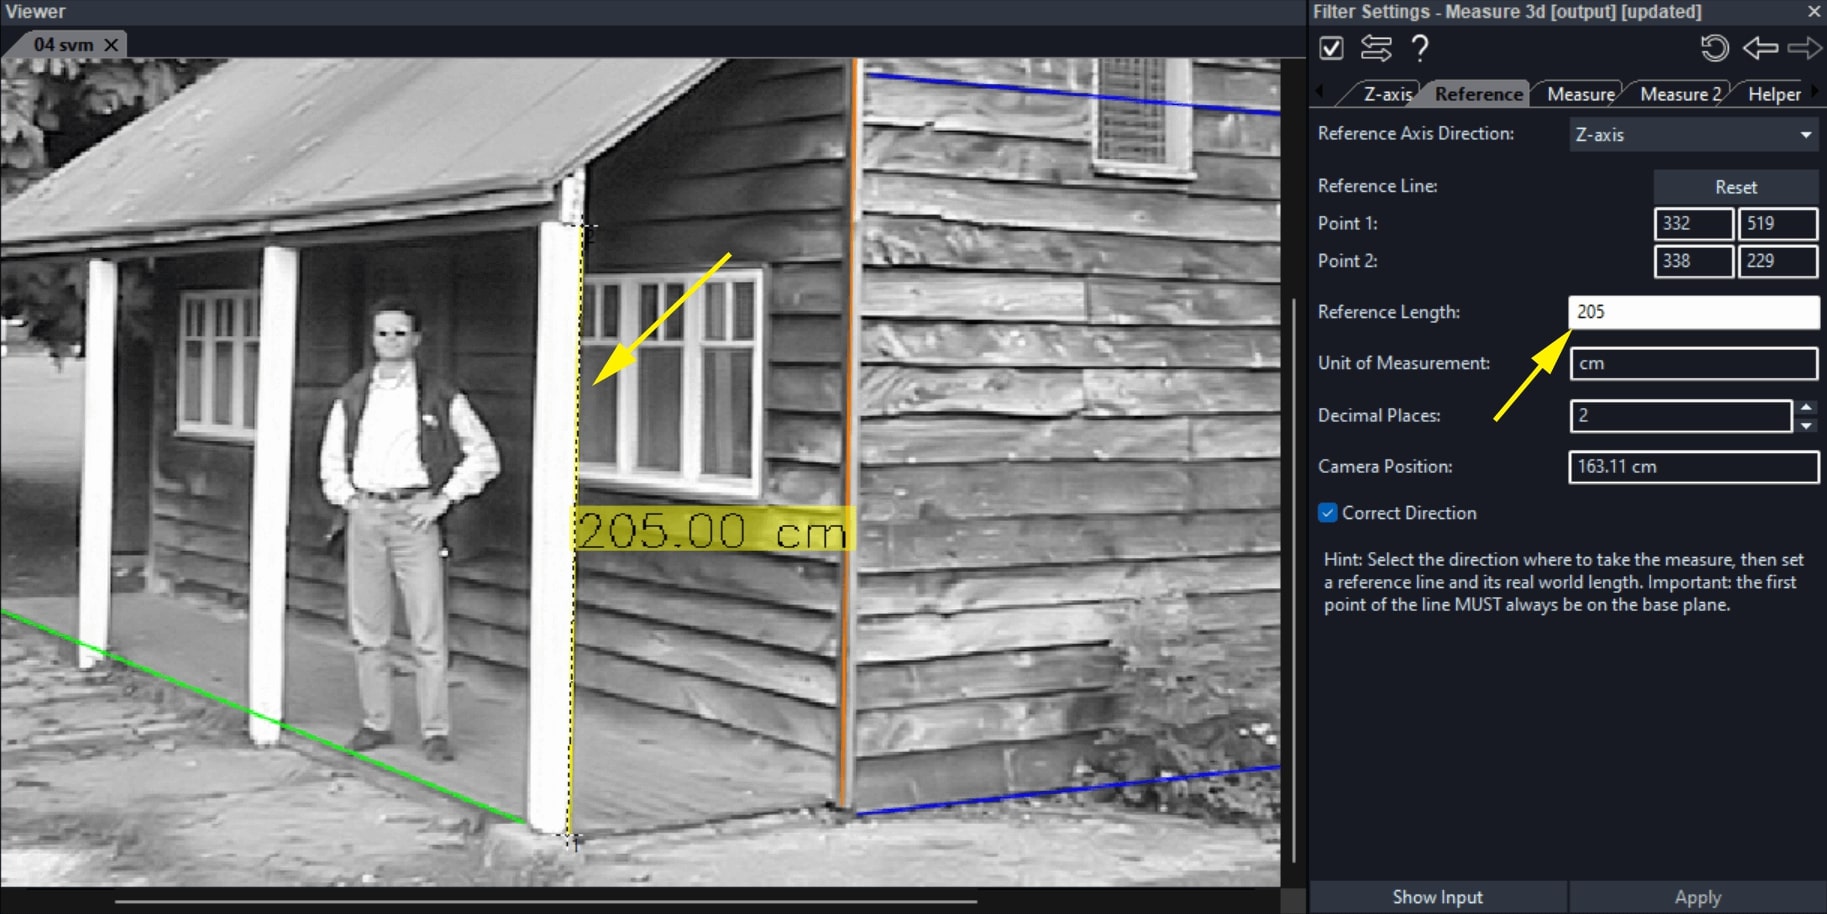
Two important things to remember when registering the reference object. The reference line needs to be in the same dimension as that of our suspect line. That means that if we are measuring the height of a subject, we also need to register the height (and not the width or depth) of our reference object.
The other constraint is that the reference object must sit on the same planar surface as that of our subject. In the example above we cannot use the height of the window as reference because it is not sitting on the floor, as the suspect is.
Measuring the Height of the Subject
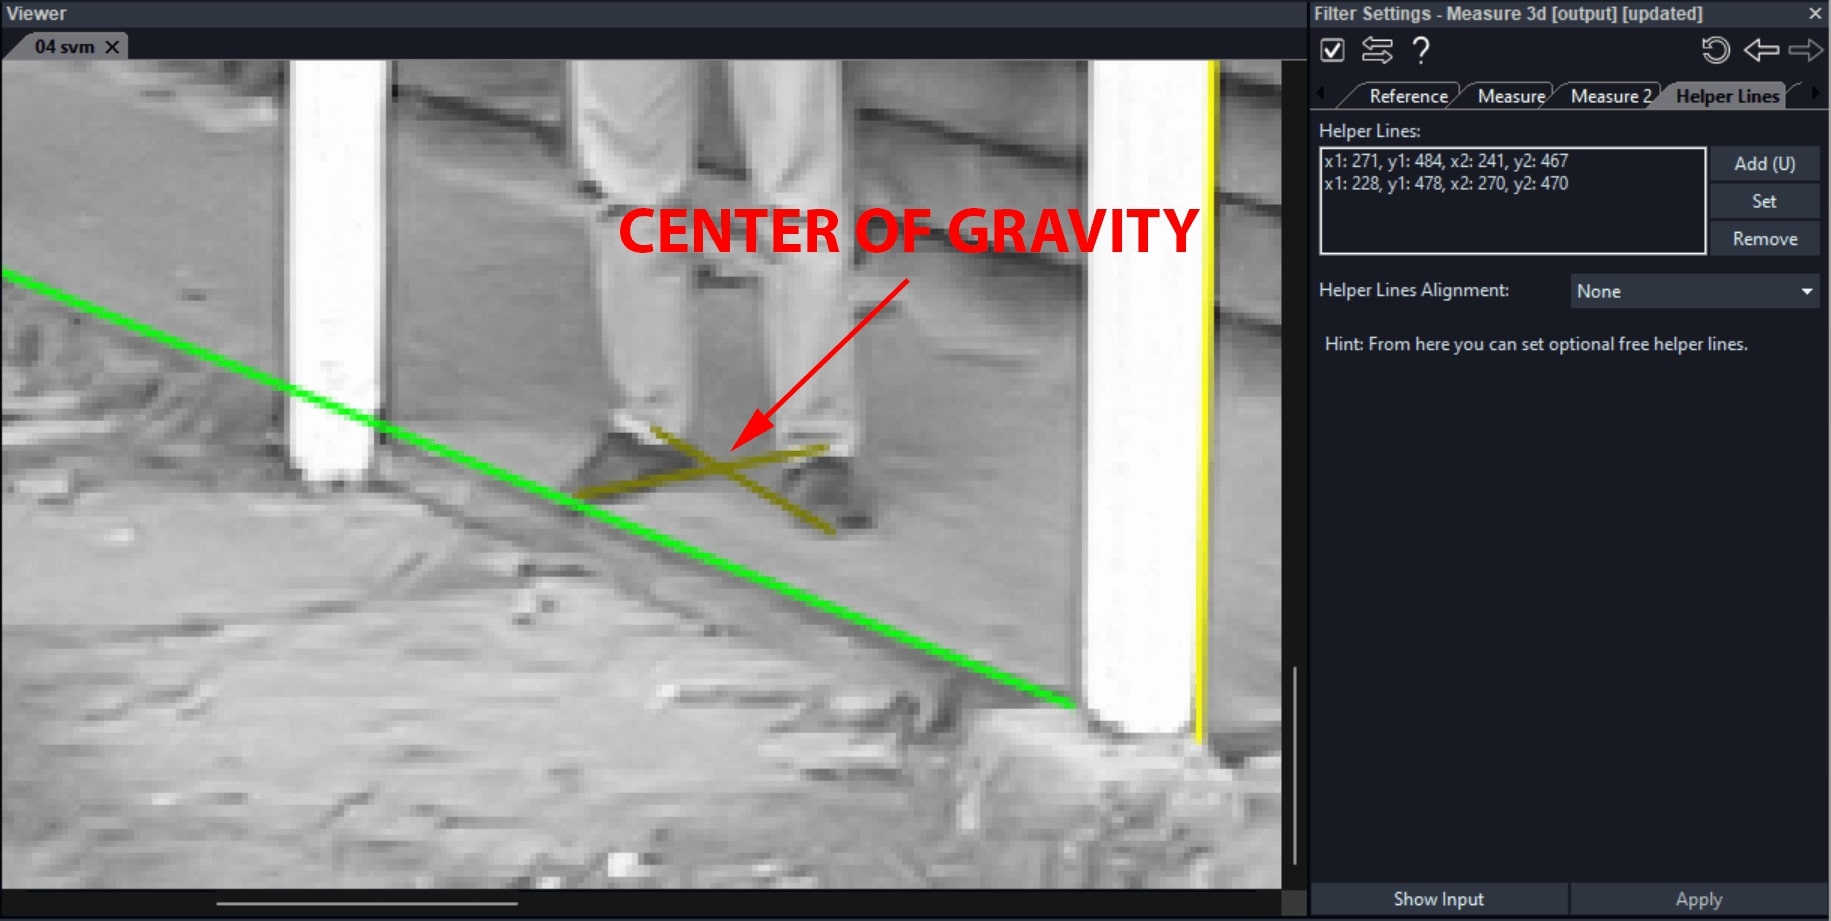
We are now ready to measure the height of our subject! Switch to the Measure tab and draw a line from the center of gravity of our suspect to the top of his head. What is the center of gravity and why is it important for our measuring line?
In physics, the center of gravity is an imaginary point in a body of matter where the total weight of the body may be thought to be concentrated. Its exact location in the image is important for us. This is because any inaccuracy in determining the point’s position can lead to significant errors in our final height assessment.
Estimating the Center of Gravity
With the Measure 3D filter you also have a Helper Lines tab. This will allow you to draw annotating lines in the image (which bear no effect whatsoever to the filter calculations). Switch to the Helper Lines tab. Then, draw two lines, one joining the left heel and right toe of the subject and the other the right heel and left toe. The converging point between the two lines will be our (very roughly) estimated center of gravity of the subject in the image.
Go ahead and switch to the Measure tab. Draw a line starting from the center of gravity all the way to the top of the head. When completed, the output measure will be displayed in the filter settings and also on the image itself, as an annotation.
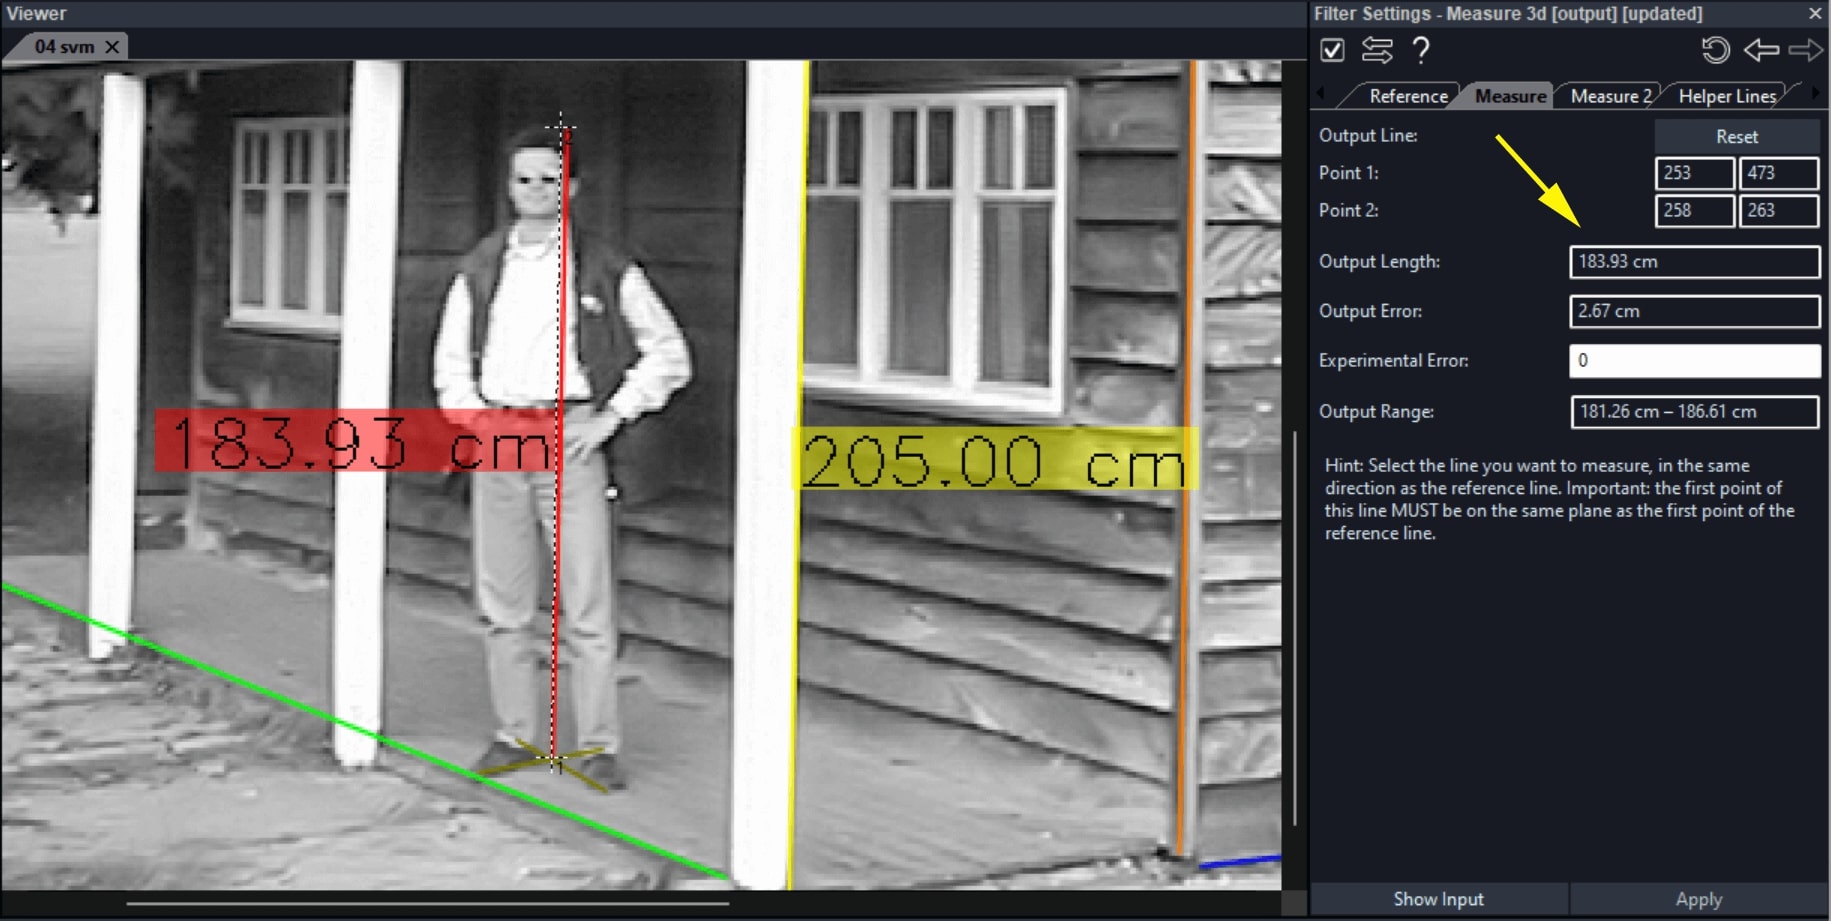
Calculating the Margins of Error
There will also be a margin of error at either side of the output measure. This is mathematically calculated. It is dependent on the resolution of the image and the accuracy of your drawing. It is also possible to add additional error using the Experimental Error text box. This allows for the margins of error that cannot be mathematically accounted for (such as hair thickness, headgear, stance, posture, etc.).
Check out also this video on our YouTube channel. This explains how to measure the height of a subject with the Measure 3D filter in Amped FIVE.
Performing a Reverse Projection
To validate measurements we will apply both the Single View Metrology and Reverse Projection methods. They are completely different methods. If all goes well, the results between the two will be similar. This, in turn, will make your evidence that much more robust.
In Amped FIVE, you can overlay your questioned footage to the reconstruction footage by using the Video Mixer. This will load the output of two previous chains in your history. It will also visually combine them together in a variety of different ways. With Video Mixer, for example, you can put two videos or images side-by-side. You can also overlay them together, if you wish.
Using the Video Mixer to Overlay Sources
Drag both of your questioned and known images (or video) in the viewer. If prompted, load them as a separate chain. Then select the Video Mixer filter from the Link group of filters.
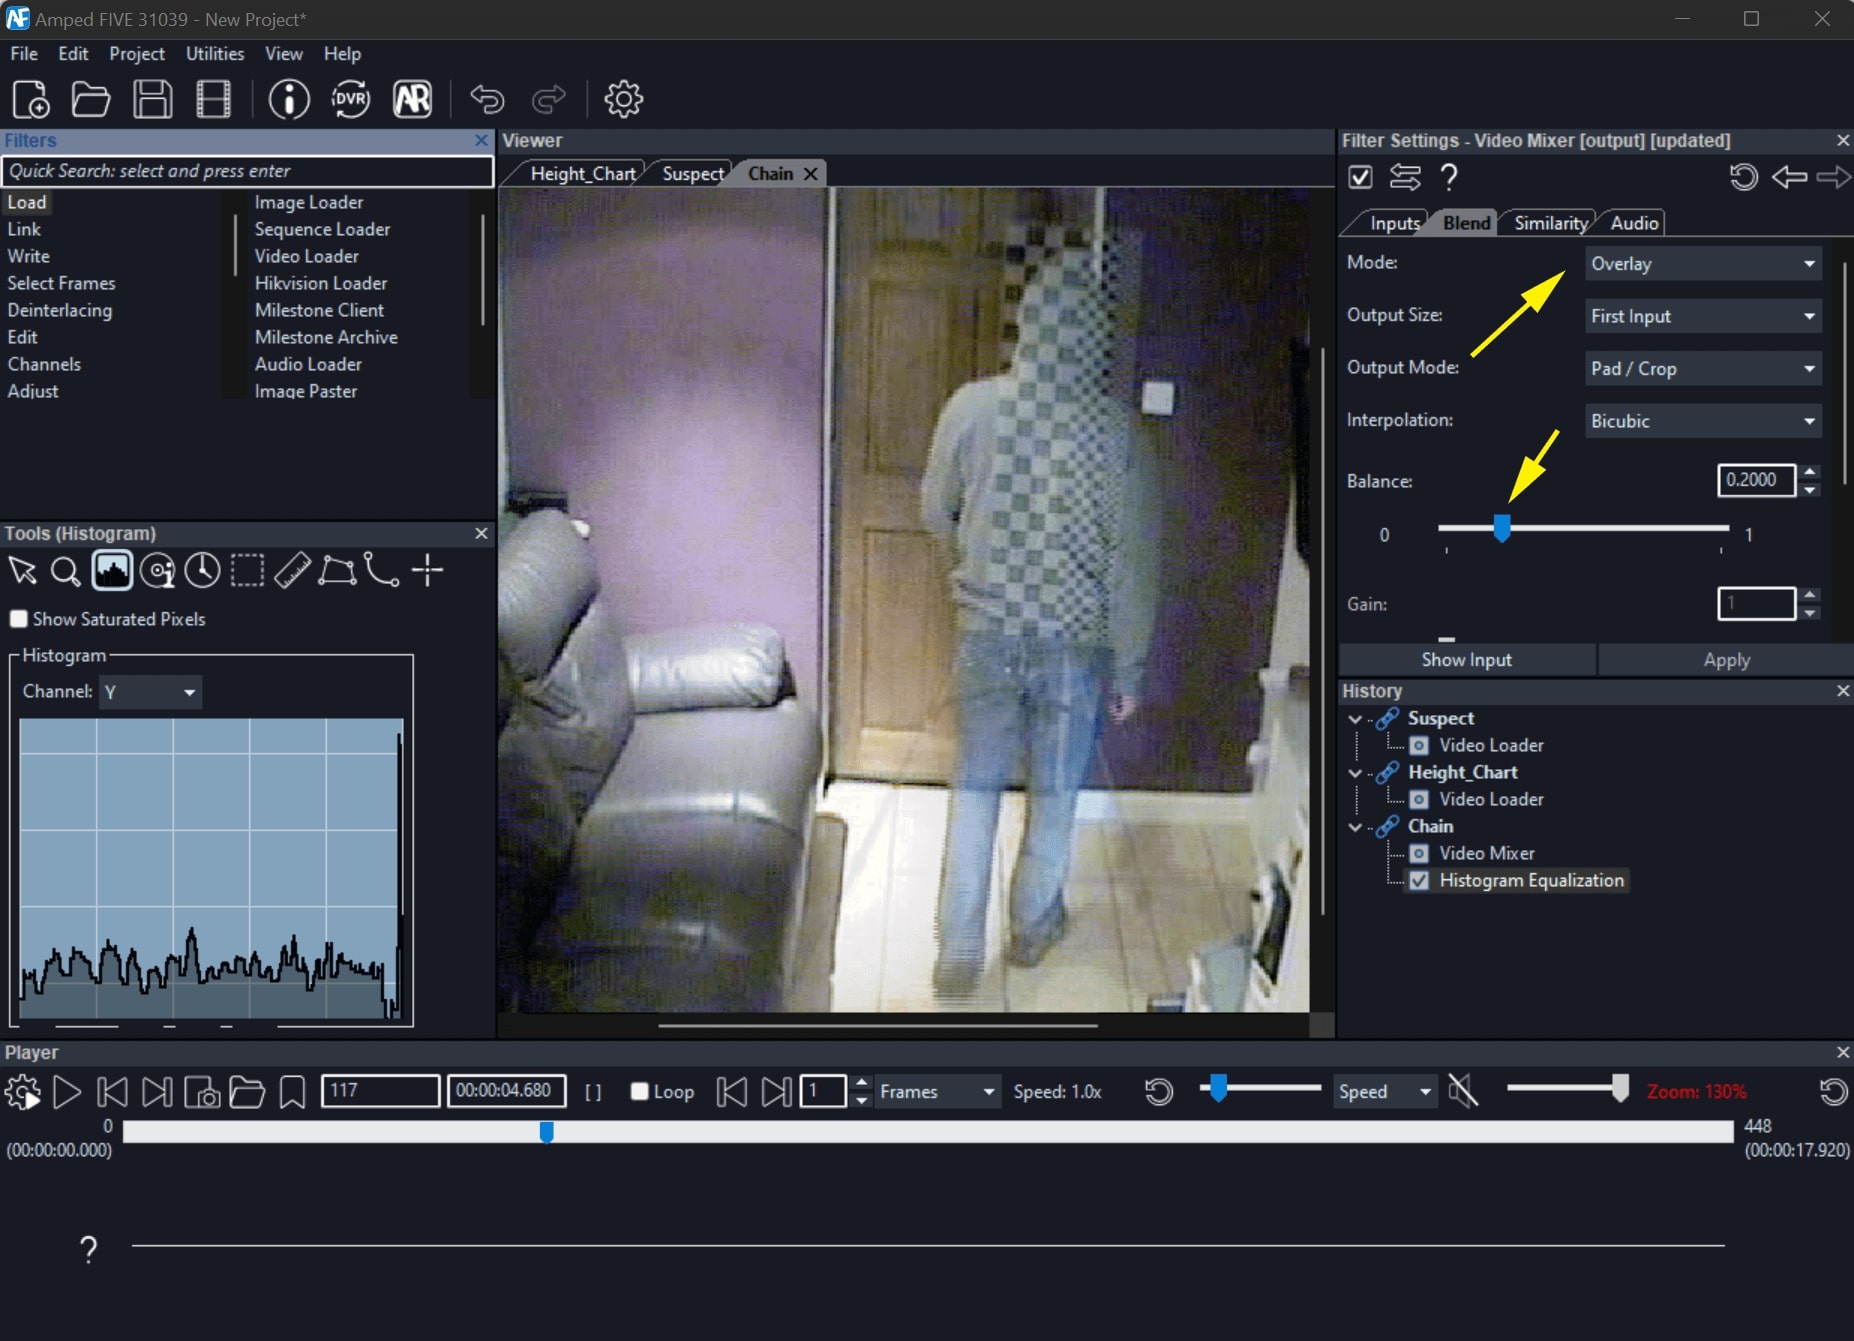
Click on the Blend tab and change the Mode to “Overlay” to superimpose one clip onto the other. In the filter settings, you have a Balance slider. It will adjust the transparency of one source over the other. In this case we will use the slider to give us the best visibility of both the subject and the datum pole. We will also move the playhead so that the feet of the subject are on the center of gravity of the pole. If you need, you can use the Annotate filter to draw lines to help you locate the pole’s center of gravity.
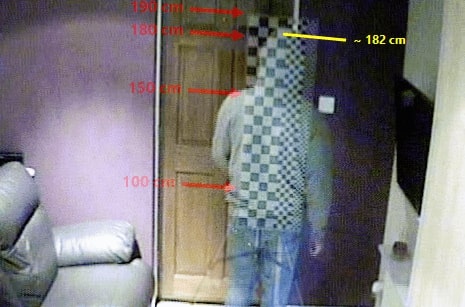
To increase the contrast of pixels near the measuring area (the top of the head), you can also use one of the Adjust filters which will bring out the detail even more. In this instance I have used the Histogram Equalization.
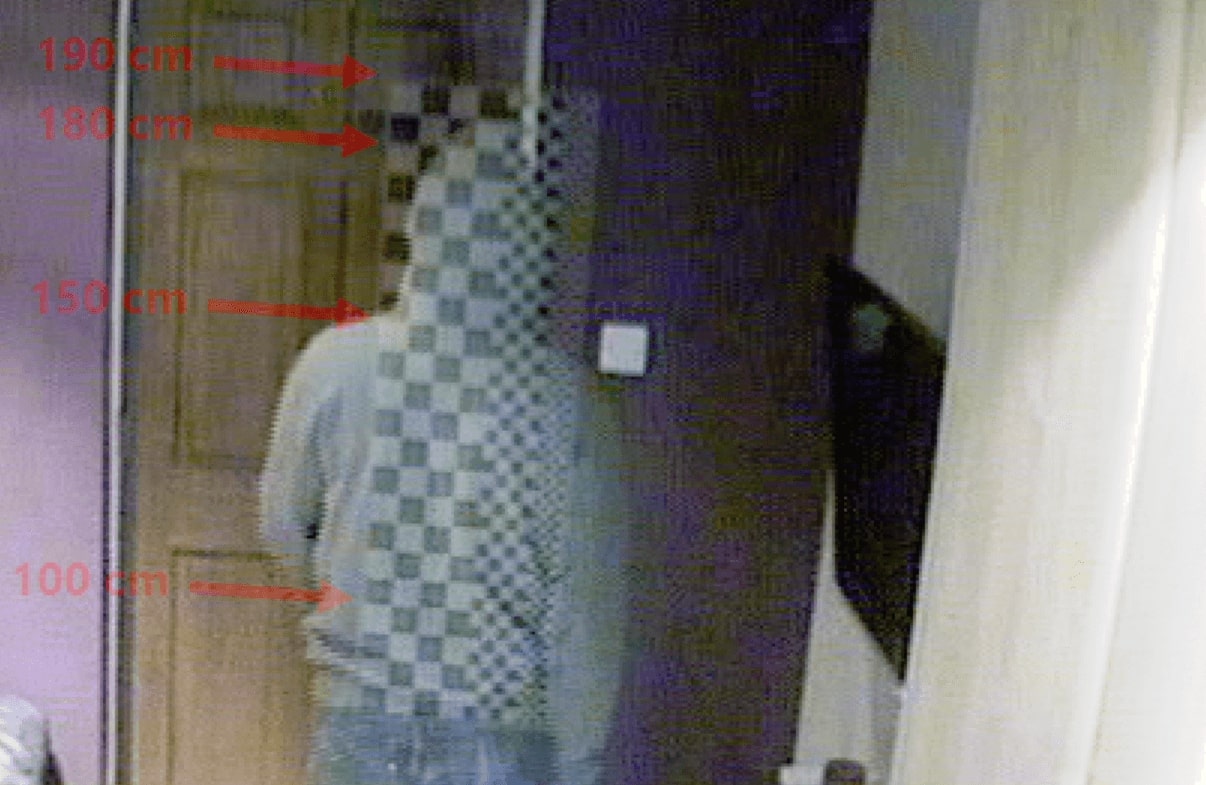
If everything went well, you should be able to see where the top of the suspect head lays in between the datum pole markers.
Conclusions
We hope that you enjoyed this article. If you wish, there are more articles in our blog that will enhance your knowledge of measuring filters in FIVE. Check this article out if you wish to learn the difference between all our measuring filters. Or check this article out if you wish to find out more about the challenges that perspective brings us when measuring in an image. Till next time, as always, take care and stay safe!


