
Being able to measure an object or a person (or an animal ?!) in a two dimensional image is in high demand these days within the forensic video community.
The following blog post will discuss measuring in a scene and what filters to use in Amped FIVE.
We all know (or should know!) that in Amped FIVE it is possible to calculate measurements such as the height of an unknown person or the speed of a vehicle from CCTV and other video evidence. And we have a variety of different filters in the Measurement group that can do the job just fine, such as Measure 1D, Measure 2D, Measure 3D and Speed Estimation 2D. But what filters shall we use? And which one is going to give us the most accurate results? It depends, of course.
Let’s have a look at the train of thought that will lead us to choose the right filter for our specific circumstances.
Measure 1D
Many of us have been shown the power of Measure 3D in FIVE and how to measure the height of a subject in a two dimensional representation of a scene. But did you know that if the subject and the reference object are located on the same plane you can also use Measure 1D and Measure 2D? You could use these filters to validate your results in Measure 3D, for example, or to simplify your workflow.
Length or Height of a Subject
Measure 1D is used to determine the length or height of an unknown subject or object when the length or height of a reference object is known, when the two are located on the same planar surface and when the camera lens is perpendicular to that surface. It could be extremely practical when you are working with CSI photographs with which the aforementioned criteria are usually met. In the example below, the knife and pen are both sitting on the same desk (the planar surface). The angle of view of the camera is perpendicular to that desk.
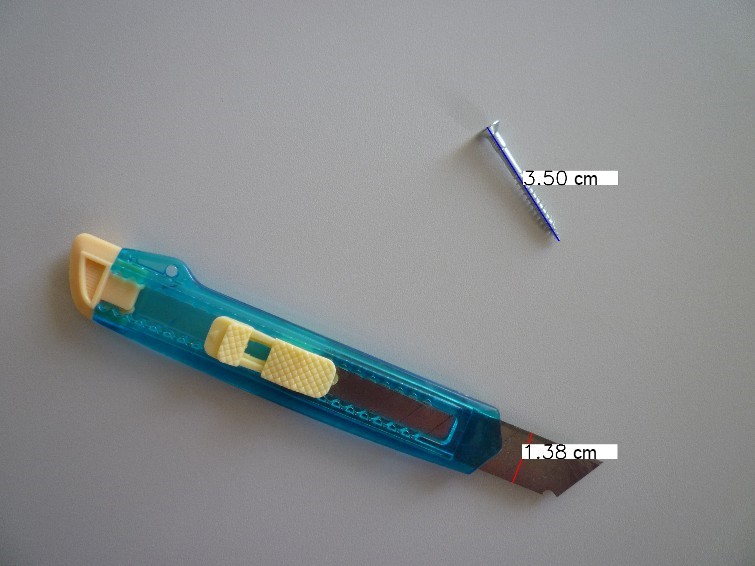
By inputting the length of the nail, we can determine the length of any lines depicted in the same image, such as the height of the knife’s blade, whatever their inclination. The filter can do this by calculating the length and height of single pixels using the length of the reference object.
Real Casework
In real casework though, the filter may become very useful when measuring. For example, a subject standing underneath a door frame and the camera’s angle of view is perpendicular to the subject, like in the example shown below.
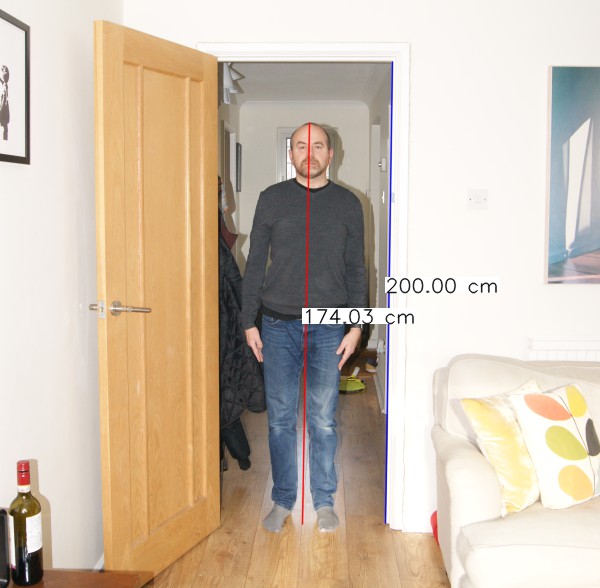
Because the subject is standing on the same planar surface as our reference object (the door), in this instance it is sufficient to tell FIVE what the height of the door frame is (200 cm) in order to measure our subject.
So, in this instance, I simply applied a Measure 1D to my image chain. I inputted the height of the reference object in the relevant tab of the filter settings. I then switched to the Measure tab and drew a line from the subject’s center of gravity to the top of the head.
Learn how to use the Measure 1D filter in Amped FIVE to take a measurement on a planar image.

If we validate the results with those obtained with the Measure 3D filter (demonstrated later in the article), we can see that they are very similar indeed. Physics never lie! Not even in images.
Watch and Learn How to Take a Measurement on a Planar Image
Want to see the filter in action? Check below to learn how to use the Measure 1D filter in Amped FIVE to take a measurement on a planar image.
Measure 2D
Perspective Correction
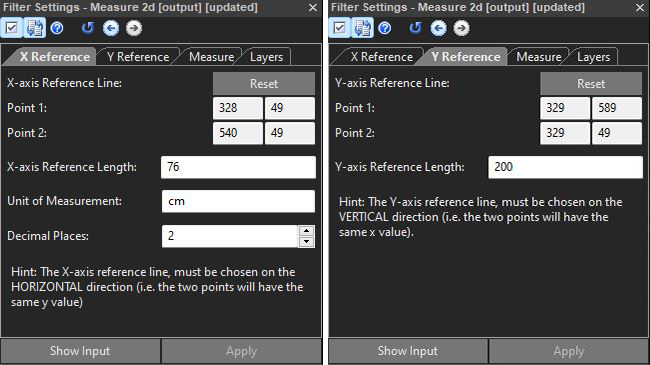
With Measure 2D we can go a step further. The subject still needs to be in the same planar surface as the reference object. However, the camera’s angle of view no longer needs to be perpendicular to the scene. The reference object, though, needs to be of rectangular or of square shape. The X and Y measurements of which must both be known to us. We also need to correct the perspective of the scene before performing the measurement as Measure 2D can only draw perfectly horizontal and vertical lines for our reference object. It is not required to correct or estimate the aspect ratio once the perspective has been corrected. Because, the filter already knows the mathematical relationship between the X and Y dimensions in the image. In the image below, the door frame was used as a reference plane to correct the perspective before applying Measure 2D.
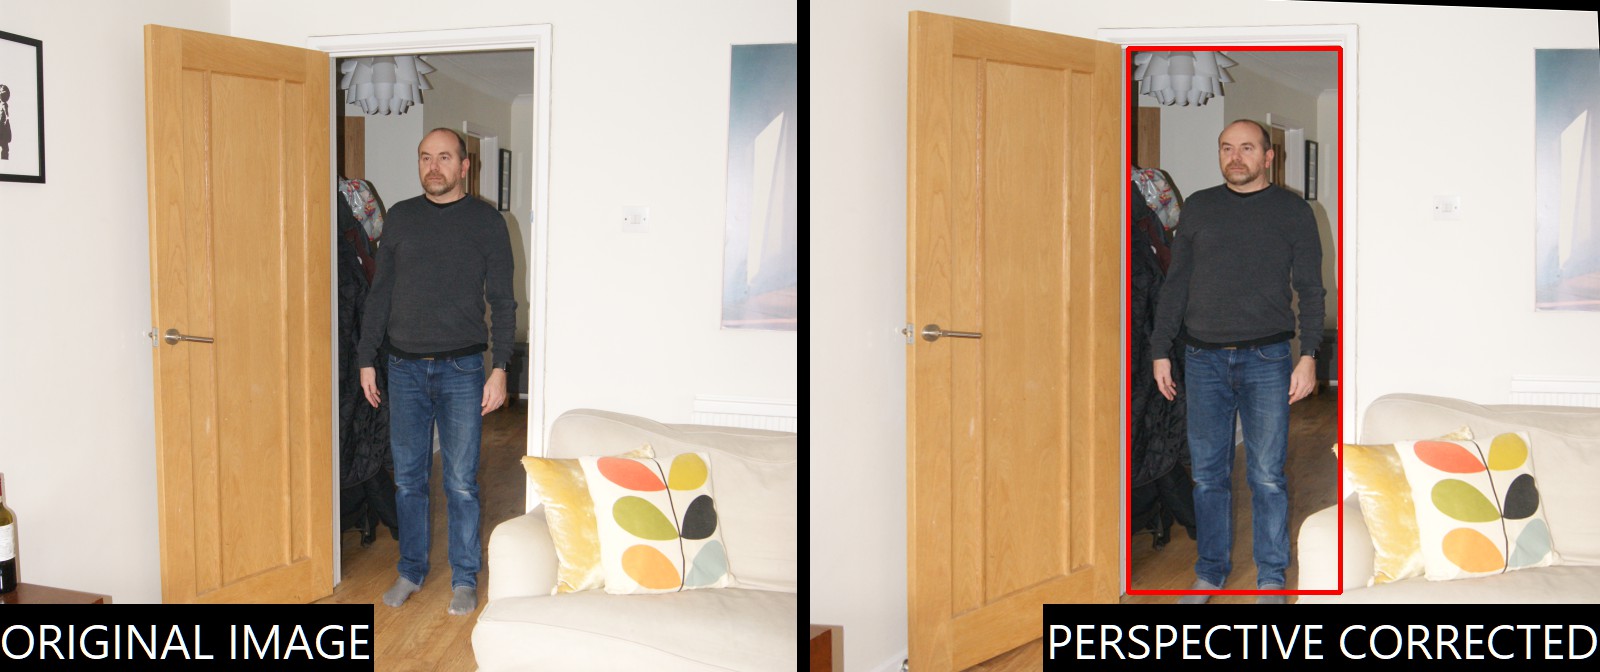
Once the perspective has been corrected, we can apply the Measure 2D filter. In this instance all we need to feed the filter are the length and height of the door frame, 76 cm and 200 cm, respectively – by entering this data in the X Reference and Y Reference tabs, as shown below.
Subject Measurement
Then we can go ahead and measure the subject, by switching to the Measure tab and by drawing a line from the subject’s center of gravity to the top of the head.
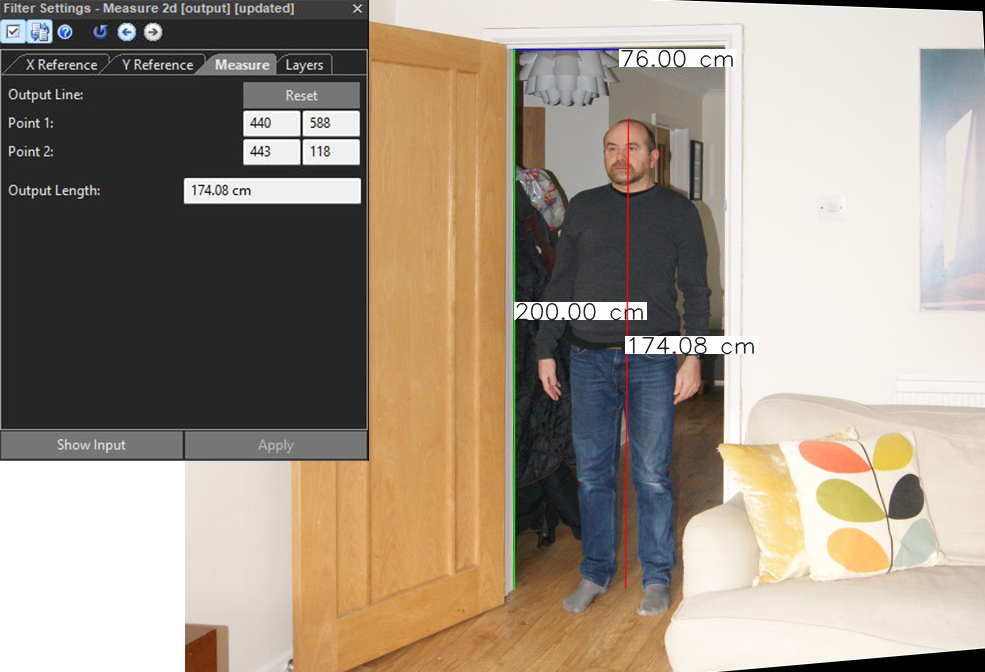
Be careful when using this filter to measure non-flat objects (such as a person!). Remember that an image is a bi-dimensional representation of a three-dimensional scene. Therefore, you just need to take extra care when calculating distances between objects which are on different planes. If in doubt, validate your results with Measure 3D, which is a more reliable filter to use under these circumstances.
Watch and Learn How to Take a Measurement on a Planar Image after Perspective Correction
Learn more on how to use the Measure 2D filter in Amped FIVE to take a measurement on a planar image after perspective correction.
Measure 3D
Measuring the Height
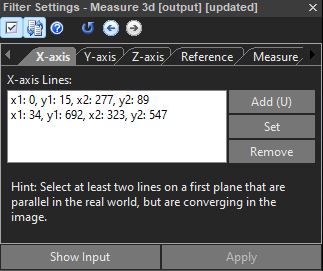
With Measure 3D, as well as telling FIVE the height of the door frame (the starting point of which needs to be in the same planar surface as the feet of our subject), we also need to feed FIVE Single View Metrology data by drawing lines in the image, which are parallel in the real world, for each of the three spatial dimensions. In a two dimensional representation of the real world, the parallel lines will inevitably converge into a single point. It is the location and distance of these three points relative to the image and to each other which will allow FIVE to gather a geometrical understanding of the scene. A a result, measurements can be performed in the virtual three dimensional environment.
In Measure 3D we have three tabs for each of the three spatial dimensions (X, Y, Z) in which we need to draw at least two lines which are parallel in the real world (if necessary, go back to the scene to ensure the lines used are, indeed, parallel). The coordinates of the lines drawn will be registered in the corresponding text boxes. You can always use the Add, Set and Remove buttons to refine your drawings or to edit/remove bogus lines.
Measuring in a Scene: Suggestion from the Author
My suggestion would be, if possible, to draw two lines that are not only parallel, but also fairly distanced from each other. This will reduce the error in calculating the lines’ converging point and therefore maximize the accuracy of your results. I appreciate this is not always possible. However, take into account things like floor tiles, covings on the ceiling and wall joints as these will be invaluable when drawing the parallel lines into the filter tabs. Draw your lines as long as you possibly can, but without compromising accuracy, to produce even more robust calculations.
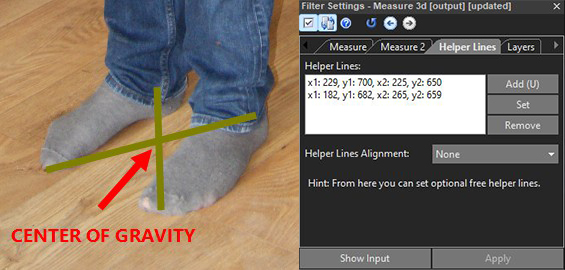
Determining the Center of Gravity of a Subject
In a two dimensional image of a three dimensional world determining the center of gravity of a subject (the starting point of our measuring line) can be tricky. In physics, the center of gravity is an imaginary point in a body of matter where the total weight of the body may be thought to be concentrated. Its exact location in the image is important for us because an inaccuracy of determining where this point is can cause some considerable error in our final height assessment.
With the Measure 3D filter you also have a Helper Lines tab which will allow you to draw annotating lines in the image (which bear no effect whatsoever to the filter calculations). I use this tab to draw two lines, one joining the left heel and right toe of the subject and the other the right heel and left toe. The converging point between the two lines will be our estimated center of gravity of the subject in the image.
Measurement
Once we have calculated the center of gravity we can switch to the Measure tab and draw a line starting at this point and terminating at the very top of the subject’s head. Thickness of hair can sometimes give us problems in determining the exact location of the top of the head. We just have to take this into consideration for any measurement error.
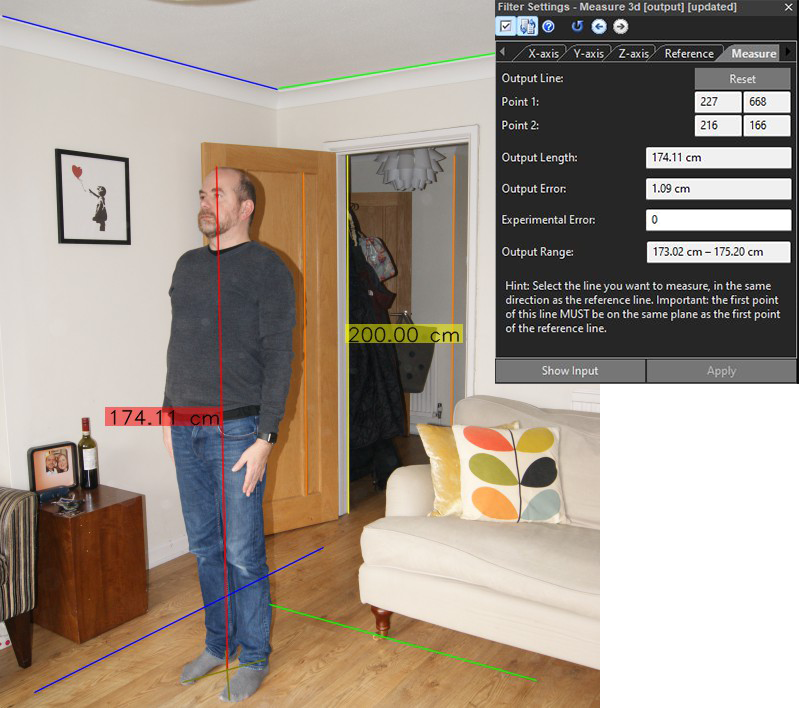
Measure 3D is also able to calculate margins of errors within the measurement (as shown above). The mathematical calculations involved in obtaining this data are quite complex. However, in a nutshell, the resolution of the image and drawing accuracy all contribute in producing the error displayed. Subject’s stance and headgear must also be taken into account when reporting results in a criminal justice setting.
Watch and Learn How to Take a Measurement on the Image
Watch Measure 3D in action now!
Speed Estimation 2D
But what about Speed Estimation 2D? One would expect this filter to simply calculate the speed of travel of an object or vehicle of interest. However, because the filter performs spatial calculations in a two dimensional representation of a planar surface (such as a road or a floor), we can also calculate the length of any object laid into that surface by using the Ruler tool available within the filter.
Similarly to Measure 2D, we need an object of reference in the image, of which the X and Y dimensions are known. In the example below, I used the rug (which has a width of 140 cm and a height of 200 cm) as reference. In this instance, I simply fed this data in the Grid section of the filter settings, as shown below. I also used the Horizontal Extension and Vertical Extension sliders to give me a broader view of the planar surface. This helps in ensuring the rectangle of reference is drawn accurately.
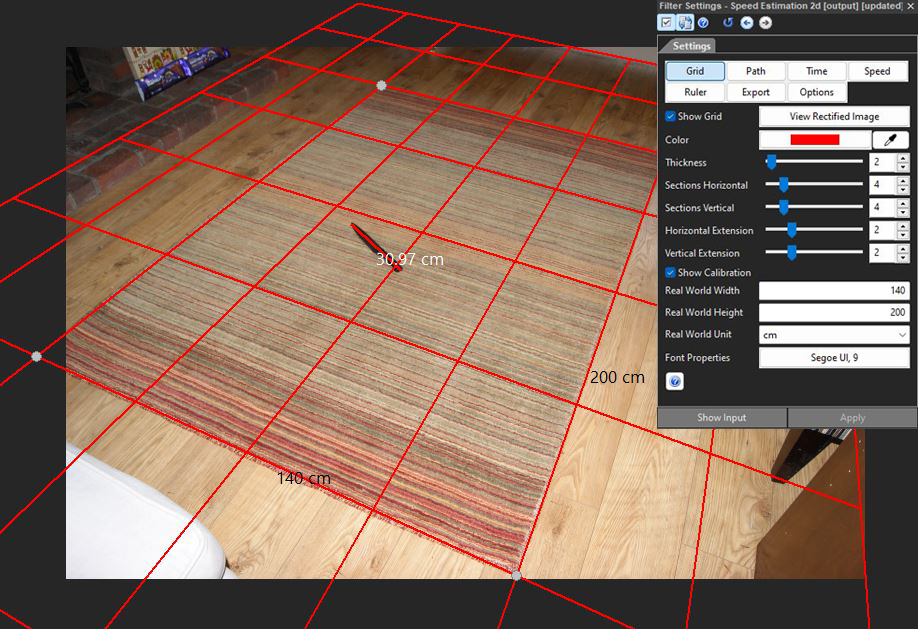
All we need to do now is to click the Ruler button. Then, we can measure any objects in that planar surface, such as the knife laying on the rug.
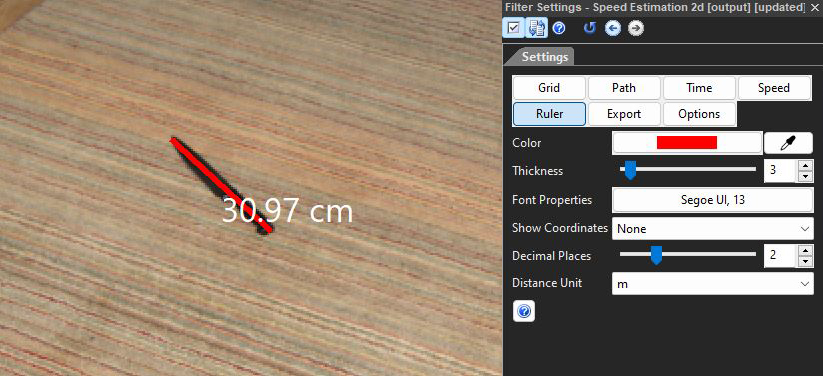
Unlike Measure 2D, we do not need to worry about correcting the perspective of the image as Speed Estimation 2D is able to work with the image as is. However, in this instance, Measure 2D can be used effectively as a validation tool.
We can clearly see that the results obtained with Measure 2D are very similar to those obtained with Speed Estimation 2D. Therefore, we have more confidence in the accuracy of our measurements.

Useful Links
Learn more about Speed Estimation here:
- The Full Workflow of Speed Estimation 2d in Amped FIVE
- Amped FIVE Update 23195: Speed Estimation 2d
- Webinar: Understanding the Speed Estimation 2d Filter in Amped FIVE
Conclusion
We hope this article will help you determine which measurement filter to use or has provided you with ideas on how to use the different filters to validate your results. If you need more information or have questions, feel free to contact our support team! Stay tuned and don’t miss the next posts! You can follow us on LinkedIn, YouTube, Twitter, and Facebook: we’ll post a link to every new article so you won’t miss any!


