We are very excited to bring you yet another big Amped Replay update today! The number one player designed specifically for front line policing and investigating is back and packed with lots of new features and improvements. We think you are going to love them!
In line with our development strategy for 2022, we continue to bring performance improvements, as promised – this time adding CPU Multi-threading Support and Standard Rounding Chroma Up-sampling for the decoding and playback of video. You will now also be able, if you wish, to customize your interpolation method when resizing video clips.
Let’s go through the complete list of updates we have in store for you.
See the New Features in Action!
Improved Decoding Performance
With 4K and UHD video now comfortably established in the market, it is becoming increasingly important to make the most of our hardware to facilitate the decoding, playback, rendering and export of video. At Amped Software we always strive for forensic correctness. Maintaining evidential consistency between different systems had always priority over user’s hardware capabilities. But after extensive testing, we have determined that we could empower our decoding system whilst maintaining forensic correctness. We have introduced multi-threading support to decode and playback video faster than ever before!
Multi-threading is the ability of a Central Processing Unit (or CPU) to provide multiple threads of a program execution simultaneously. This ability, though, also needs to be supported by the Operating System and the program in question.
The Amped video engine is capable of decoding frames using all the available threads in a CPU. When this option is active, as you may imagine, the process of decoding those frames and rendering them visible on your screen is considerably accelerated. And in turn, this minimizes the risk of slowing down real time playback. It is especially relevant when working with very high resolution video such as 4K and UHD.
In this Amped Replay update, we have enabled multi-threading support by default. The program will use the maximum amount of threads available at any one time to decode and playback the video while it is being loaded. It is, however, possible to disable multi-threading or even to lower the maximum amount of threads in use. This can be done by performing some simple text editing in the “admin-settings.ini” file which can be found in the directory C:\ProgramData\Amped Replay\admin-files (please see this previous blog post to locate and open this file).
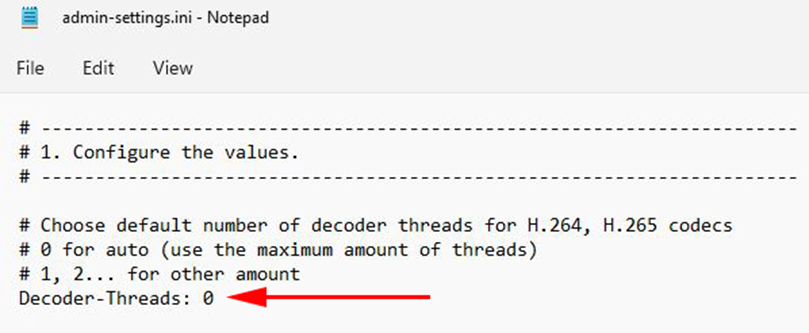
Find the line “Decoder-Threads” (which is near the top of the file) and change the default value of 0 (which is the number associated to the Automatic mode) to the required number of threads to be used. For example, if you want Multi-threading disabled, you would just assign a value of 1 (one thread only being used) or you could assign an arbitrary number. For example, assigning a number of 4 when your system has 8 threads would ensure only half of the system’s CPU resources would be used. Please be careful with your syntax when editing this file as any errors (including spaces or lack of spaces) could cause problems with the smooth running of Replay. If in doubt, create a backup copy of the “admin-settings.ini” before you make any edits.
At the moment, multi-threading is only utilized by Replay when loading h264 and h265 (or HEVC) compressed videos. We continue to test reliability for other codecs and implement any changes necessary in future upgrades to guarantee 100% forensic correctness for all codecs and formats.
As well as Multi-threading Support, we are also introducing Standard Rounding Chroma Up-sampling, which will improve decoding performance even further. But what do we mean by Chroma Up-sampling? As you may or may not know, the most effective way of spatially compressing an image or a video is by changing its color space from RGB (Red + Green + Blue) to YCbCr (Luma + Chrominance Red + Chrominance Blue). This is so that color information (which the human eye is less sensitive to) can be substantially reduced with negligible visual effect, while luminance information (which the human eye is most sensitive to) is fully retained.
When a video is decoded and its color space changed back from YCbCr to RGB (which is a necessary step to display the pixels back on your monitor), new pixels that were previously discarded need to be created by a process of interpolation (more on interpolation later!). There are two known methods for this interpolation: accurate rounding and standard rounding. As the names suggest, the former is a more accurate method, but also more computationally demanding (and therefore slower), whereas the latter is theoretically less accurate but much faster. After extensive testing, we concluded that the difference between the two methods is visually negligible. That is why this is now the default Chroma Up-sampling option in Replay.
Please note that, because of this change, when you now load a project which was created by an older version of Replay and re-save it, the hash values of any newly exported videos (whether original or processed) will be different from those of previously exported videos.
Custom Interpolation Method
In this Replay update, we introduced the ability to choose the preferred method of interpolation when resizing an image. An automatic interpolation mode is still available as the default option, if this is the user’s preferred solution.
But what is interpolation? Simply put, when enlarging or reducing the size of an image, we are adding or removing pixels from the image, respectively. When doing so in pursuit of justice, this process has to be scientifically reliable. The data added or removed must not change the authenticity of the image/video in any shape or form.
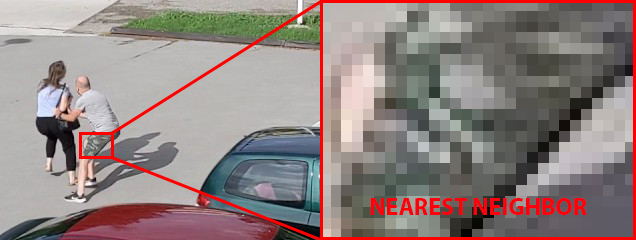
The most scientifically reliable interpolation method (but least visually appealing) used to enlarge an image is known as “Nearest Neighbor”. With this method, individual pixels are duplicated in RGB values around the original pixel. No blending occurs between pixels of different RGB values. Visually speaking, enlarged pixels now appear as squares (as shown below).
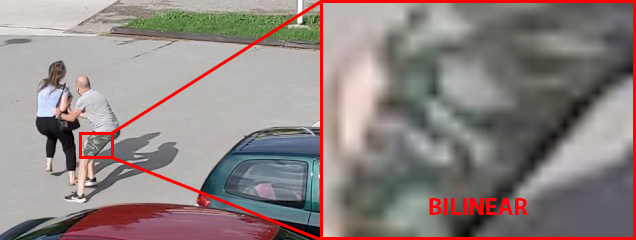
More common interpolation methods used to enlarge an image though are known as “Bilinear” and “Bicubic”. These methods blend duplicated pixels of different values together, using mathematical algorithms designed specifically to maintain the authenticity of the image. The pixel blending used by these two methods surely makes the enlarged image more visually appealing. But, also, it does not alter the contextual value of the original image.

On the other hand, when reducing the size of an image and therefore removing pixels (rather than adding pixels) we are left with the issue of removing data. It may potentially deteriorate the appearance of depicted objects. This may not be such an issue when removing pixels from straight lines in an image, for example. However, it may be more so when removing pixels from diagonal lines, giving them an unwanted and inaccurate “jagged” appearance, which is otherwise known as aliasing. To deal with this issue, a fourth interpolation method, known as “Area”, has been developed specifically for the size reduction of images and the smoothening out of aliasing.

If you navigate to the Enhance tab within Replay and select the Resize option, you will now see a new Interpolation drop down menu. There, you will be able to select your preferred Interpolation method.
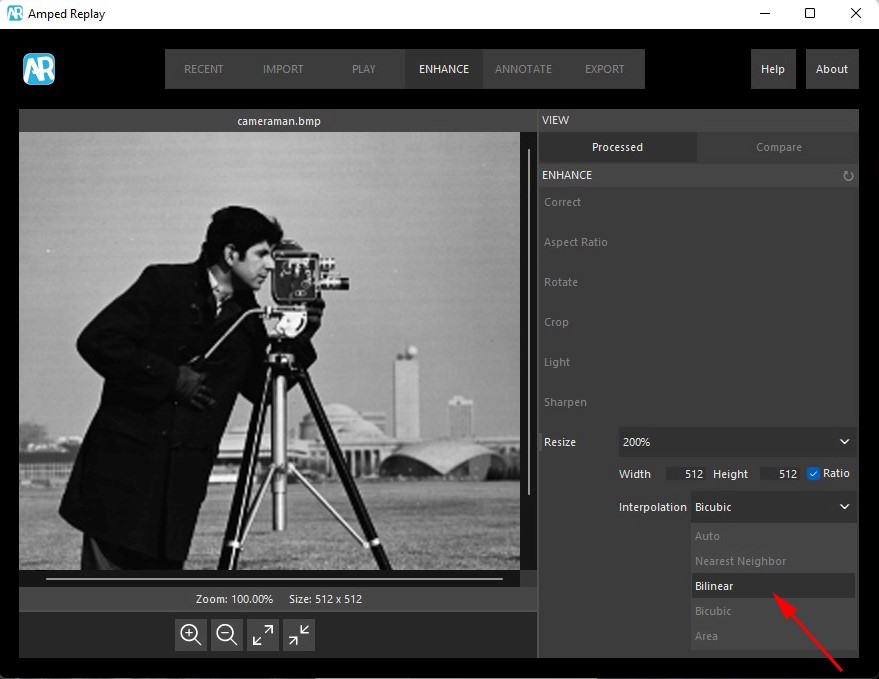
If you select the “Auto” option, Replay will choose the default interpolation method. When increasing the size of an image (setting Resize values bigger than 100%) this is set to “Bicubic”. When reducing the size of an image (setting Resize values smaller than 100%) this is set to “Area”. Alternatively, you can manually select the required interpolation method by selecting the remaining options in the drop down menu. You may, for example, choose the “Nearest Neighbor” method because you want to illustrate the most accurate representation of an image to your intended audience. The choice is yours!
It is important to know, however, that, whatever method you choose (including the “Auto” mode), the interpolation method selected will always be included in the Replay generated report for forensic clarity and correctness.
Aligning Annotations
In an effort to improve Replay’s video evidence presentation toolset, we have now added the ability to easily align annotations with the main landmarks of an image and/or with other annotation objects.
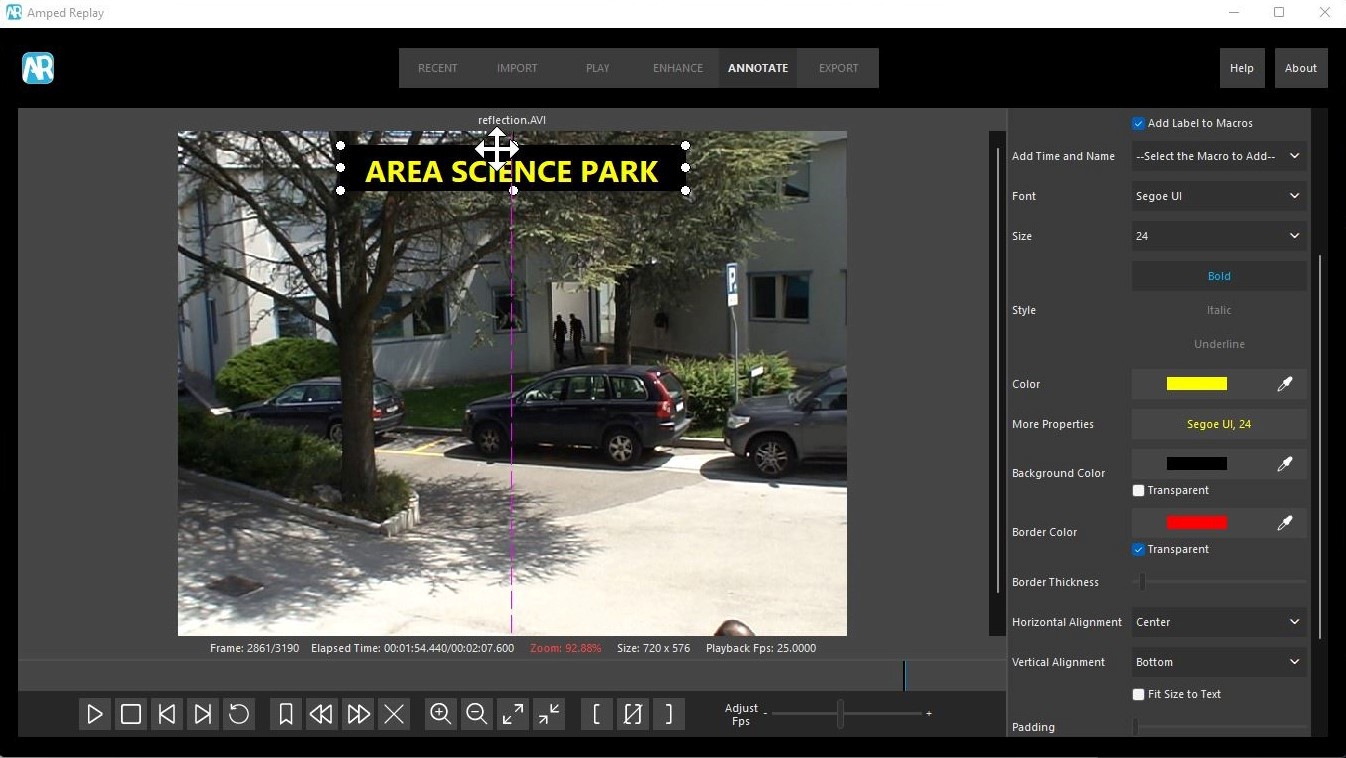
Once you have created an annotation of any type, you will now be able to position it in the center of an image, or in the middle axes, as shown in the example above. While dragging an annotation to these main areas, a magenta dashed line will appear and the annotation will snap into place. It is also now possible to align new annotations to existing annotation objects. The magenta dashed lines will also appear when hovering objects near the center or the edges of other annotations, as shown below.
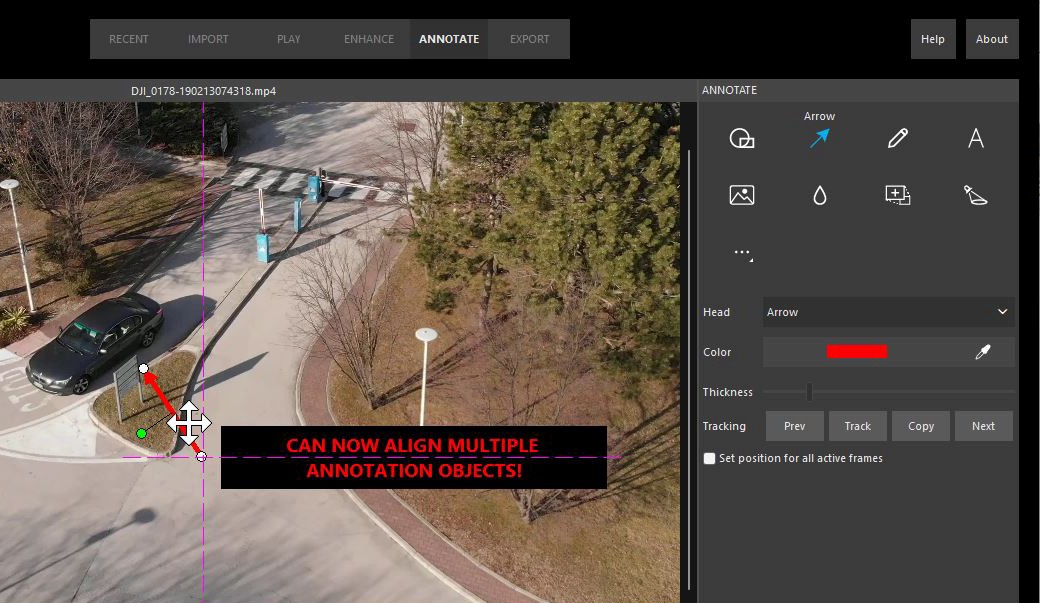
If you wish, you can also temporarily disable the snapping feature by holding the ALT key while moving the mouse.
Default File Names for Exported Files
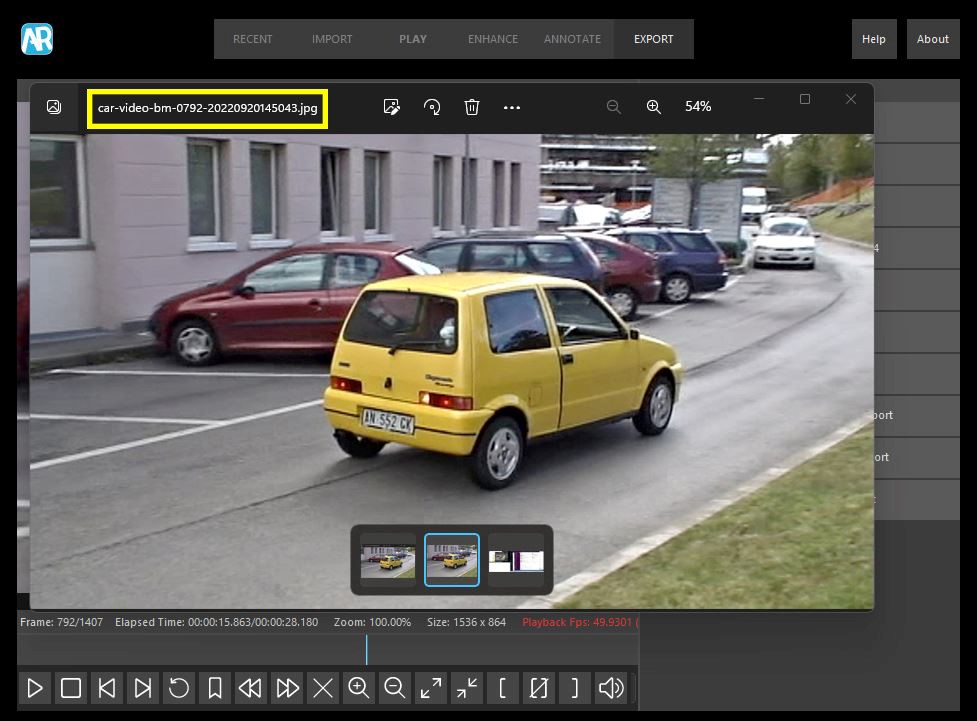
Project management is of paramount importance when working with any digital forensic application. So, in this update, we have also improved the naming convention for exported images and videos.
When you export images (including bookmarks) and videos from Replay (both original and processed), you will now have information included within the file name as to where they come from and when they were created. For images exported from a video, there will also be a clear indication of what frame number was selected.
Keyboard Shortcuts
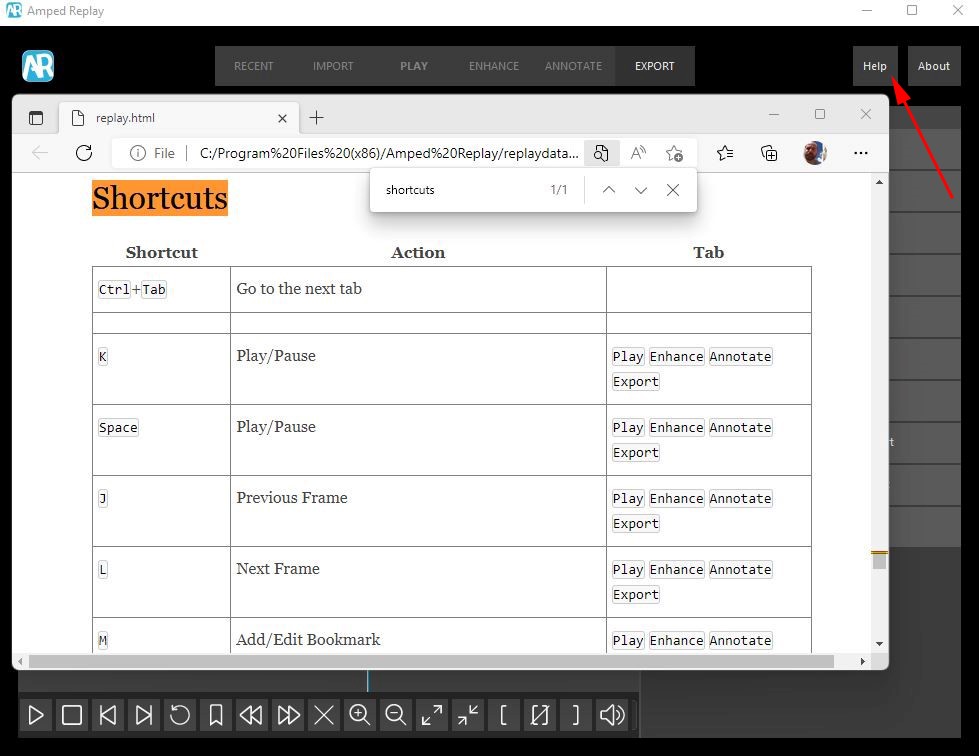
We know many users prefer to work with keyboard shortcuts when using their favorite desktop applications. In this update, we have now included a detailed list of all the available keyboard shortcuts and their corresponding functions in the embedded Help documentation.
To access this list, simply click on the Help button in Replay. This will open the HTML help document in your default browser. Within the HTML, find the Shortcuts near the end of the document or simply search for the keyword “Shortcuts” (in most browsers, searches can be performed by pressing CTRL + F together).
Exporting Projects and Media Items to the same Location
When saving a Replay project, it may be a good idea to save any associated media clips in the same location as the ARP project file. This can be particularly useful when transferring projects to another machine or an online location. Any broken links between a project and its associated media items can cause issues opening that project. That’s why, in this Replay update, when you are saving a project, you are now presented with the option to copy the media item(s) associated with that project in the same folder.

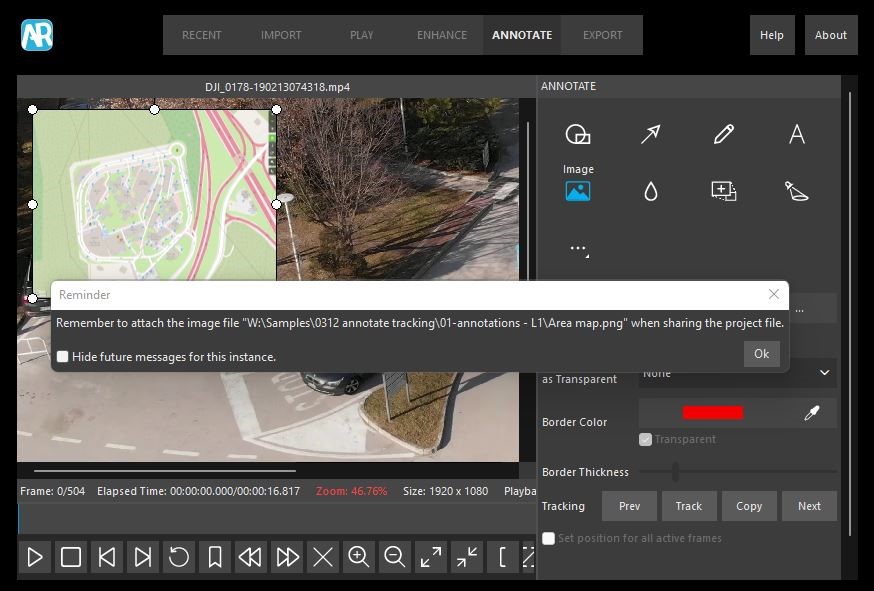
Add Image Reminder
Last, but not least, when adding an image annotation, you will now be reminded via a pop-up window to copy the image in your project folder. If this is not done, and the project is later shared online or with another user, the annotated image will be missing. You also have the option to acknowledge the message and to hide future reminders, if you so wish.
Formats
Support for new proprietary video formats remains a priority at Amped. With every product update, we offer compatibility with a number of formats not previously supported. And this Replay update is certainly no exception.
In this update we have added support for:
- 4 new file extensions (ami, amv, cbf, ubv)
- 1 new variation of already-supported formats (exe)
- 3 new timestamp formats (ami, amv, ubv)
- 3 new variations of already-supported timestamp formats (dvt, exe, sec)
- 1 new audio format (ubv)
- 1 new variation of already-supported audio formats (data).
Remember: if you find a video file that we don’t fully support, then there is a good chance we have never seen it before! Hop over to the Amped Support Portal, upload it , and we will get straight on it. This not only helps you out but the entire Amped community. The best part? This is all included in an active Software and Maintenance Support plan.
Other Improvements
- When using Export Original Video as MP4 and Export Processed Video as MP4, the AAC audio codec will always be used for better compatibility.
- We have added information about the color of annotation objects to the Report.
- We have improved the synchronization between audio and video streams.
- We updated the lookup table used by the Light filter when working in manual mode.
Bugs
- Fixed a bug causing scaling and interpolation in 1-to-1 pixel renderings when the user configured “Scale and layout” monitor settings to a value higher than 100%.
- Fixed a bug causing repeated reporting of the warning “iCCP: known incorrect sRGB profile” when a defective PNG image is used; now the user can hide future messages of the same type.
- Fixed a bug causing the selected annotation’s range to expand to the whole video length if playback is active and the play head reaches the end.
- Fixed a bug causing invalid/empty Magnify object because of too big an image.
- Fixed a bug causing an incorrect rotation angle to be shown in the report.
- Fixed a bug in Export Processed Video as MP4 causing possible color and frame shift in the output video if the frame size was not multiple of 4.
The Final Word
Replay overcomes the challenges of a limited toolset often encountered by police officers and detectives throughout the world. It protects them with the forensic rigor required in today’s legal environment and speeds up investigations. Forensic Video Analysts and Technicians have benefited from Amped FIVE for many years. The common toolset is now available for everyone within Replay. If you are lucky enough to have Replay on your desktop, then update today or send us an email at info@ampedsoftware.com.
Don’t Delay – Update Today
If you have an active support plan you can update straight away by going into the menu About > Check for Updates within Amped Replay. If you need to renew your SMS plan, please contact us or one of our authorized distributors. And remember that you can always manage your license and requests from the Amped Support Portal.