
Hi again everyone. Yes, it’s another update to Amped FIVE, and yes it’s another big one. We are committed to making FIVE the best it can be for you. Your time is valuable so we are working hard to ensure that you can work more effectively within FIVE. Several of the new updates here are direct user requests and relate directly to a faster and simpler workflow.
So, grab yourself a cup of coffee and read on to find out more.
See the New Features in Action!
Video Loader: Chroma Upsampling
Very high-resolution videos are becoming ubiquitous, and being able to play them back at their correct speed is important. This release of Amped FIVE brings a new feature within the Video Loader that will speed up video decoding when required, and thereby enable real-time playback of many more videos.
Most videos are recorded in the YUV420 or YUV422 pixel format, which means that some color (chroma) information is discarded during compression within the encoding process. When the video is subsequently decoded during playback, the discarded color values need to be interpolated to recreate full frames. FIVE has always utilized an interpolation method using accurate rounding routines which are computationally very intensive and therefore make real-time playback of many hi-res videos unfeasible. In this update, we have added the option to change the chroma upsampling to the standard used within the FFMPEG multimedia framework. With the calculations being less intensive, faster playback can therefore be achieved. You can switch between the two options using Video Loader‘s new Chroma Upsampling parameter, in the same way as you have been able to switch and observe differences in Color Range decoding.
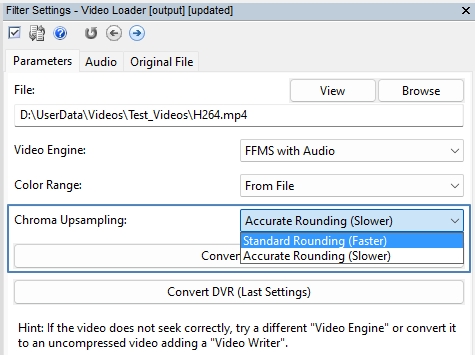
Important: Switching between the two options will obviously affect the pixel values produced.
After extensive testing, we concluded that the difference between the two methods is visually negligible. On average, comparing videos decoded with Standard Rounding versus Accurate Rounding gives a PSNR (Peak Signal-to-Nose Ratio) of more than 45 dB, and a mean SAD (Sum of Absolute Differences) of approx. 1.5.
Here we have two chains, where we decode the same video, one with Standard Rounding and the other with Accurate Rounding.

After using Video Mixer, we can observe the differences, not only visually within the Blend options but, numerically within the Similarity tab.
The differences are not visible and do not change the authenticity of this particular video with regard to the questions being asked of it. Therefore, the benefits of real-time playback massively outweigh the invisible improvement in the computation of pixel values.
For example, it may be required to view, annotate, bookmark and output a video for court. This workflow has now become much faster thanks to the option for Chroma Upsampling.
If, however, the same video is required to be analyzed at a pixel level for an object or incident, then Accurate Rounding can be selected after loading the video into a new chain.
Within Program Options, you will also find the ability to select the default Chroma Upsampling algorithm used by the Video Loader filters.

Import Options
As users will know, FIVE is a hugely flexible application. With so many different use cases and forms of multimedia, the initial stages of any project can be complex. To simplify the import process, we have developed a series of new automation functions to make your life easier at this critical stage.
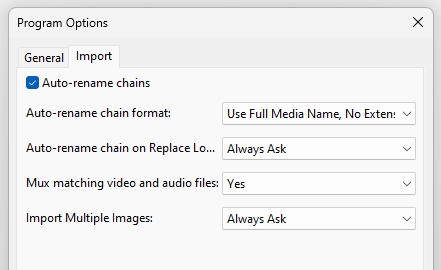
Program Options is now divided into two tabs, with a new one dedicated to Import.
Let us look at each of these new options separately.
Auto-rename chains checkbox
You can disable any auto-renaming simply by deselecting this box. The following two Auto-rename options will then be greyed out.
When enabled, the first option relates to how you will auto-rename your chains.
Auto-rename chain format
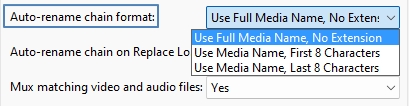
When loading files into FIVE, either with drag and drop, or other loading methods, you can now select how to auto-rename the chains. In most cases, the full filename may be suitable, but for some, this may be quite long. To assist you, you now have the option to choose the first or the last part of the filename.
Auto-rename chain on Replace Loader
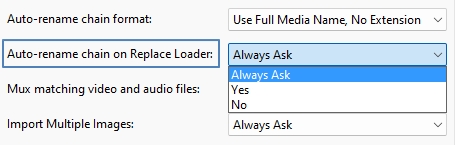
Very often, you may want to replace the loaded file with another one. Or, you may copy the loader to work with it in a different filter chain. This option is set by default to “Always Ask”. However, you can override this and either set it to “Yes”, or “No”.
The auto-renaming will then match the format selected.
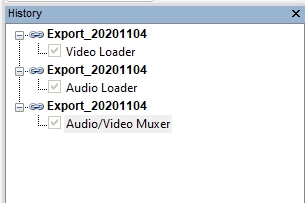
Mux matching video and audio files
One method that several CCTV companies use for exporting video and audio streams is to separate them into individual files. You may also have used Convert DVR on a proprietary file and selected to place any detected audio into a separate stream.
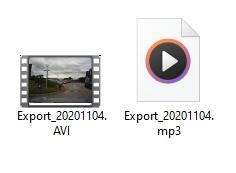
Here we have two files from a dashcam export. Notice that the filename is the same, it is only the extensions that are different.
When you load files like this into FIVE now, if you have this new option set to “Yes”, the matching filenames will be autodetected and the Audio/Video Muxer filter will be loaded automatically after the files.
Import Multiple Images
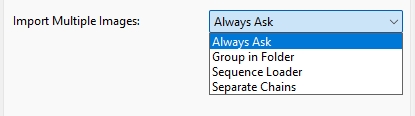
If you load multiple images into FIVE, you now have 4 options, with the first being to always ask what you want to do. If your workflow changes on a case-by-case basis, having this set to the “Always Ask” option may be the easiest thing for you. However, if you only use FIVE for images, such as those people within the fingerprint or footwear mark labs, having this set to “Separate Chains”, or “Group in Folder” will speed up your loading considerably.
When “Group in Folder” is selected, the folder name will be automatically obtained from the originating directory.
Proprietary Multistream Videos
Finally, in this update to the importation of media, we have made some changes to the handling of proprietary multistream videos.
Many CCTV manufacturers fail to adhere to standards and store multiple video, audio, timestamps, and metadata in a proprietary format. When a format of this type is identified we must develop a decoder to deal with it, and this is then added to the Amped Conversion Engine. Users are then able to decode the video and associated data correctly without interference or unnecessary re-capturing, processing, or transcoding.
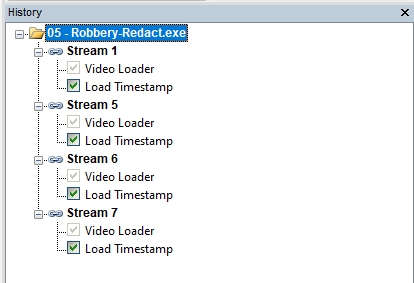
When you now load a video of this type into FIVE, and after you have selected your conversion requirements, all the extracted streams will appear inside a folder named as the original file. The chain names will correspond to the stream number. If there were no information within the file regarding the stream number, you’ll find that FIVE will name and order the streams sequentially starting at “Stream 0”
Tools
In this update, to help you in locating some of the popular tools, we have moved them out of the File menu, and into their own dedicated Tools menu.
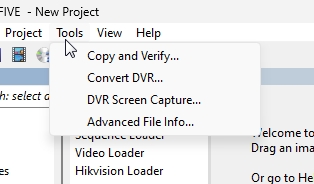
You will notice that the order fits the workflow of Copy, Convert, Capture and Analyze.
Link Filters
FIVE has several filters that enable users to “link” video files together, in many different ways, with the output being a single video. Multiview, Timeline, and Video Mixer for example. When working with multiple different chains, with each one having multiple filters, the list of input options can be quite large.
In this update, we have enabled drag & drop between the History Window and all of the Link filters parameters.
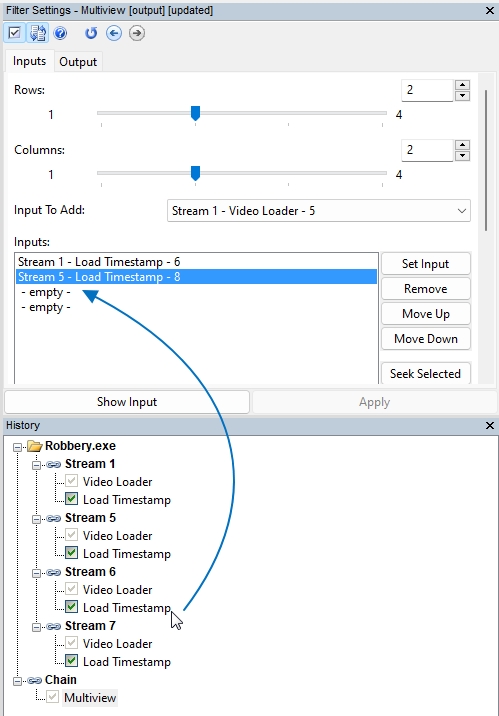
Users can now either use the filter’s “Input to Add” option or simply click the point in the chain and drag it into the filter’s parameters.
This is such a simple addition but makes building multi-views or timelines so much quicker. Remember also, that this works for all the Link filters, including Picture in Picture!
Rename Chain
We have now included the universal rename shortcut into History. By hitting F2 when you are working anywhere within a chain, the chain name will become active and immediately editable. No need to select it with your mouse, you can do it straight from the keyboard.
Annotate
Annotate allows for multiple texts, images, and graphical video overlays to be placed onto your demonstrative evidence. This filter is in constant development to ensure it meets the ever-changing needs of the community. In this update, we have enabled three new functions: Grouping, Alignment, and the Color Picker Eyedropper.
Grouping
It is common to have several annotations linked to the same subject. To simplify the placement and tracking, users can now select multiple objects with the Shift key and then “Group” them together. Grouping can be activated with a shortcut (Ctrl+G), or from the right-click menu.
When grouped, the group tracking can be managed by the new tracking control bar within the filter settings window.
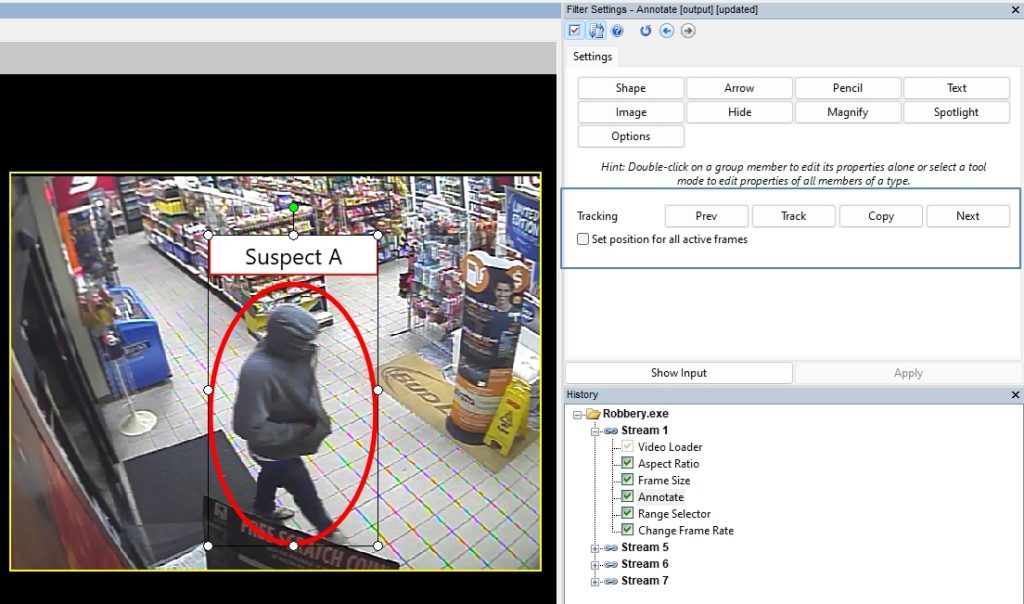
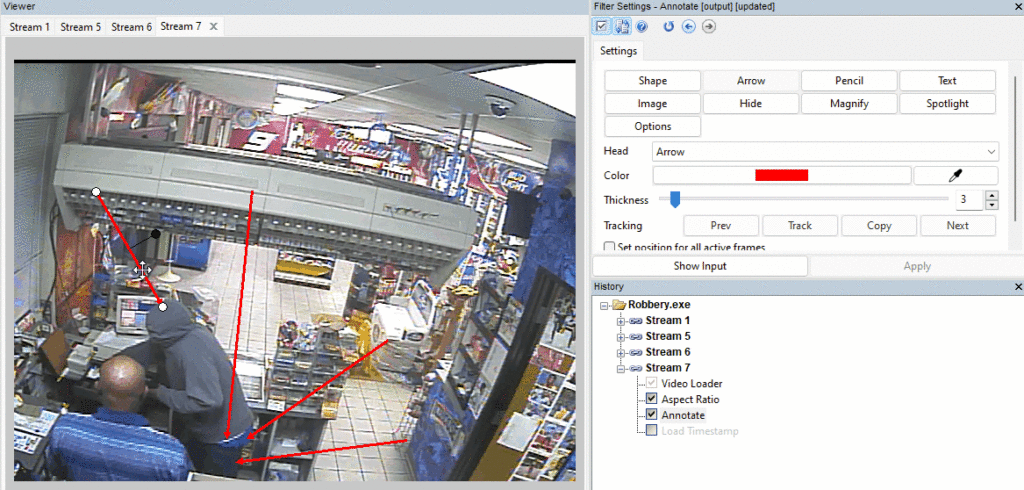
If all the objects in that group are the same type, you can edit and change them all at the same time by selecting that specific tool. This is very handy for arrows or pointers added during the creation of an image comparison chart for instance.
Alignment
When applying several annotations, and maybe grouping some together, the alignment of each object and their position within the video frame becomes important. Now, when you move objects around, vertical and horizontal alignment guides will appear.

Remember, it’s not just objects. You can also align to the Video Frame. No more guessing if it’s central!

Eyedropper
Selecting colors already in the image, or within other Annotations is now possible thanks to the Eyedropper tool within Annotate.
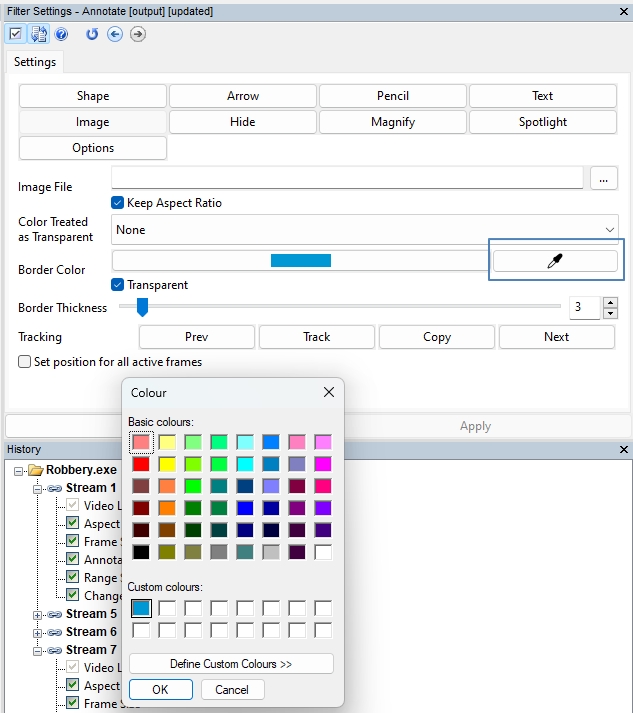
This is great if you want to match some Text to perhaps your agency’s logo. To make things even better, we then save these for you within the Custom Colors palette, so you don’t need to use the dropper again in future projects!
One last small thing with Annotate, before we move on.
If you select an image as an annotation, perhaps your agency logo, you will be reminded to include it with any sharing of the project.

As always, you can hide any future messages of this type whilst working on your project.
Connected to this, if you load a project and it cannot find an image used for annotation, you will be asked to relocate it, or simply delete that annotation.
Range Selector
Selecting a range of frames from a video is one of the most common functions. To speed up your workflow, we have added two new keyboard shortcuts.
Alt+I (In) and Alt+O (Out).
Wherever you are in a filter chain, selecting either of these shortcuts will automatically insert the Range Selector filter into the chain at that point. If you used the IN shortcut, your video will be trimmed to start at the point where your scrub bar was positioned. If you now scrub to your required endpoint and use the OUT shortcut, your Range Selector will be amended to end at that point.
If you selected Alt+O to start with, your video would start at frame 0, but now end where you selected.
The shortcut has a toggle function. This means that if you press it twice, it will return to the previous state. For instance, if you start at frame 0, scrub to frame 928, and then hit Alt+I, you will be starting a frame range at frame 928. Using Alt+I without moving the scrub bar will revert your point back to the original frame 0.
Two simple shortcuts that make selecting ranges so much quicker.
Crop
This is another common function, and we are introducing another change to speed up your casework.
Within the Crop filter parameters, you will now find a dropdown with Size Presets. You will only see the sizes smaller than your current video size.
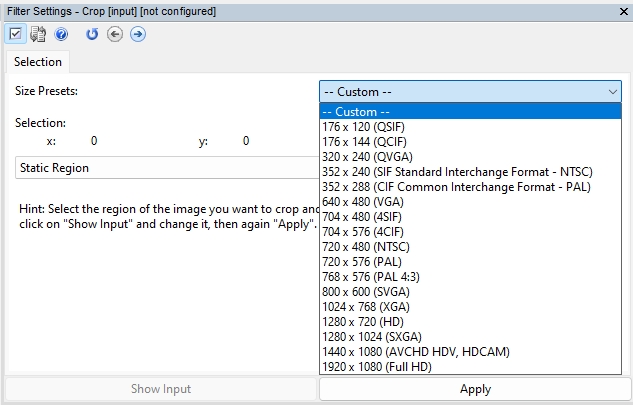
Selecting the preset required will then add the chosen WxH to your Selector tool automatically. You can move it around to cover your chosen area, or you can use the new Center Button within the Selector tool.
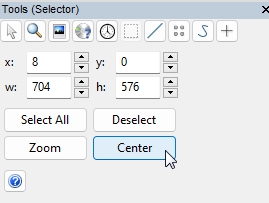
A centralized crop is particularly helpful when selecting analog video active areas before adjusting the Aspect Ratio.
Frame Size
More presets have been added here, but not for video output, this time they are for printing.
Many users still have to print out images and documents for including in reports, briefings, or jury bundles. To assist you in this process we have added a new dropdown of Print Presets.

It is now so quick to prepare a Frame-by-Frame Image Chart for presentation on the screen, and after chain duplication, it can be prepared for printing, for immediate inclusion in court papers.
Video Writer
Following on from the previous update to Amped FIVE, we have continued working inside Video Writer to make things easier for you and provide another important option for encoding and video writing.
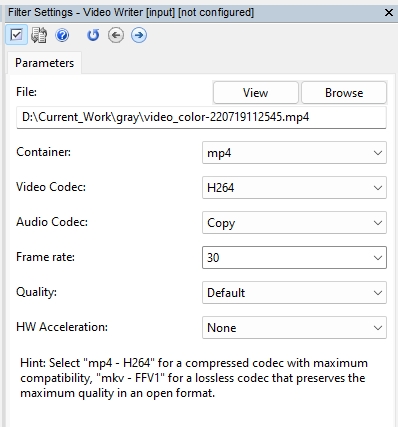
You will now see that the container options and the codec options are separated, making it easier to select different options if required.
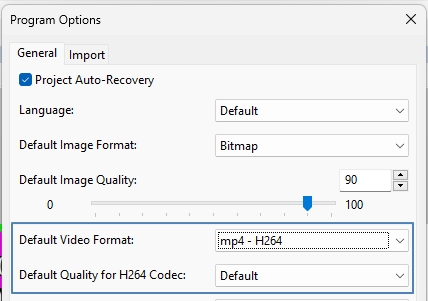
Remember, you can set your defaults within Program Options.
You will also now see an Audio Codec option that will be available if an audio stream is detected.
If you attempt to select a configuration that is not supported by either the container format or the codec, then a message will appear.

You can accept the selected combination or attempt another one.
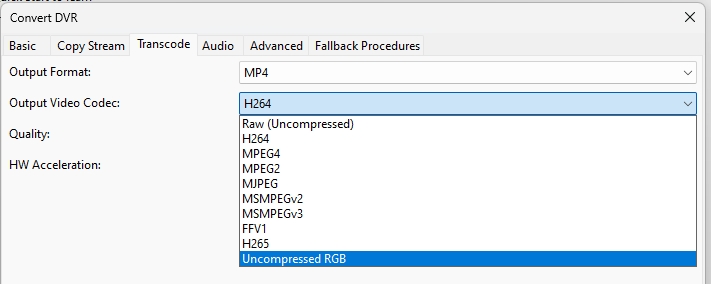
In this update, we have also added another new codec: “Uncompressed RGB” has no chroma subsampling and will therefore be completely lossless. It will though be very large.
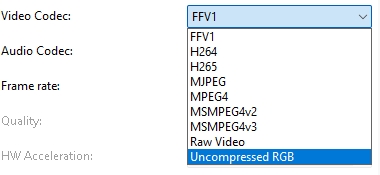
This differs from the “Raw Video” option as although this is a YUV stream, the U and V channels are subsampled for compatibility.
FIVE now has 2 lossless formats, one that uses compression, FFV1, and one that does not (Uncompressed RGB). Having both gives you options to compare and validate any writing standards within your department.
If you are conducting any writing validation, it is important to use the Video Writer filter, rather than Convert DVR or Export Video. This will ensure that any decoding parameters are read correctly and, most importantly, in the same manner as the test video.
Convert DVR
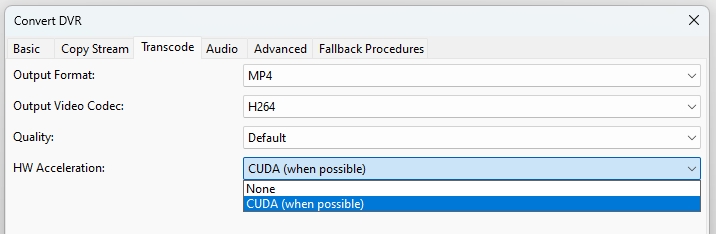
The new Uncompressed RGB Codec has also now been enabled in Convert DVR.
Also, following on from the previous Amped FIVE Update, and the addition of Hardware Acceleration within Video Writer, we have now added this into Convert DVR too.
Demultiplexer
A popular filter, even though many systems are now multiple streams rather than images, Demultiplexer is still used a lot with digitized analog or image-based recordings.
After assisting several agencies over the past few months we have automated some of the naming and folder creation processes.
The filter has always had the ability to write all the detected scenes into separate files.
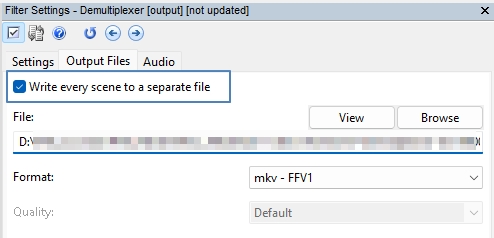
From this update, if all the scenes are written a once, all the new files will be placed directly into a folder called “Demultiplexed”.
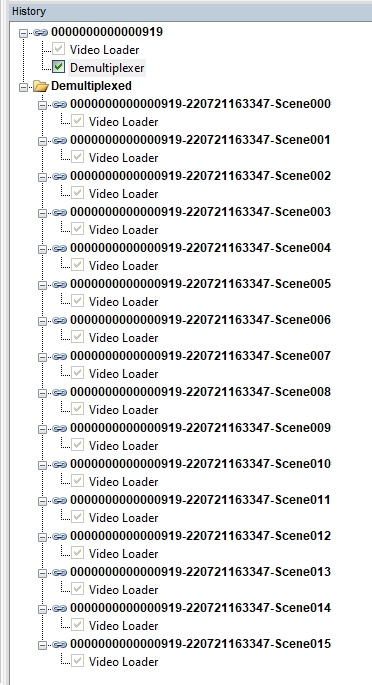
All scenes will be named with the original filename and scene number.
This makes it so much easier to deal with all the various scenes, and perhaps then load in the Multiview filter to display several together. Simply closing the folder tidies up your History Window, allowing you to work on what is required.
Speed Estimation 2d
It has been great to hear so much positive feedback from the forensic collision investigation community and their use of Speed Estimation 2d. One request was to export both the frame numbers used from any selected range and also the original frame numbers from the evidential media.

From this update, when you export all the calculation data, you will see two columns of frame data. One from the range used, and one showing the original frame number. This will help if calculations are being peer-reviewed or analyzed by another analyst and they have selected a different frame range.
Another request was to offset any new speed annotations, so they are easily seen and, importantly, any accidental extra annotations can be visualized and removed if required.
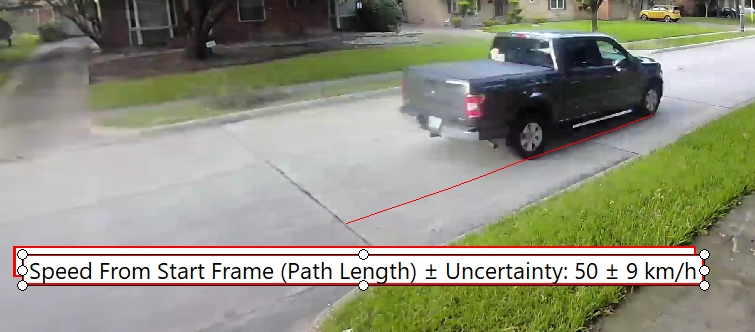
In this release, when you select New Measurement from within the Speed tab, if a previous measurement is detected, your new one will be offset slightly, making both visible.
Text Macros
Text Macros are very powerful features found within Add Text, Annotate, and Speed Estimation 2d. In this update, we have added a new one and changed the name of an old one.

$FILEPATH used to be Filename (No Path). The change has been made to make it easier to differentiate the two File Macros and negate any need to edit the title when used.
The new Macro, $ORIGINALFILENAME, can now be used when Convert DVR has created new files from a proprietary container. This macro will show the original filename, rather than the newly created one.
Updating Filter
Every time you load a new project, all chains and filters are reproduced. From this update, you will now see what chain and filter are being processed within the Updating Filter window.
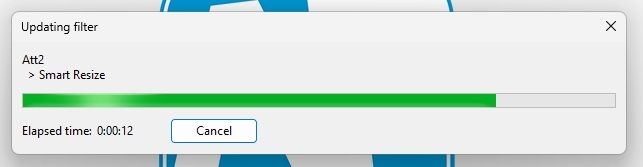
You can see here, that the chain called “Att2” is currently being rebuilt, and the filter being processed is Smart Resize.
Seeing this information is a great help when a large project is loading.
Formats
Several new format variations have been included in this update. Worthy of particular note has been the decoding of multiple DVT formats and their timestamps.
Remember, if you receive a file that requires the use of Fallback Procedures, or is unable to be correctly decoded, please contact us through the Amped Support Portal so we can get to work and add it to the powerful Amped Conversion Engine. This not only benefits you but all of the worldwide Amped community.
Stop Button
We have tidied up the Player panel and removed the Stop button.
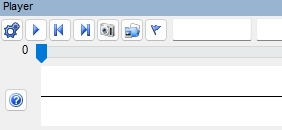
Your video will either be playing or paused. Remember, you can control playback with the button in the Player window, the K keyboard shortcut, or the SPACE bar.
The Stop button was a little under-used so, after speaking with a few users, we decided on sending it to the recycle bin!
HiDPI Mode
This is also no longer required as HiDPI is now fully auto-detected. As a consequence, the option for controlling this has been removed from the Program Options.
FLV Codec
Here we say a final goodbye to the FLV Codec. Goodbye Flash Video!
Bugs
Finally, we have the bug fixes.
- Video Writer: fixed a bug causing a “Path file is invalid” error when writing videos with large frames (8K or more) and CUDA acceleration is enabled.
- Player Panel: now when going to the previous frame (button click or keyboard shortcut J), the frame audio chunk is played backward.
- Resize 1:1, Viewer Panel: fixed a bug causing scaling and interpolation in 1-to-1 pixel renderings when the user disabled HiDPI Mode and configured “Scale and layout” monitor settings to a value higher than 100%; now that HiDPI Mode is fully autodetected, the program option is obsolete and has been removed.
- Annotate: fixed a bug causing invalid/empty Magnify object when the images was too big.
- History Panel: fixed a bug causing a drag/drop clone to point to a wrong input filter (original filter’s input, rather than drop destination).
- Blank Video: fixed a bug that was permitting the creation of pathological videos with a length of zero frames; now the minimal length is 1 frame.
- Timeline: fixed a bug that was causing wrong playback speed when the filter is used together with Add Timestamp.
- Convert Frame Rate: fixed a bug that was causing incorrect audio resampling.
Don’t Delay – Update Today
If you have an active support plan you can update straight away by going into the menu About > Check for Updates within Amped FIVE. If you need to renew your SMS plan, please contact us or one of our authorized partners. And remember that you can always manage your license and requests from the Amped Support Portal.


