We never stop here at Amped so here we are again with another software update. This time to the enhanced video player for everyday policing, Amped Replay.
Officers and police staff need to review and perform basic tasks with CCTV, dashcam footage, body-worn video, and footage from cell phones. However, they also need to do this quickly and, most importantly, adhere to forensic guidelines.
This is where Replay comes in. Using the powerful Amped Conversion Engine, allowing the lossless extraction of video from proprietary formats, and then utilizing an easy to use selection of forensic filters and annotation tools, users can expedite their video evidence, knowing that they are being protected with a science-based workflow acceptable within the criminal justice systems.
Let us see what’s new:
Admin Settings
The Admin settings file for Replay is a very powerful configurator, designed to assist IT departments in the rollout of Replay within an organization. You can learn more about it in this recent ‘Tip Tuesday’ blog post.
When a new version of Replay is installed, users will now be informed of a new admin file, and they will have the choice of what to do. They can keep their customized version, or change to the new one.
The latest addition to the Admin settings file is the ability to store a default still image format.
The default is JPG, but if required by your organization, this can be changed to either PNG or BMP.
Enriched File Info for Converted Files
Whenever Replay automatically converts a video, you will now see both the name and path to the original file, plus the converted file created by the software.
If the path is too long to fit the panel, just move the mouse over it to see it extended.
Timestamp Based Playback
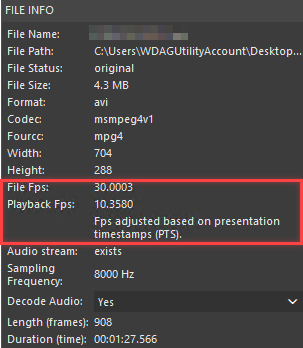
If a video is loaded and it includes timestamps, we will scan this data to ensure the frame and timestamp values match. After loading, the speed of playback will be controlled by the timestamp. This is a huge benefit to Replay users as many proprietary video files are controlled by the time data and not the file’s internal frame rate. The automatic playback speed adjustment will be documented in the File Info panel:
If, however, the frame and time values do not match, users will have the option of either loading or not.
There are many valid reasons why discrepancies can occur in the frame/time data.
In the example above, several camera files have been extracted and they have a single timestamp. The timestamp must cover all the camera video streams but these have slightly different frame counts. As a consequence, this camera has 2 frames less than the timestamp.
You may also find that a CCTV manufacturer only adds a timestamp to certain frame types.
If there are fewer timestamps than frames, the timestamp can be loaded but no frame rate adjustment will occur.
Automatic playback speed adjustment also happens when allowed by the presence of presentation timestamps (PTS), that is, time metadata stored in the video container. In such a case, the message in the File Info panel will change accordingly.
Fps Information
The Playback Frames per Second information has been moved from its position next to the adjustment slider, to the file information bar under the video.
Remember, this is the playback rate and not the file’s FPS value.
The different values are now clearly shown in the File Info panel.
If you adjust the Playback rate manually using the slider, it will turn red.
This should avoid you exporting a video that you had slowed down to review, but wish to export at the correct speed. You can always double click on the Adjust Fps text to restore the default File Fps or (when available) Playback Fps value as indicated in the File Info panel.
Reporting of FPS Changes
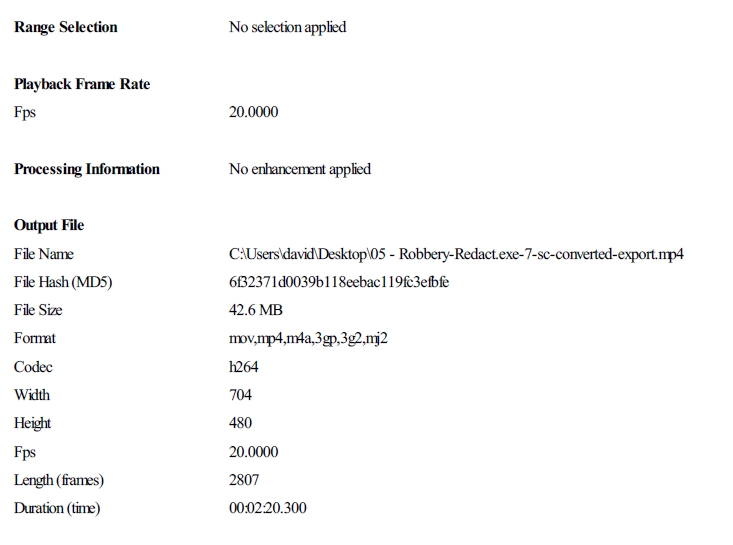
Whenever the speed is changed, either caused manually by a user or automatically adjusted to match a timestamp, the new FPS details will be documented in any report as Playback Frame Rate.
When the change was done automatically, the new value and its source will be reported, just as we saw above for the File Info panel.
Also, if the project is saved but no file is exported, the changed playback speed will be retained within the project’s settings.
Exporting Videos With Auto-Adjusted Playback Fps
Whenever you try to export a video whose FPS was automatically adjusted, you should keep in mind that using Export Original Video as AVI or Export Original Video as MP4 might not reflect the adjustment in the created video: the exported video would thus retain the File Fps that was indicated in the File Info panel, not the Playback Fps.
Also, when you have an auto-adjusted playback speed, using Export Original Video (both as AVI or MP4) is not the best choice if you want to export just a range of frames, as the exported range could be less precise.
Both the above issues are solved if you choose Export Processed Video as MP4. To help you remind all of this, we included a new warning message that appears when a video with auto-adjusted Fps is being exported using Export Original Video.
Output File Information
When a file is exported, the information relating to the output file is now included within the report.
This works both when you export a video/image and when you export all bookmarks, in which case, you’ll get a separate section for each bookmark in the report.
This ensures that the report correctly documents what was opened, what actions were conducted, and what was created.
Annotate – Tracking
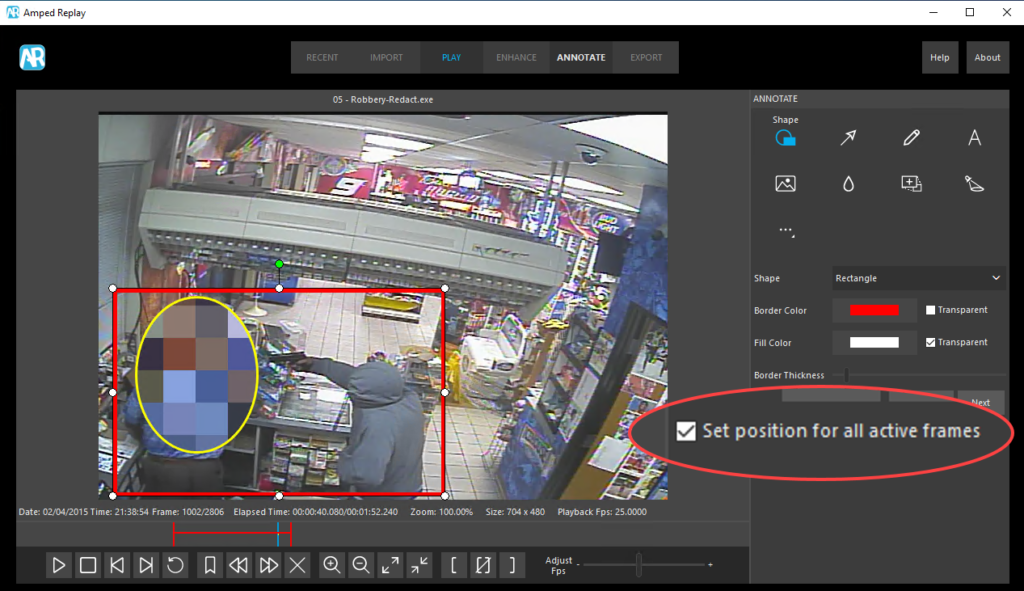
A simple checkbox now turns off tracking.
If you wish to keep an annotation in that same position, selecting this option will now deactivate any tracking and movement changes. It is great for boxes and text that need to stay in a set position throughout their active frame range.
Annotate – Date and Time Format
Users are now able to select their preferred format for the display of date and time information.
Under the Annotate options, you will find the dropdowns for how to display the timestamp data. There are various formatting choices and there is a tooltip to help you by hovering over the text.
Bugs
One or two bugs always creep in and this update has fixes for:
- wrong frame to timestamp association when video frames are missing.
- application crash when attempting to add Date and Time information when no timestamp data loaded.
- last frame being trimmed when exporting as MP4
- presenting the audio codec instead of the video codec when stream mapping was non-standard.
Final Thoughts
It is amazing to see how Amped Replay has grown in the last few years. From an idea to help front-line police officers and investigators, to an extremely powerful video player with all the forensic conversion and enhancement tools they need to quickly deal with their visual evidence. Every day across the world, officers are having to risk the integrity of their evidence by using transcoded and changed video. They may not be informed that the evidence they are viewing has been changed, they are limited on what can be achieved and are then forced to either accept that or send the simple case to their over-worked and under-staffed forensic video unit.
If all this sounds familiar, then you or your officers need Amped Replay.
It is even more of a necessity in countries that are regulated, ensuring that visual evidence is managed forensically, even when not directly by a forensic unit.
Don’t Delay – Update Today
If you have an active support plan you can update straight away by going into the menu About > Check for Updates within Amped Replay. If you need to renew your SMS plan, please contact us or one of our authorized distributors. And remember that you can always manage your license and requests from the customer support portal.


