
One of the most important additions in the latest Amped FIVE Update 21826 is the Adjust Timestamp filter. In this post, we look at its importance and go through all the adjustment types.
Timestamps are either supplied along with a video file or have to be extracted from a proprietary container during the cleaning and conversion process that happens within Amped FIVE. Timestamps relating to surveillance video are often wrong and/or incomplete, perhaps only displaying once per second. They may also display the same time for a series of frames.
To preserve forensic integrity, and allow various display options, we must complete any changes to this data within a new step, so welcome to the Adjust Timestamp filter! You now have the option of showing two timestamps: the original and the adjusted.
There are many reasons why you may need to adjust a timestamp so let us take a look at this valuable new filter and then go through some scenarios.
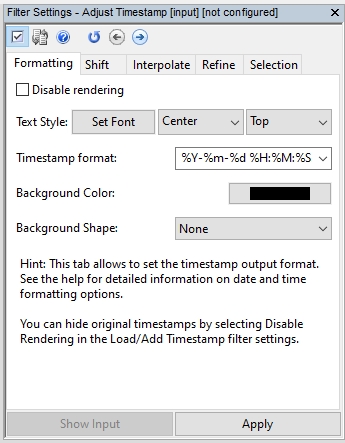
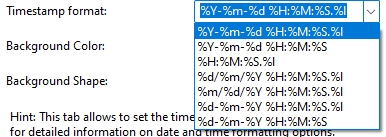
The first tab manages the formatting of the new timestamp. The controls are the same as in other filters so you should feel right at home here. It is a good idea, if displaying two, to perhaps using a different font or background color. Or add some text beforehand using the Add Text filter and the new macros.
The Shift tab allows us to make simple changes to the timestamp.
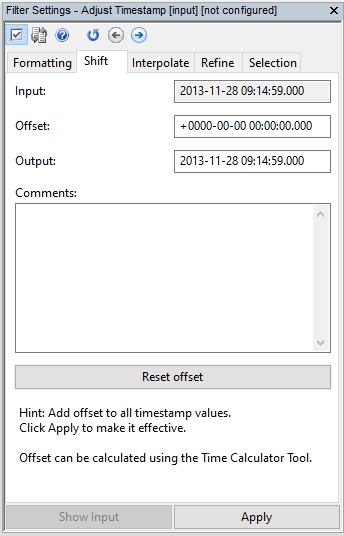
This tab deals with our first two scenarios: incorrect time on the DVR and timezone adjustment.
CCTV Systems are rarely displaying an accurate time. When the footage relates to the timing of an incident, displaying the incorrect time can be very problematic.
Many systems also store their date and time information with no adjustment for where in the world they are. It is the recording device or player that calculates the difference and then displays the correct time according to the settings. Let us look at the timezone adjustment first.
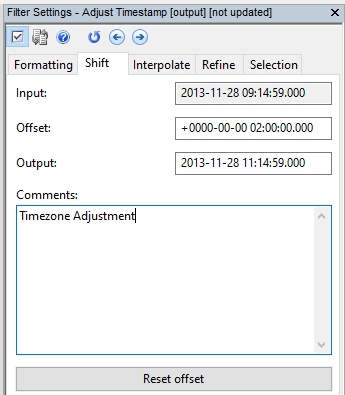
In the example above, the output time was simply changed to 11 AM from the original 9 AM. As a consequence, the Offset calculation was performed, showing an increase of 2 Hours.
Users are able to calculate an offset using the new Time Calculator tool and then paste that value in as well. The Offset and Output seamlessly interact.
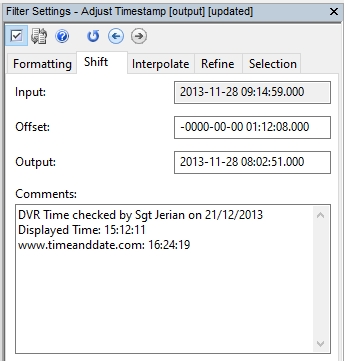
The Comments box is there for you to document the reason for shifting. This is vital if an offset has been calculated by another officer or technician at the time of acquisition. Users are then able to enter that person’s details and the relevant data used for the calculation. This is retained within the project and within any subsequent report.
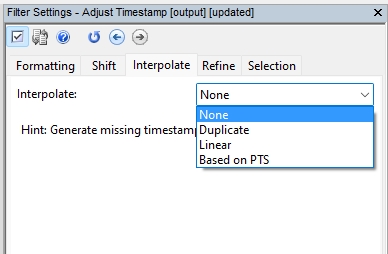
Next, we have the Interpolate tab where, as you can see from the dropdown, we have 4 options.
To help us understand why interpolation may be needed, let us have a look at this timestamp, which has been extracted from the proprietary format using the Amped Conversion Engine within the Convert DVR tool.
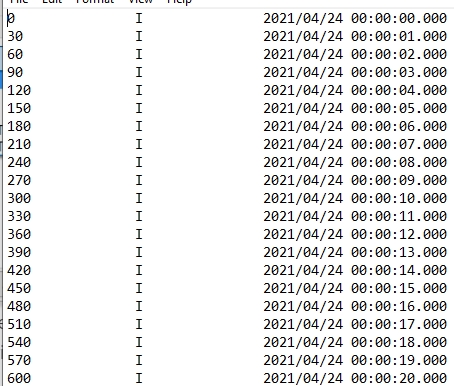
The timestamp data is associated with every I frame, and there is an I frame every 30 frames. The timestamps are increasing every second, starting at midnight. If we did not adjust this timestamp, it would only be visible on the I frames. Proprietary CCTV players often interpolate behind the scenes and you never know if they have, or how. Within Amped FIVE, you control the decision to interpolate missing values, and also how.
The dropdown menu gives us access to the Interpolation options:
- None: This will not generate any new timestamps.
- Duplicate: This will generate new timestamps for all the frames where there is no timestamp, but it will duplicate the values, so all of a single second will end in 000ms.
- Linear: This will generate new timestamp values for all the frames where there is no timestamp, and it will calculate the missing values using a linear calculation. So in our example above, the milliseconds would increase by 0.033 ms per frame.
- Based on PTS: This will use the Presentation Time Stamp (PTS) that may be present within the video file. This is different from the Date and Time information that tells you when an incident has occurred in real-time. The PTS controls the playback of the video stream and allows for synchronization between other video streams and perhaps audio. Using the PTS to calculate the frame timing can ensure that frame duration differences are correctly presented.
Before we look in detail at the PTS option, let us look at the next tab: Refine. This tab is used to increase the precision of the timestamp.
In the following timestamp, there is a value for every frame, but they all have 000ms.
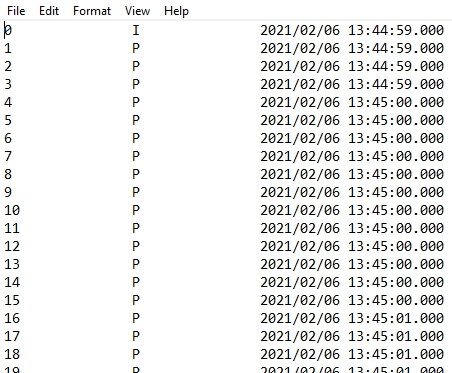
This is a common scenario, and I would guess that at the time of forensic acquisition from the CCTV device, the start time entered was 13:45 Hrs. So why does it start at 13:44:59? Well, the video would have to start at an I frame, so we have a few frames relating to the second before. We are also able to see that we have 12 timestamps for a second.
Using the Refine tab allows us to present the milliseconds within the timestamp and uses the same dropdown options as for the Interpolate tab:
- None: This will not refine any timestamps.
- Linear: If we were to use all the frames, and used this option, the milliseconds would be calculated using the seconds. In the case above, this would be wrong. As we are not starting exactly on the first frame of a second, Linear would calculate the first frames as having a duration of 250ms each.
- 13:44:59.000
- 13:44:59.250
- 13:44:59.500
- 13:44:59.750
- 13:45:00.000
If you removed the first 4 frames, perhaps using either the Range Selector or Remove Frames filter, then it would be possible to use Linear as each frame would then increase according to full seconds.
- 13:45:00.000
- 13:45:00.083
- 13:45:00.166
- 13:45:00.250
- etc.
This is where the final option can help, for both timestamp interpolation and refinement.
Based on PTS: By identifying the frame duration set within the stream’s metadata, it is possible to exploit this and display the milliseconds for all frames. The filter will scan forward to the first second change, and will then calculate backward using the PTS duration data. This will then result in the first frames displaying a correct millisecond value.
- 13:44:59.666
- 13:44:59.750
- 13:44:59.813
- 13:44:59.916
- 13:45:00.000
There may be situations where you have to use Interpolate > Duplicate first and then Refine the Duplicates. The filter is extremely flexible with many different possible configurations to suit various scenarios.
We have configured the filter in such a way that it’s able to read the PTS and match this to the correct frame even after duplicate or incorrect frames are removed.
Duplicate frames are often inserted by the decoder when the duration of the frame does not match that of the container’s timebase.
Look at the below example from the Advanced File Info Tool:

The timebase is set for 0.040ms per frame but, as can be seen from the highlighted extracted data, the PTS for each frame is often longer (PTS Duration calculated from Advanced File Info within MS Excel). As a result, the decoder may add in duplicate frames.
Therefore, if a single frames PTS Duration is 120ms, it will display the real frame, and then two duplicates. As the timestamp is per frame, it will not be shown on the duplicates.
An example chain for this scenario could be:
- Video Loader – Loads the CCTV
- Load Timestamp – Time file loaded automatically
- Remove Duplicates – Duplicate frames removed
- Adjust Timestamp – Refine Timestamp to the PTS
- Add Text – Show duration of each frame as text overlay
It is important to note that all the PTS values in Amped FIVE are truncated. This means that in FIVE they are shortened to the thousandth of a second. A full PTS value has 6 digits after the decimal point. So, for example, it may be 1.666667. In FIVE, you would then see a PTS value of 1.666. Some other software however may use rounding and would therefore display 1.667.
Understanding this will help if you see differences when conducting any cross-tool validation.
Before we move on, there is one last PTS issue to contend with: Reliability!
Firstly, you must ensure that your file, and particularly the video stream, has integrity and it is unchanged since the time of acquisition. Any transcoding or change of container, especially outside of a forensic environment, can cause the timing, or the presentation of that data, to change.
Then you have codec and container limitations. AVI for instance was not designed for variable frame rate video, and as such, the video streams PTS data will not be interpreted by this container format. If intending to analyze timing information, it is not advisable to use AVI as a video format. MPEG2 is decoded in a way to ensure video and audio synchronization. As such, decoders can dynamically adjust the frame rate to ensure sync. This is another reason why video DVD is no longer suitable for video evidence.
Finally, it is vital to understand the two types of video timing: Real-time & Video-time.
- Real-time: This is the date and time as displayed on a surveillance system, dashcam, or bodycam, where 60 Seconds equals 1 minute, etc.
- Video-time: This is how long a frame should be displayed. If one frame has a PTS of 1.080 and the next 1.120, then that image should be presented for 0.040 milliseconds. It would take 25 frames to last one second, or 1500 to cover a minute.
Here is the important bit!
If a surveillance manufacturer is using Real-time, controlled by their timestamp or an audio stream, to manage the speed and playback rate of their video, then we may not be able to rely on the video stream’s PTS data. The manufacturer may never have intended this to be used and it would therefore be unreliable.
However, you may want to look a little later at this post regarding frame rate.
We can see here that the PTS rate is the most reliable, and it is even possible to identify the frame timing pattern from it.

If the millisecond data is not reliable for any reason, by using Amped FIVE you have options not to use it and/or display it. All of the filters relating to time presentation in FIVE have formatting options.
PTS data, and its use within forensic video analysis, can be very powerful. At Amped we pride ourselves in empowering you with the analytical and presentation tools you require in your role. As with any tool, it must be learned and the data understood. To develop your knowledge, take a look at Amped Training.
This new filter links heavily with some of the new tools and functions found in the Amped FIVE Update 21826.
Don’t Delay – Update Today
If you have an active support plan you can update straight away by going into the menu About > Check for Updates within Amped FIVE. If you need to renew your SMS plan, please contact us or one of our authorized partners. And remember that you can always manage your license and requests from the customer support portal.


