Dear friends, welcome to the weekly appointment with the “How do I do this?” series! Playing a video frame-by-frame is an essential yet invaluable feature for video forensics. And when you spot something interesting, you’ll want to save that position and possibly add comments to relevant stills. We’ll see how all of this can be done with Amped Replay in a moment. Keep reading!
Long story short: in Amped Replay, press “J” to move back by one frame and “K” to move forward. Press “M” to bookmark a frame, and press it again to add a comment to the bookmark.
For some mysterious reason, many important and dramatic things tend to happen quickly. Someone being hit by a vehicle, someone firing a gun, a suspect fleeing whose face becomes visible only in one exact moment. There are numerous cases where the most important piece of evidence is sitting in just a single frame of a video. For this reason, while it is important to watch the video at its original speed, it is nonetheless fundamental to be able to examine every single frame.
On top of that, remember that most players may skip frames during playback in order to keep pace with the video speed. This usually happens when the video is at high resolution and the computer can’t decode and play every frame at the nominal frame per second speed. So watching the video at the original speed is important. But then you need to focus on the key moments and be sure you’re not missing any piece of information.
Now, with most consumer players frame-by-frame playback is either not supported or somewhat hidden. Many are also unable to go backwards due to how most video is constructed. In Amped Replay however, frame accurate navigation is readily available both in the player bar, and through keyboard shortcuts.
You can also hold the shortcut key to keep moving frame by frame continuously. This way, you’ll be sure you are visiting each and every frame because no frameskip is allowed in this navigation mode.
Proprietary CCTV Players may have frame accurate navigation. However, they are not designed for legal use, with no ability to forensically enhance, annotate or report.
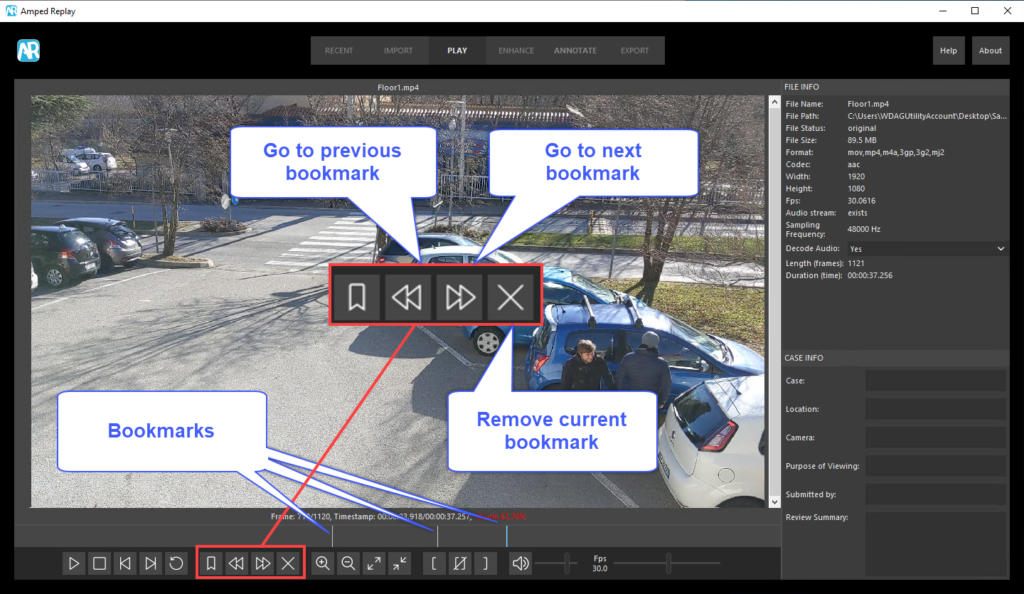
Okay, let’s say you’ve identified an important frame in the video where something happens. How can you memorize its position so to have it readily available later and in the report? That’s what Amped Replay’s Bookmarks are for. Just click on the Add/Edit bookmark button on the player bar, or use the keyboard shortcut “M” to bookmark the current frame.
Bookmarked frames’ positions are denoted by a white vertical line in the player bar. You can navigate between bookmarks using the dedicated buttons. You can use the “X” button to cancel the bookmark you’re currently sitting over.

Once you’ve bookmarked a frame, you may also want to add a text comment to it. Just move to that bookmark and then hit again the Add/Edit bookmark button, or press again the “M” key: a window will pop up where you can enter your description.
Your comments will obviously be reported in the final report, together with an image of each bookmarked frame.

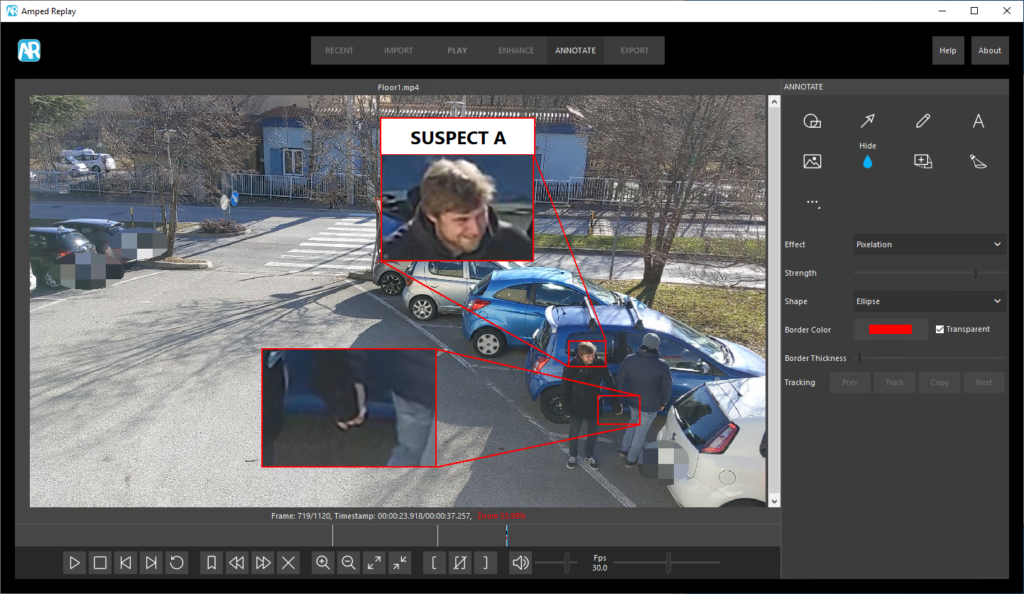
In a case like the one above, we’d be also adding compelling annotations to this frame, to reach something like:

Cool, isn’t it? Keep following this series and we’ll guide you to obtain this and even more compelling results with Amped Replay.
That’s all for today! We hope you’ve found this issue of the “Amped Replay Tutorials: How do I do this?” series interesting and useful! Stay tuned and don’t miss the next ones. You can also follow us on LinkedIn, YouTube, Twitter, and Facebook: we’ll post a link to every new tutorial so you won’t miss any!


