

A new release of Amped Authenticate is ready! We have worked hard to improve the performance of several filters and tools, and to make Authenticate more robust to corrupted files. It’s all explained below!
Improved Video PRNU
Video PRNU was part of the latest release, and it gathered lots of attention, as expected. If you’re familiar with PRNU analysis, then you probably know that one important step is extracting the PRNU noise from the reference and evidence frames, so as to be able to compare them. In this release, we’ve improved the noise extraction algorithm, with an impressive impact on performance!
As a benchmark, we’ve used the well-known VISION dataset (freely available here), and run several experiments using the 19 available devices that don’t use digital stabilization, exploring different CRP creation modes and different PRNU Identification configurations. In particular, for creating the CRP, we used three different videos (one flat still video, plus one indoor and one outdoor video, both with moving camera), two different amount of frames (400 and 900), and two possible frame selection modes (All and Group with a size of 25). So we had a total of 19 x 3 x 2 x 2 = 228 CRPs.
We then tested each CRP against 4 videos of the same device (to keep it realistic, we only tested against non-flat and non-still videos) and 4 videos from other devices picked at random. For each test, we used two possible amounts of frames (400 and 900) and two possible frame selection modes (All and Group with a size of 25). That gave us a grand total of ~7200 identification tests.
We repeated the same tests using the previous denoising algorithm and the new one. Then we compared the performance in terms of the discrimination power of the obtained PCE scores, which was measured using the Area Under the Curve (AUC). Basically an AUC value of 0.5 means “random guessing”. An AUC value of 1.0 means “perfect accuracy” (under the considered test settings, of course!). Here’s some performance comparison, separated based on different CRP and evidence creation modes.
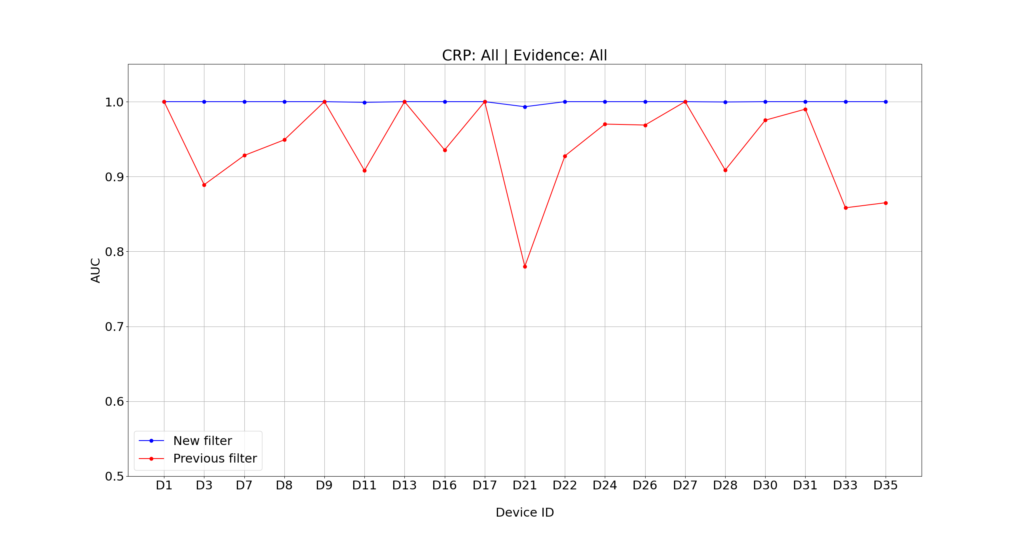
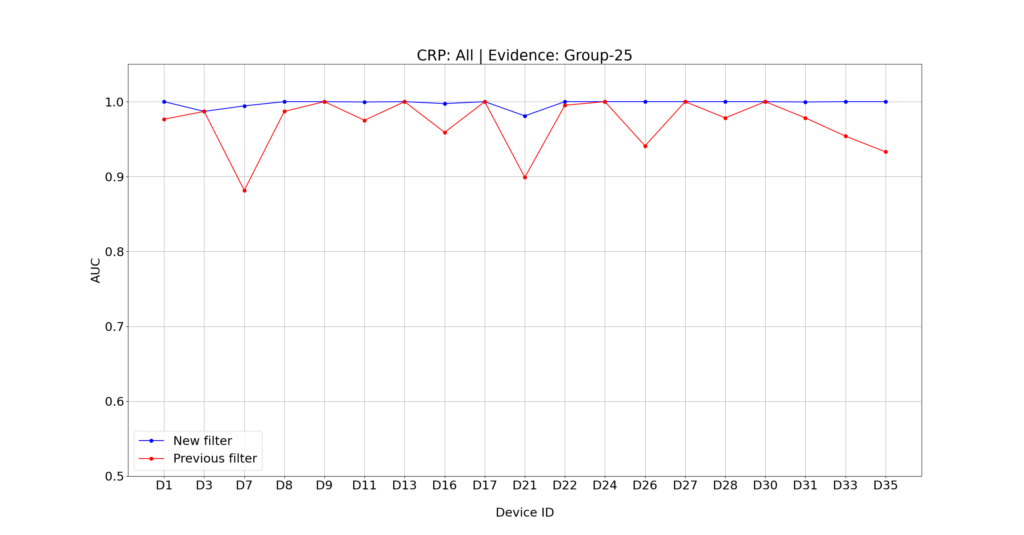
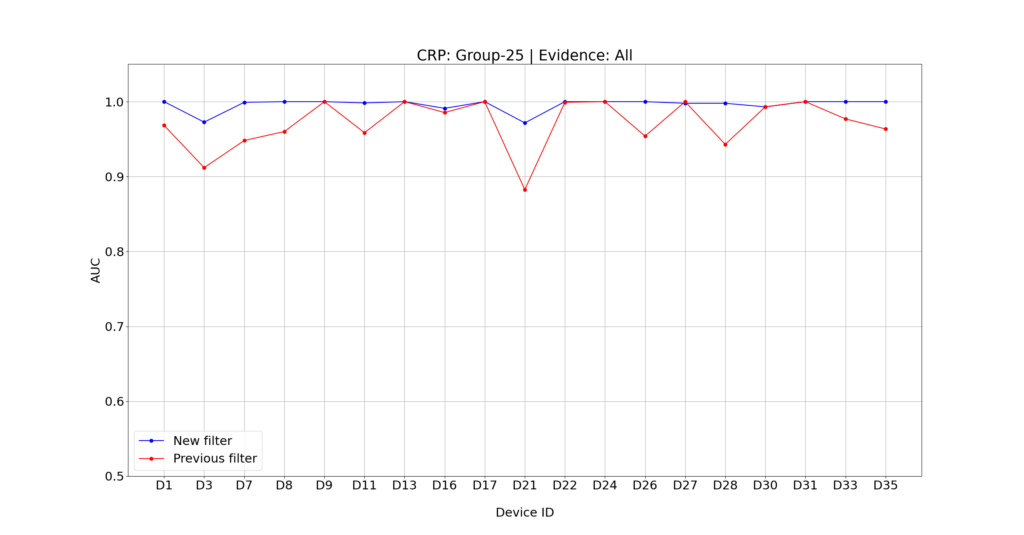
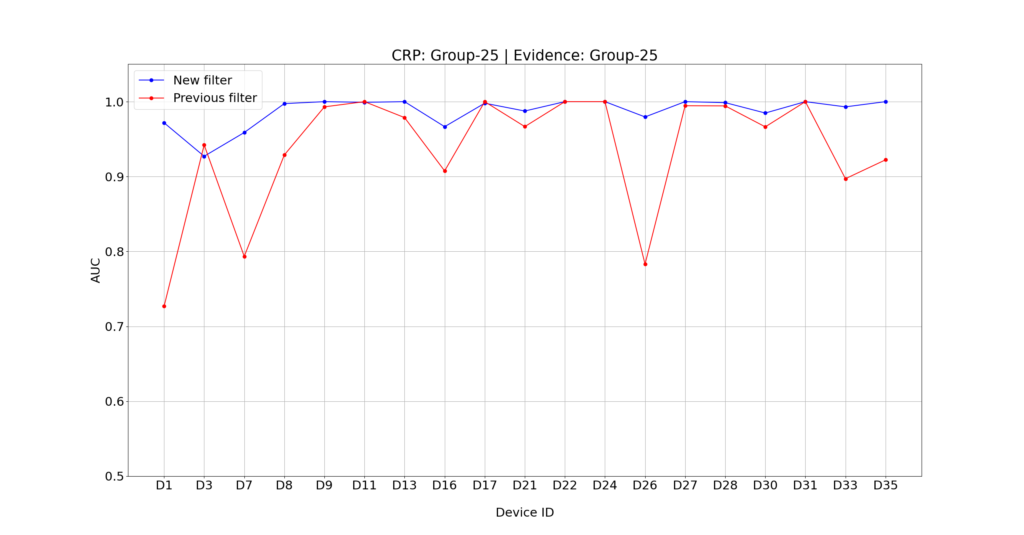
Despite the previous algorithm already achieved good performance (AUC was above 0.9 for most devices), we can definitely say that the new denoising algorithm performs even better! We also checked if we needed to change the default PCE threshold proposed by the software, currently set at 60. In the plot below, you can see the distributions across the 19 devices of the true positive rate (green boxes) and false positive rate (red boxes) obtained for increasing threshold values. For each box, the black horizontal segment shows the median value, the solid-filled part covers the 25th to 75th percentiles, the thin line covers all samples that are not considered statistical outliers, and isolated circles mark every single outlier.
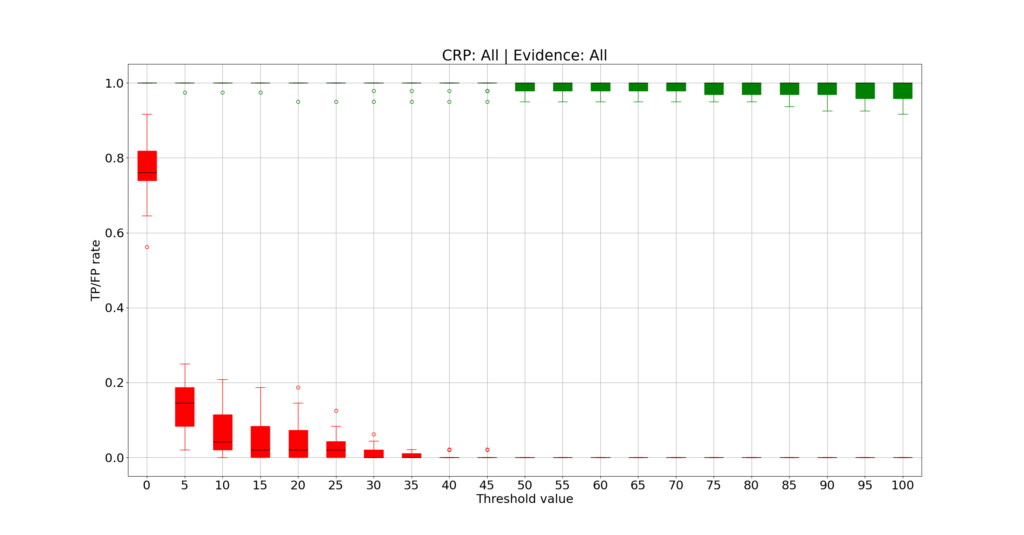
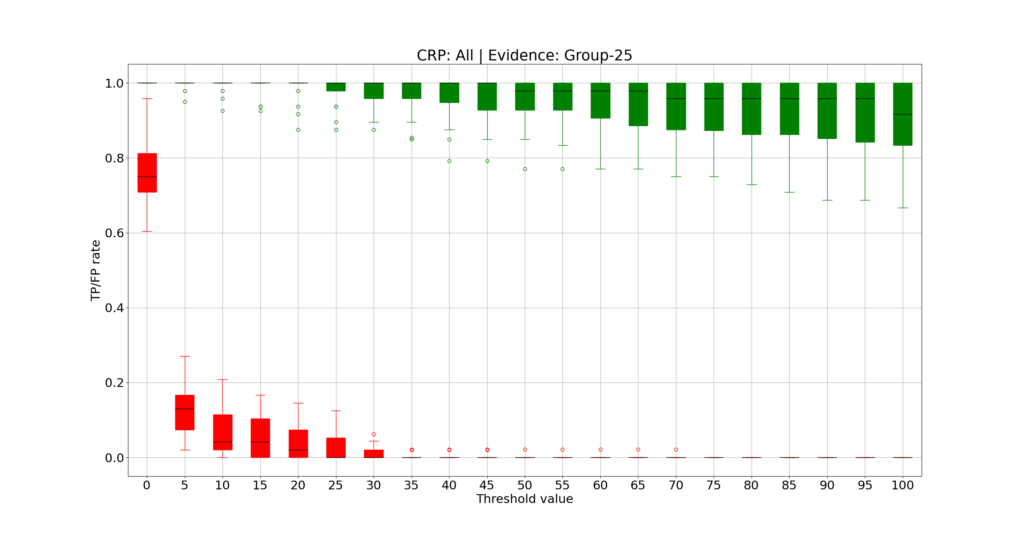
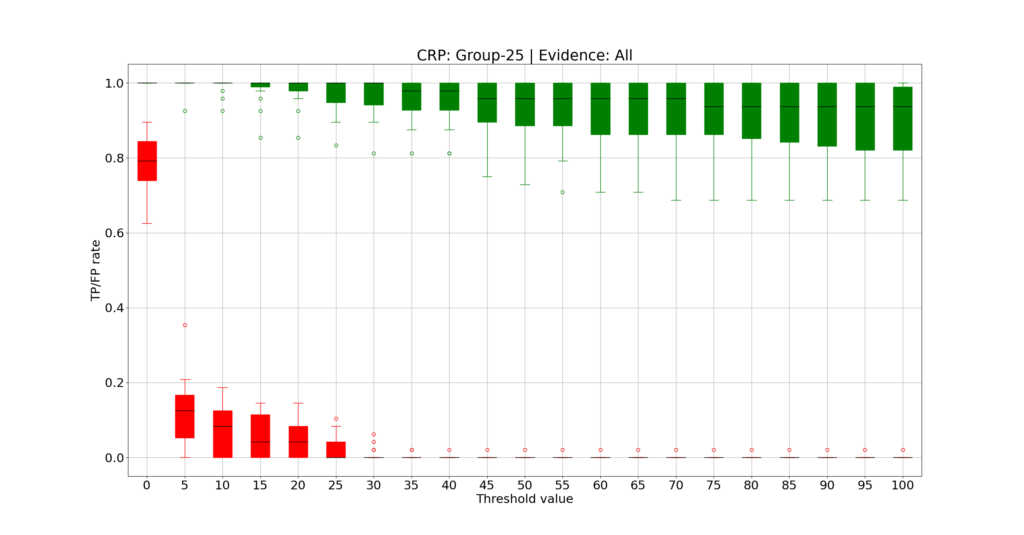
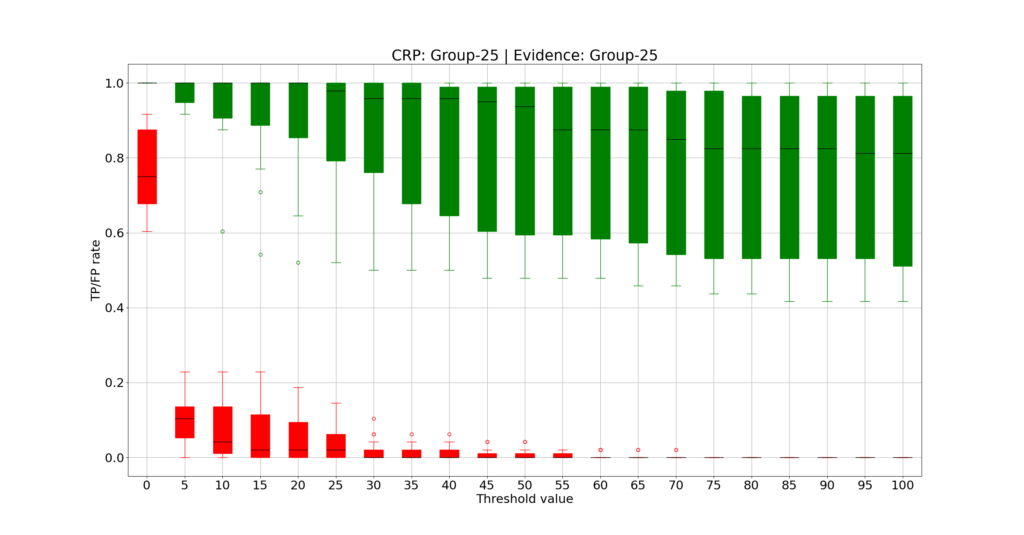
You can see that a threshold of 60 seems a safe choice for the considered tests, with most devices showing no false positive under any settings. If we set the threshold to 60, we can then summarize and compare the overall performance, as in the tables below.
| Evidence Mode: All | Evidence Mode: Group (25) | |
| CRP Mode: All | TP: 98.97% | FP: 0.0% | TP: 94.28% | FP: 0.11% |
| CRP Mode: Group (25) | TP: 92.30% | FP: 0.11% | TP= 79.78% | FP: 0.44% |
| Evidence Mode: All | Evidence Mode: Group (25) | |
| CRP Mode: All | TP: 73.03% | FP: 0.0% | TP: 80.66% | FP: 0.15% |
| CRP Mode: Group (25) | TP: 78.71% | FP: 0.97% | TP= 66.53% | FP: 1.42% |
However, when working on a case, we always recommend validating the threshold in your specific settings (e.g., gathering images from other devices of the same model and running some experiments).
Customizable JPEG Ghosts Plot
The JPEG Ghosts Plot is much appreciated because of its versatility (it can be used on images of any format) and because it can effectively reveal possible previous JPEG compressions in an intuitive way. If you’re not familiar with this filter, take a look at this dedicated blog post: you’ll love it! However, in a nutshell, the filter works by iteratively recompressing the image to JPEG at increasing qualities, computing the total difference between the evidence image and the recompressed version, and eventually plotting the total difference obtained through all iterations (that is, for each recompression quality).
Now, if you have a 40 megapixels image, recompressing it 100 times, like the JPEG Ghosts Plot has been doing until now, can take some time. Moreover, nowadays it’s hard to find a device or software that will compress an image to a quality factor less than 50. We thus decided to let you decide! You can now set the minimum of the quality range to be explored by the filter. The default value is 50, but of course, you’re free to customize the filter’s configuration and turn the value back to 1, which would give you exactly the same plot you were used to.

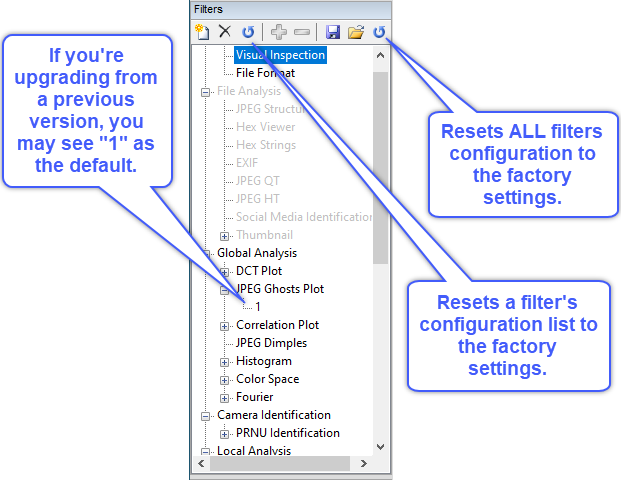
Of course, this modification is backward-compatible: if you load a project created with an older version of Authenticate, you’ll be warned that the JPEG Ghosts Plot filter is missing the new parameter, and it will be automatically added. To preserve identical results, when loading an older project the default value of the filter will be 1 and not 50. Similarly, if you’re updating Authenticate and you are using some customized startup settings, we won’t overwrite anything. You’ll just see that, in your customized filter list, the JPEG Ghosts Plot has now the additional parameter, set to 1 to preserve backward fidelity.
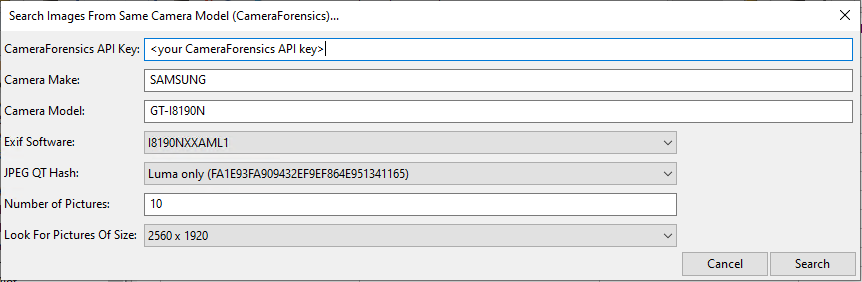
At any time, however, you can use one of the “Reset default” buttons to restore the factory settings, where the JPEG Ghosts Plot has a default value of 50 for the minimum quality, as shown below.
Better Batch Processing
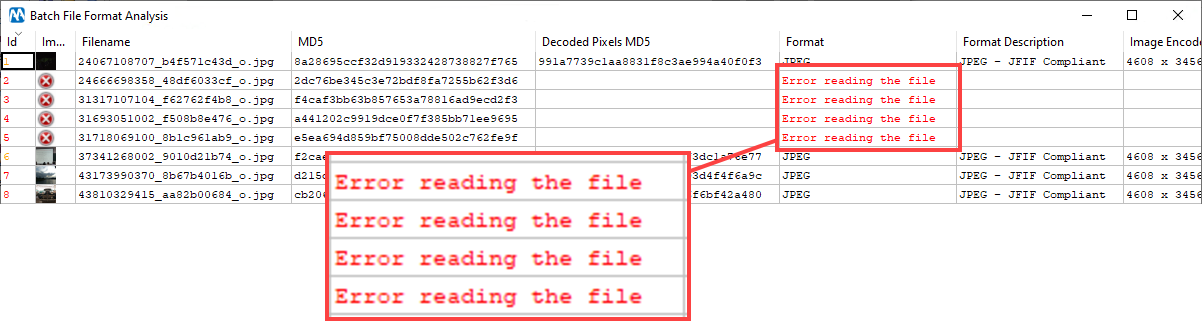
This one comes from our loyal users! We’ve been notified that, when running a Batch File Format Analysis or Batch File Format Comparison, Authenticate could hang if a corrupted image file was encountered. We understand it would be very annoying, especially if you had left the software running at night time to process 10.000 images, and it stopped at image number 4.
We’ve thus improved the robustness to corrupted files: when a problematic file is found, the processing will continue, and the issue will be reported in the results table.
Showing the Hash of Decoded Pixels
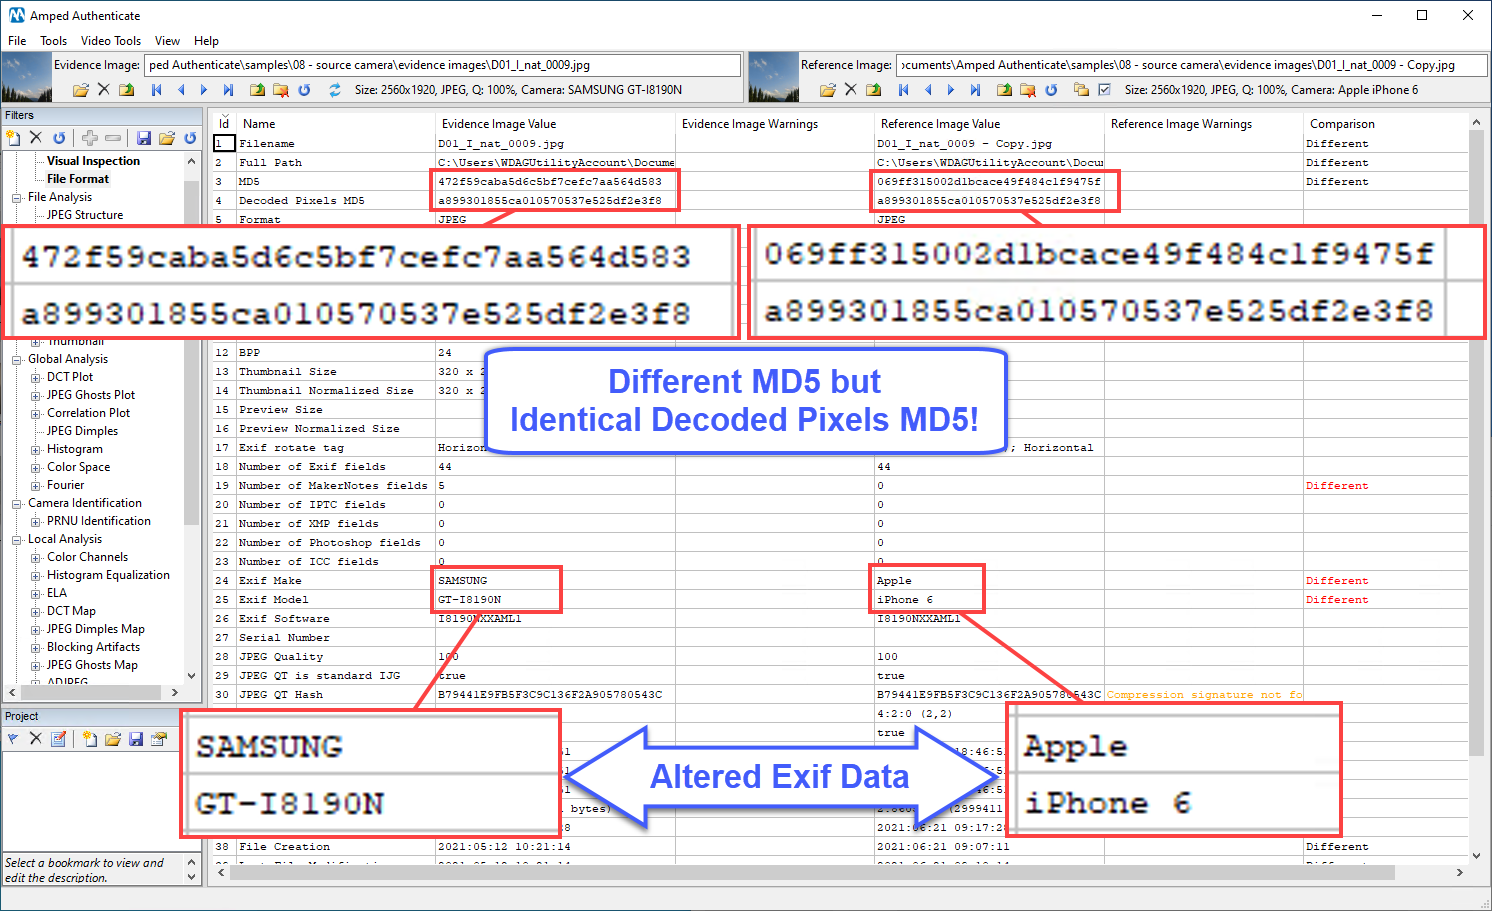
For a long time, Amped Authenticate has been showing the image file’s MD5 and various SHA hash values in the File Format filter. However, with this update, we have a new entry:

The Decoded Pixels MD5 provides the MD5 hash computed on decoded pixels. What’s the difference compared to the “classical” MD5 of the file? Imagine someone has a picture in their computer and creates a modified version of it where only metadata is changed. For example, they may use Exiftool or Windows Explorer to change the Exif make and model, or the acquisition date. Let’s imagine also that they forget to erase the original file. While altering metadata would change the hash of the file, it would not change the hash of pixels.
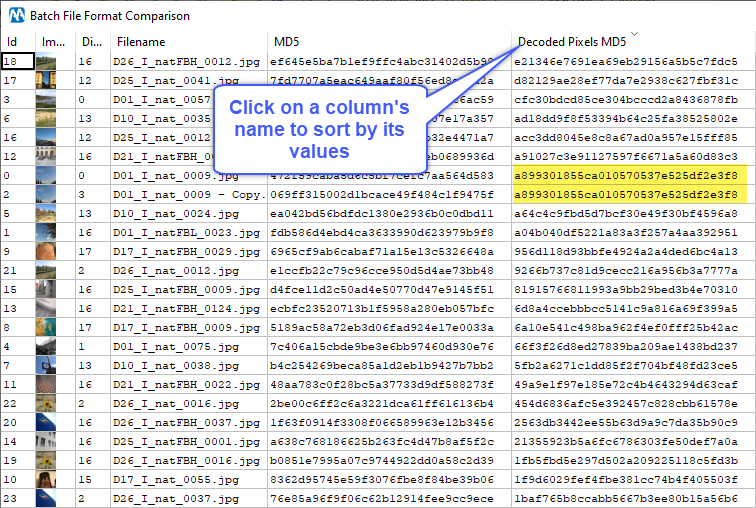
So if you’re using Batch File Format Analysis on a folder, you may sort by the Decoded Pixels MD5 folder to reveal if there are images with exactly the same pixels and focus the attention.
Search Images From Same Camera Model (CameraForensics): More Info Available
It’s no secret that reference images are a great asset for image authentication. If you’re investigating the integrity of an image, indeed, nothing is more valuable than having other pictures captured by the same camera model and, possibly, running the same firmware, as discussed in this blog post. When there is no time (or budget) to buy the same device and capture pictures, you can still use Amped Authenticate tools for searching reference images on the web. And if you have a subscription to CameraForensics, the search is much faster and cleaner thanks to our integration!
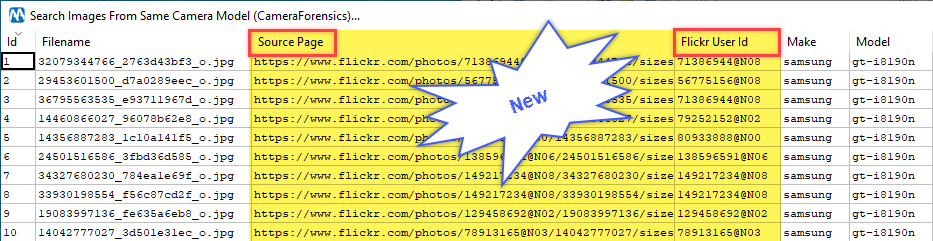
In this update, we’ve added more information to the output table produced by this tool: you’ll be able to see the webpage where the image is posted (which is often different than the image’s URL, that is, where the image file is stored). Moreover, if the image is hosted on Flickr, you’ll be now able to see the Flickr User ID. This can turn very useful if you’re downloading images for PRNU validation. Indeed, it seems reasonable to assume that a Flickr user owns only one exemplar of a specific smartphone/camera model.
Updated JPEG Quantization Table Database
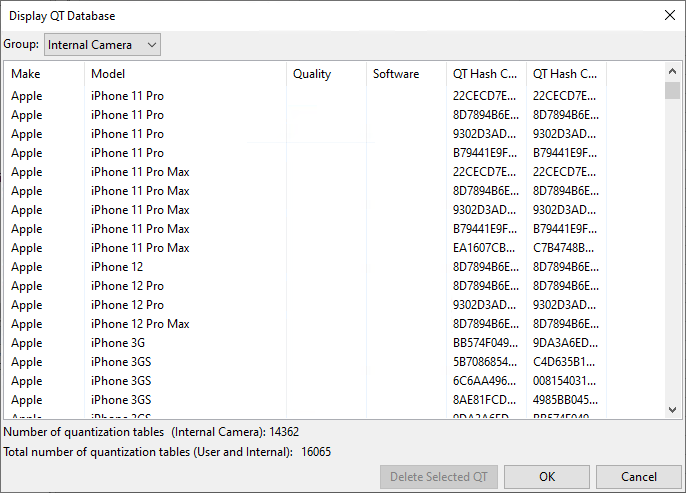
We’ve added to Amped Authenticate’s JPEG Quantization Tables database the QTs used by several recently released smartphones, such as Apple iPhone 12 and Samsung Galaxy S20 (plus their variants), and several Huawei models.
Fixed Bugs
We’ve fixed some bugs. If you spot any issue when using Authenticate, please let us know via our support portal, so we can fix it!
- Fixed a bug that caused the Histogram Equalization filter not to be applied as soon as the filter was selected;
- Fixed a bug that caused, under some circumstances, some extra text characters to appear below pictures in the Report;
- Fixed a bug that caused wrong nesting in the Report’s Table of Contents (did not affect the actual report content).
Don’t Delay – Update Today
If you have an active support plan you can update straight away by going into the menu Help>Check for Updates Online within Amped Authenticate. If you need to renew your SMS plan, please contact us or one of our authorized distributors. And remember that you can always manage your license and requests from the customer support portal.


