
Dear friends welcome to this week’s tip! A question we get very often from our users is: which format should I choose to write my enhanced video/image once I’m done? We’re thus happy to introduce a mini-series of two tips on this subject! Today we’ll introduce the topic and focus on choosing the right export for images, next week we’ll deal with videos. So, keep reading! And see you back here next week for part 2!
When doing video enhancement, sometimes your goal is to create an enhanced video, sometimes just a still frame, sometimes… both! If you’re working with Amped solutions, you know it really makes no difference: their streamlined, chain-based workflow makes so that you don’t need to worry about this until you reach the end. For example, if you have a video and you use Amped FIVE‘s Frame Averaging filter, you’ll collapse all frames into one so the output will be a still frame and no longer a video. Similarly, you can trim a video so that only one frame is left, so that your final result will be an image.
The point is, whatever kind of media you have to produce, you’ll need to save it to a file at the end of your job. For images, there are essentially three ways you can store them into a file:
- Uncompressed pixels, which means, write pixel values to a file and that’s it. Nobody will beat you if you do that (well, perhaps someone will if you send them a 30MB image as an email attachment). Jokes aside, the only downside of uncompressed images is that they eat up lots of space, but it’s still something bearable, at least for small resolution pictures. One very popular and widely supported uncompressed image format is Bitmap (BMP).
- Lossless compression, where a “smarter” way of storing the original pixels is used. You save some drive space while simultaneously guaranteeing that, at decoding time, pixels will be reconstructed without any loss. The main drawback is that you can only obtain a limited reduction of file size (e.g. 3x, which is not bad anyway!) One widely adopted lossless compression format is Portable Network Graphic (PNG).
- Lossy compression: for everyday applications, it is normally preferable to limit the file size even at the cost of losing some information. You can thus obtain a file that is one-tenth of the original size, or less, and still get good visual quality (but no pixel-perfect reconstruction). The JPEG compression algorithm has been the undisputed king of image compression for decades, thanks to its very smart way of dropping information that is less visible to the human eye. When saving an image in JPEG, a quality factor is specified which determines the “aggressivity” of compression: if you set the quality factor to 1 (the minimum), you’ll get a tiny file but degraded pixels, if you set to 100 (the maximum), you’ll lose very little quality but the reduction in size will be less.
Okay, that was a long paragraph, I know. And now comes the question: what format should I choose? The answer is: it depends! What is the purpose of your export? Let’s look at three possible scenarios, focusing on images for the sake of this tip, while videos will be covered next week:
- You are exporting the image because you’ve finished working or you want to use the exported images as an intermediate step for further processing, and the final result will be potential evidence. In this case, you want to ensure that the process is totally lossless, which means, the exported picture is pixel-by-pixel identical to the result you see in Amped FIVE. In this scenario, we’d recommend using either an uncompressed or lossless compression format (so, BMP or PNG).
- You are exporting the image to send it to a colleague who will examine it, trying to read out a hard-to-see license plate. You’d like to preserve quality, but you also need to limit the file size. In this case, we recommend to i) crop the relevant pixels so you don’t send useless parts of the image, and ii) use PNG to get lossless compression.
- You are exporting the image to hand it to the press office, to broadcast it as soon as possible (e.g., you’re issuing a missing person advisory). In this case, you may prioritize compatibility over pixel quality: you want to be sure that the image will be displayed correctly on any consumer PC/smartphone, without any format/codec issue. JPEG compression can be the right choice, setting the quality to a high value (between 90 and 100) to avoid losing too much visual quality.
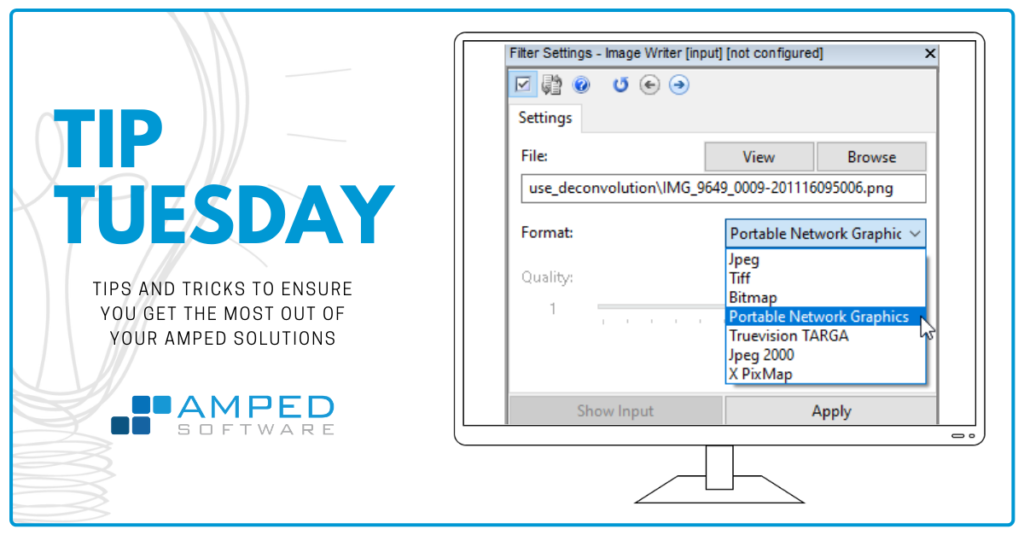
“Okay, I’ve chosen the format. How do I save the image?”. It’s very simple! If you’re using Amped FIVE, just go to the Write category and choose Image Writer. You’ll notice that the Quality slides are only activated when JPEG is selected in the Format list. The default is 90, but you can customize it as you wish.

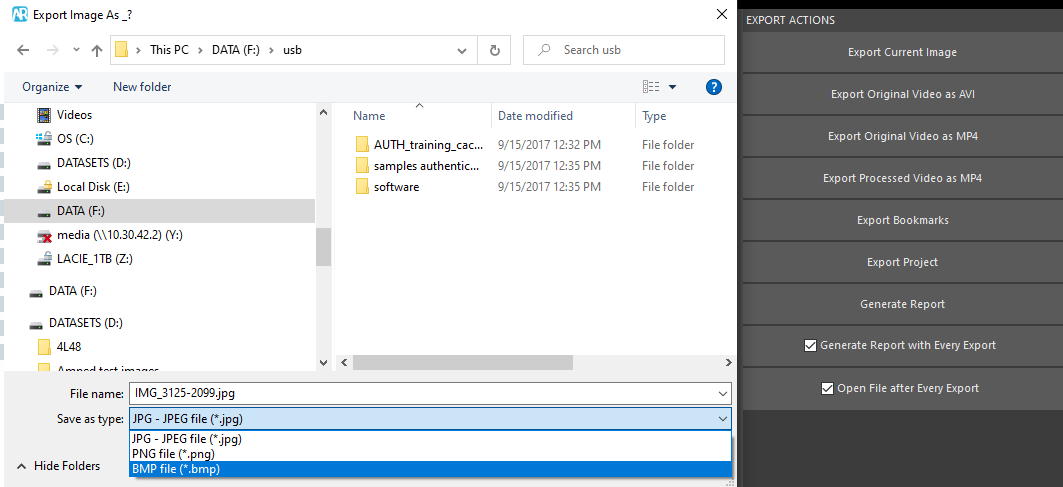
If you’re using Amped Replay, it’s even simpler: go to the Export tab and choose Export Current Image. You’ll be able to choose the format straight from the file browser window that opens up. In this case, the JPEG quality is automatically set to 100.
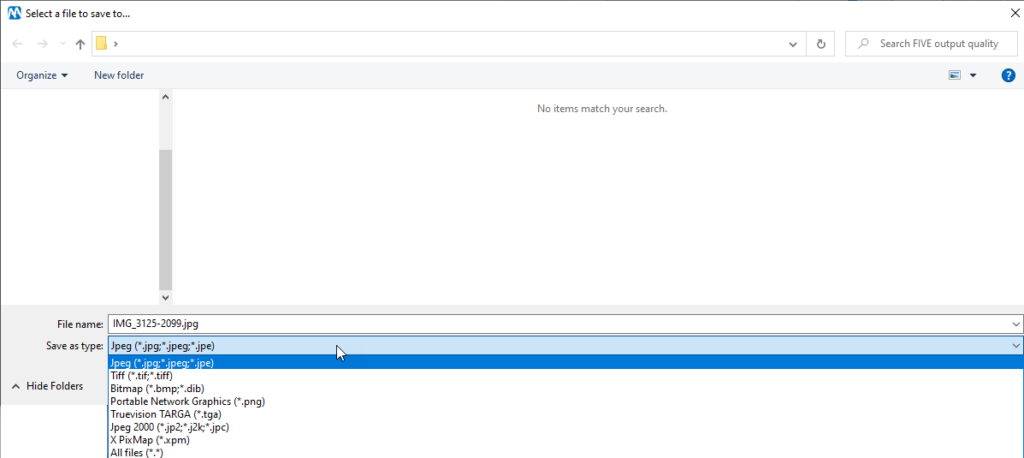
Finally, if you’ve been working with Amped Authenticate, you can save the currently shown image by clicking on File and then Save Result As. Like for Amped Replay, you can choose the format in the file browser:
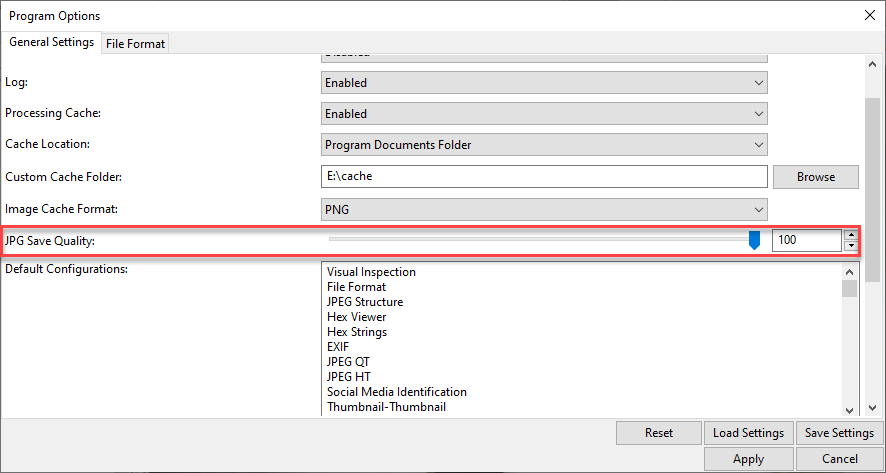
Like it was for Amped FIVE, the default quality of the JPEG compression is 90. But you can customize it from the Program Options panel, that’s available under the View menu:
And that’s all for today! Next week, we’ll discuss the case where we need to write a video.


