
Welcome to a brand new tip, dear friends! Today we’re showing you one of the newest features introduced in Amped Authenticate: the possibility to use the PRNU Identification filter to compare the sensor noise obtained from two sets of images. Reading this sentence left you confused? Then this tip is just for you! Keep reading to shed light on the mystery…
The PRNU Identification filter is one of Amped Authenticate’s most loved ones. Its ability to link an image to the specific device which captured it has a dramatic impact on investigations. We’ve dedicated many tips and blog posts to this filter in the past: if you want a quick introduction to this feature, take a look here. For the sake of this tip, we’ll just briefly recap how the filter works with this picture:
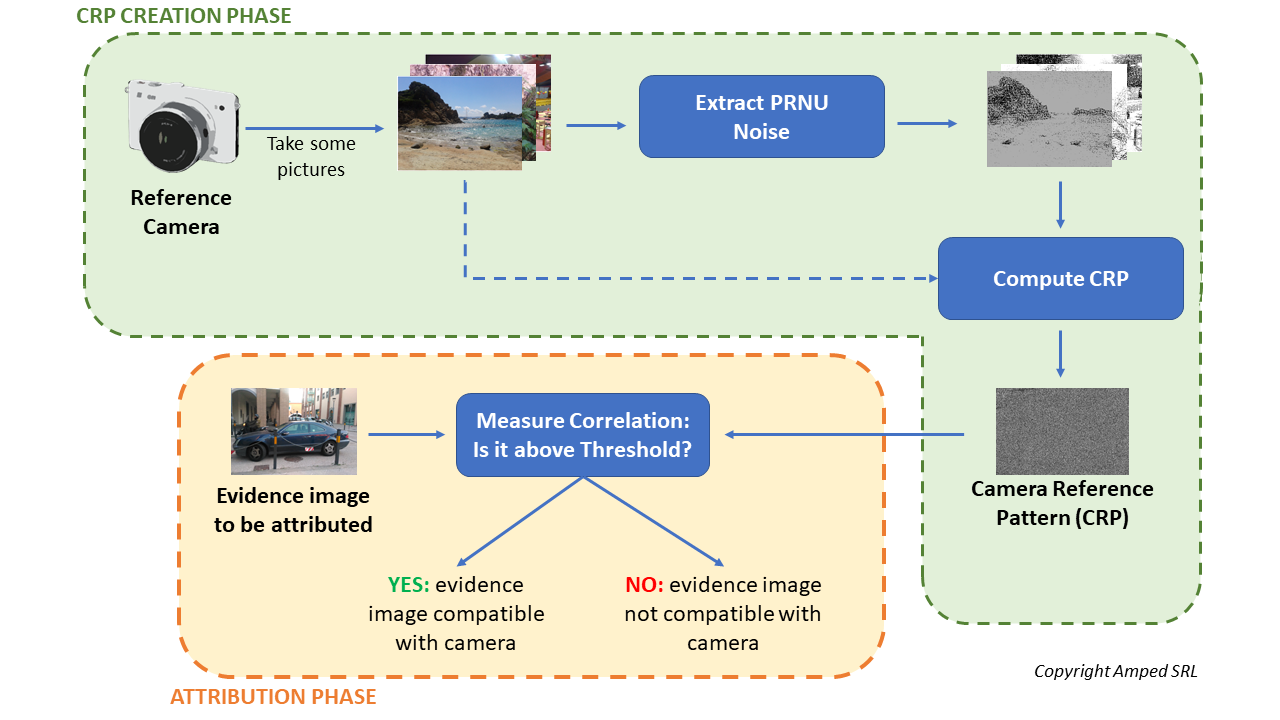
As you can see, it’s a two-stage process: in the CRP Creation phase, you build up a Camera Reference Pattern (CRP) file from many images obtained from a camera; in the Attribution phase, you have an evidence image that needs to be attributed: so you extract the PRNU noise from that image and check its similarity to the CRP.
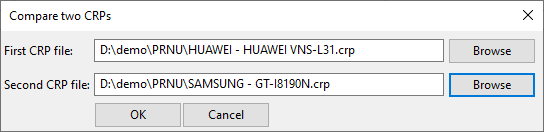
This is how PRNU is commonly used. But recently, Authenticate introduced an advanced tool called Compare two CRPs.

The name of the tool is quite self-explanatory: instead of loading a CRP file and testing an image against it, you can compare two CRP files. Just click on the button and you’ll be able to provide the path to each of them:
I guess the question that’s coming to your mind is: “Why should I ever want to compare two CRP files?”. I have an intriguing example ready for you.
Imagine you’re investigating a case related to non-consensual explicit image sharing (aka revenge porn): some explicit pictures of the victim have been made public on an anonymous Facebook profile. The victim provided a list of their ex-partners, and each of them happens to have a Facebook profile. Together with the victim, you can download several images from each suspect’s Facebook profile, and use them to create a CRP file for each suspect. If we manage to find a strong correlation between the images and an ex-partner’s personal device, that could be a great boost for the investigation.
Of course, you could just test each explicit image against each ex-partner’s CRP, and that’d be OK. But we know that images get downscaled and recompressed when they are shared on social media platforms. Worse yet, this kind of imagery is normally pretty dark, which we know is against PRNU Identification performance (PRNU is a multiplicative noise: less light, less noise). So why not use all the explicit images to build up another CRP, where the “explicit image” camera noise is better represented? Then, we’ll test that one against all suspect’s CRP files! Of course, in order to do this, you have to be rather sure that all the explicit images downloaded from the social profile have been taken with the same camera, otherwise, you’d be polluting the sensor noise with extraneous images. In situations like the one we’re dealing with, this is likely the case.
Let’s go practical with an example (we’ll not be using explicit images of course!). We’ve built a CRP file using the sole 10 images available on our suspect’s Facebook profile. (Of course, 10 images is a very small number that we wouldn’t recommend for a forensic PRNU analysis. But still, let’s see if we can obtain some indications to steer the investigation!)
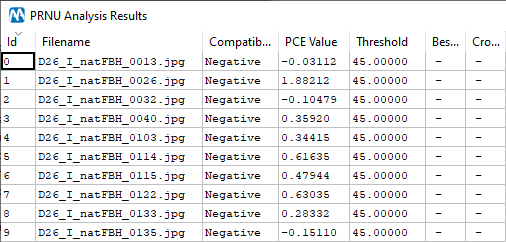
So we take this CRP and test it against these 8 “pretend-to-be explicit” images, that have been taken with the same device and uploaded to Facebook as well:
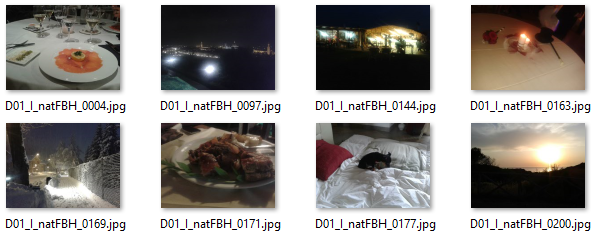
You may have noted, we’ve chosen ten images that are quite dark in general, to mimic the case we’re simulating. This is the result that we get by using the Analyze All Images in Evidence Folder tool provided in the PRNU Identification interface:
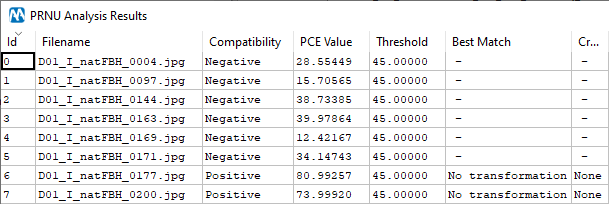
You see, most images test negative. If we instead create a CRP file using these 10 evidence images and use the Compare CRP tool, this is what we get:
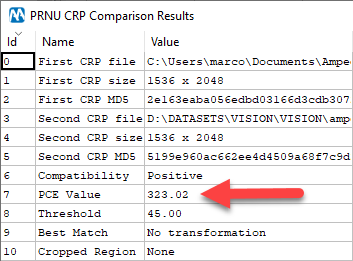
That’s a good match! What happened is that “putting together” the 8 explicit images provided a more accurate estimate of the sensor noise of the camera that was used to shoot them, which now seems to be actually compatible with the suspect’s device!
You may be wondering: “But what if the 8 explicit images were instead taken from a different camera than the suspect’s one?”. Would putting them together raise the PCE score as we’ve seen above, potentially leading to a false positive? Of course, we don’t expect this to happen. To show you an example, this is the result table obtained comparing our suspect’s CRP with 10 images downloaded from the Facebook profile of another suspect: you see the PCE is close to zero.
Now let’s create a CRP using them, and compare it with our suspect’s CRP:
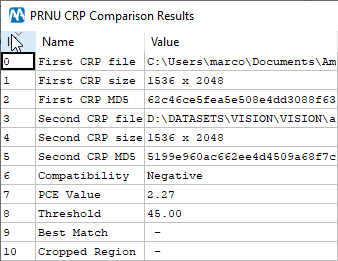
Yes, the PCE slightly increased compared to every single image alone, but by a very limited amount: nothing comparable to our previous test, and indeed we’re still very far from the default threshold value.
The nice thing about this whole story is that you can redo everything from scratch on your own if you like. All images we’ve used come from the VISION dataset, which contains images and videos obtained with 35 smartphones/tablets, along with their Whatsapp and Facebook shared version. The paper presenting the dataset is freely accessible here, while the data is on this FTP server hosted by the University of Florence (Italy). Each file has a unique name, beginning with DXX which stands for “Device XX”. In our tip, we’ve used images from device 01 and 26 (both Samsung Galaxy S3 Mini), and this is the log file of the suspect’s device CRP generation (so you can build it on your own).
If you like testing and you’re looking for more datasets, take a look at this other tip we published last year!


