Dear friends, welcome to a new Tip Tuesday! This week’s tip should have been dedicated to Amped Authenticate. However, we just released an update on Wednesday 22nd (check it out here). So, since it already received a lot of attention on our blog, we don’t want other products to get jealous. So, here we are with a tip on Amped Replay! We’ll see a simple but effective trick that will help you present your results in a compelling way. Keep reading to find out!
We all know that CCTV systems often create very low-quality recordings, and, on top of that, they store it in proprietary formats that common video players won’t eat. Amped Replay is Amped’s solution for first responder officers that need to be able to watch recordings (and people in the field know that being able to watch is already a lot!) and to make basic corrections and annotations without having to wait for an expert team to be available. You know, time is often of the essence.
When you’re done, I normally recommend exporting not only the enhanced picture but also the original one, so that you allow who’s using your work to understand from where we started and where we are. If you’re an Amped Replay user, you can even go beyond this multi-export. Let’s take a look using an example: we’re given this file.

Looking at the video thumbnail brings some good and some bad news… The good news: it shows something, so the video is likely stored in a normal format that even Windows can read. The bad news… well it seems pretty dark. Very dark, actually, as it clearly appears as soon as we load it in Replay.

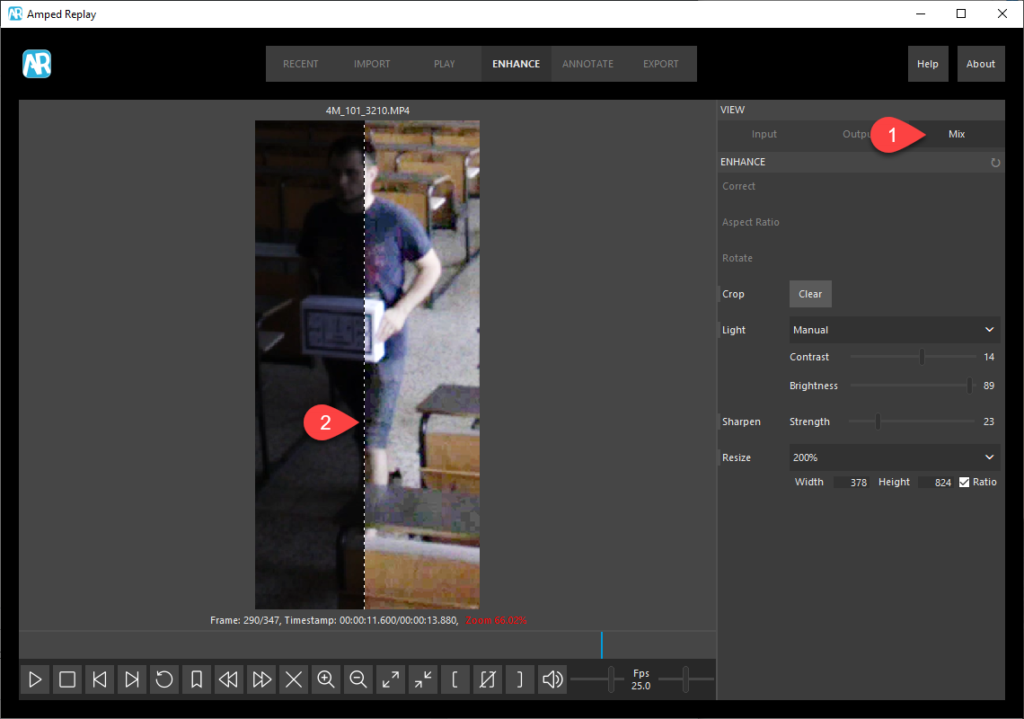
We recently explained in a dedicated tip that Replay’s Light filter can help a lot in cases like these. We just need to go to the Enhance panel, activate the Light filter and tune the Contrast and Brightness sliders as needed in our case.
I’m sure you already guessed we’re interested in the person in the video. So let’s use the Crop filter to focus on that. We’re keeping the whole body, so we don’t drop potentially vital information about what he’s wearing and other peculiarities.

Now we can improve readability using the Sharpen tool moderately, and use the Resize filter to bring our output image at a more decent pixel resolution while simultaneously taking advantage of the bicubic interpolation used by this filter.

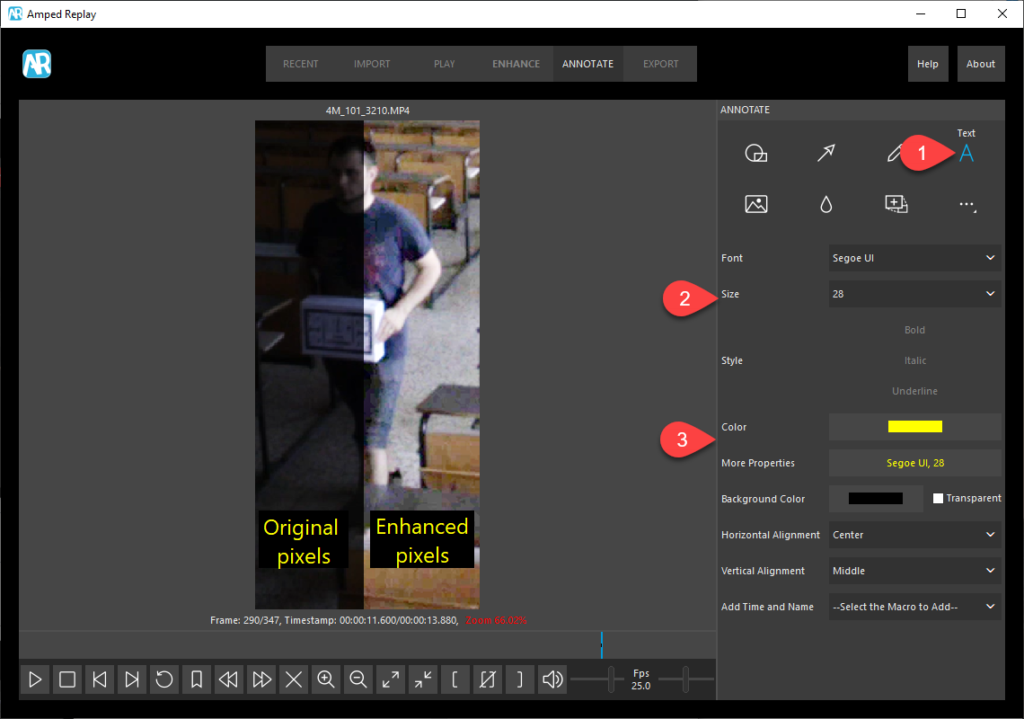
Looks nicer, doesn’t it? Well, believe it or not, you will surely find someone who expected much more (thank you so much, CSI and alike series…). In general, it’s hard to demonstrate how far you can get with enhancement (and, of course, Amped Replay is not made for a full-enhancement workflow, it has a different goal and target compared to Amped FIVE). But when someone complains about your results, it’s likely that you’re not showing clearly where you started from! What about showing them this picture as well?

Be sure, they will appreciate your first responder work much more. Preparing and exporting the image above is so easy with Amped Replay! From the Enhance panel, you just need to select Mix from the View menu and then drag the vertical dashed line to choose where to place the separating line.

From the Annotation panel, you can add the text and customize its size and colors.

Then, simply move to the Export panel and select Export current image. This will export what you’re currently viewing, including the settings you’ve selected from the View panel (mixed view, in our case).
Now, how long does it take to go through the full workflow shown in this tip? With Amped Replay, it takes less than a minute. Take a look here!


