
Dear Tip Tuesday lovers, welcome to this week’s Tip! When you load an image into Amped Authenticate and click on the File Format filter, a lot of tests are executed to analyze your image’s encoding properties and metadata. When Authenticate finds something suspicious, it raises a warning to help you focus your attention. Today, we will briefly review what these tests do, and show how you can customize the parameters determining their behavior.
As we teach in our training courses, creating credible forgeries is easy nowadays, but selling a manipulated image as a camera original image is not as trivial. When your camera takes a picture, it leaves a lot of traces in it: some at the pixel level, some other at the metadata and encoding level. For example, your camera has a limited set of supported resolutions and JPEG Quantization Tables, it writes some kind of metadata and not some other, it adds the image creation and last modification date, etc. If you are the forger, you not only have to carefully work on pixels, you also need to fix all this side information. Indeed, the software you’re using to tamper with the image will use its own way of storing the file, not the original camera’s way.
It often turns out, forgers are much better at the artistic level than at the technological level. That is why Amped Authenticate features eight different filters under the File Analysis category alone and, noticeably, presents the user the File Format filter right in the Overview category. It’s a way to say: to begin with, right after looking at the pixels, take a look at primary image metadata. The File Format groups the most relevant image properties into a table for rapid inspection. On top of that, it runs a lot of tests that are meant to identify suspicious values and raises two kinds of warnings: hard warnings (written in red) and soft warnings (written in orange). Let’s take a look at an example to better understand them:
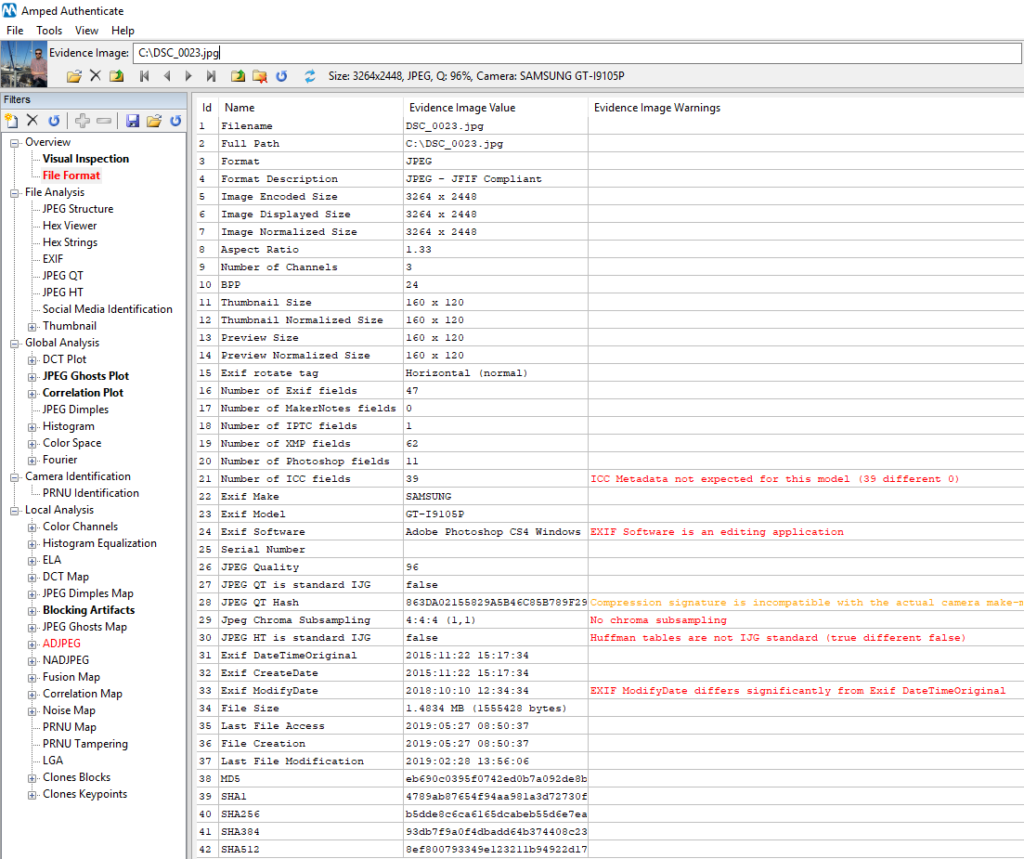
We have quite a number of warnings for this image file, each with a motivation:
- The Exif software metadata was checked against a black-list of known image editing software. A match was found (Photoshop is blacklisted, of course) and, since this is a significant threat to image integrity, a hard warning was raised;
- The Exif ModifyDate differs by many years from the CreateDate; this is also a significant threat (the camera initializes all dates to the same values or so), therefore we have another hard warning;
- The image’s JPEG Huffman Table is not the standard one, it has been optimized: something that happens very rarely on capturing devices because it requires heavy computation; hence another warning;
- The image’s JPEG Quantization Table is not consistent with those available in Amped Authenticate’s internal database for the Samsung GT-I9105P model. Now, this can be because the image has been recompressed by external software (Photoshop, in this specific case), but it could also be due to a missing entry in Authenticate’s database. That’s why this warning is soft: alone it is not enough to be a major threat to image integrity, but the analyst is encouraged to gather reference images from the same model (there are two specific tools for this under the Tools menu) and check which quantization tables are supported;
- The image contains ICC Metadata, which are only featured by a limited set of devices (which does not include the Samsung GT-I9105P);
- The image is stored with no Chroma subsampling, an unusual choice for the vast majority of cameras.
As you may have noticed reading the above lines, several tests make use of white- and black- lists, thresholds, etc. At Amped, we strive to update these parameters to follow the latest technological developments; however, there may be cases where the analyst wants to customize them. This is just as simple as clicking on View – Program Options and then choose the File Format tab on top of the panel.
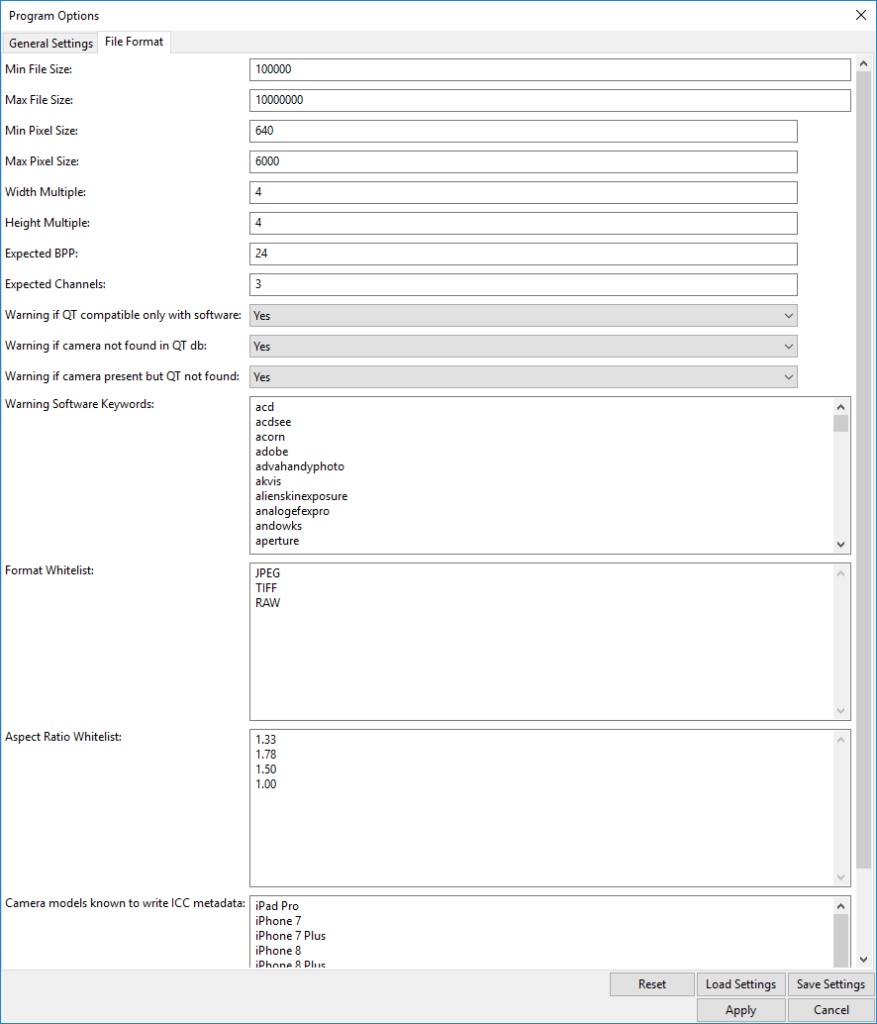
The various options in the panel are rather self-explanatory, but whenever in doubt you can read the Program Reference Manual (under the Help menu), or contact our support team.
Two more things before we say goodbye:
- Customizing the rules behind the warning system will not only affect the appearance of the File Format filter, but warnings are also used by the Smart Report tool to automatically decide whether to deeply investigate an image or not (if no warning is raised, the image is marked as “likely camera original” without any further analysis). Therefore, loosening the constraints will make your Smart Report scrutinize less, and the other way round;
- Once more, we stress that warnings in the File Format filter are meant to suggest the user investigates suspicious elements more deeply, and not to make a conclusion based on this overview filter alone.


