
First of all, let me introduce myself. I’m Lucy Carey-Shields, the newest member of the Amped team! Originally from the UK I studied Computer Forensics at degree level and was a volunteer police officer with a UK police force for six years. I later went on to work for another UK police force for almost four years as a digital forensics technician, mostly working with CCTV and video whilst also providing forensic acquisition of mobile devices. Whilst working at Amped I’ll be providing support as well as putting the software through its paces, so I look forward to hearing from you all! Now let’s dive into my first Amped blog post!
When dealing with video, we often have to hide sensitive information or protect a person’s identity, particularly if the video is to be shared with a wider audience and we need to control the display of certain information. Amped FIVE has a filter for that!
Having used two or more different tools to load, process and then redact sensitive footage in the past, I know how time-saving having all these features in one piece of software can be (and how critical time can be in a law enforcement environment).
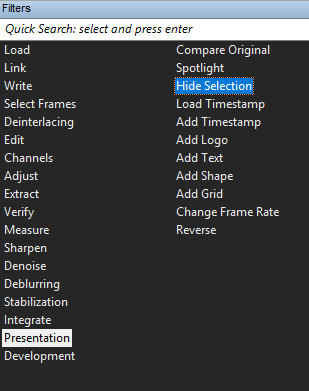
The Hide Selection filter allows you to pixelate, blur or blacken anything you want masked in a video quickly. In this instance, we’ll explore both dynamic tracking and manual tracking during the use of Hide Selection. Hide Selection can be found under the Presentation group of filters, typically used at the end of a workflow.
Redaction, whilst usually done towards the end of processing a video, is arguably one of the more critical steps in a workflow as revealing sensitive data or someone’s identity could have serious and potentially dangerous consequences. With this in mind, it’s important we ensure frame by frame accuracy so that the subjects we want to censor are completely disguised. FIVE allows you to apply the filter by selecting the necessary points – maintaining that important frame by frame accuracy.
Firstly, let’s have a look at the initial Settings of Hide Selection.

Mode allows us to choose between Pixelate, Blur and Blacken as the type of mask we want to use as a sensor in our video. Size allows us to alter the size of the pixelation or blur amount as desired, defaulting to 20. The size you choose will depend on the size and resolution of the subject you are trying to censor. Shape gives a choice between a Round or Square shape to best fit the subject. Selection Type will change the mask from Normal which is a mask inside a shape or Inverted which masks everything surrounding the shape. This means we can single out one object whilst censoring the surroundings, as seen below.

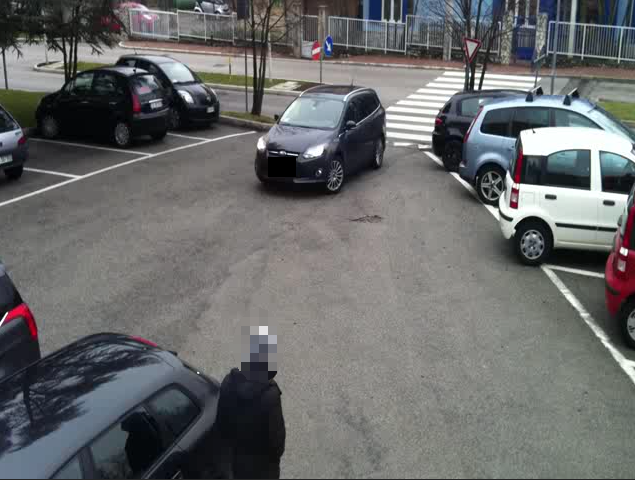
Dynamic Tracking
On the Selection screen, we can specify where we want the filter to be applied.
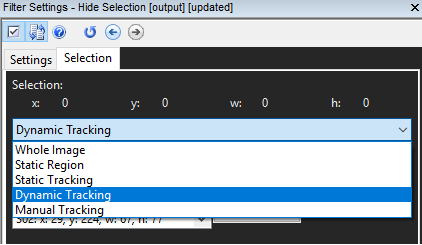
We can choose to mask the whole image or select a region we want to censor. In this case, I will demonstrate Dynamic Tracking.
Dynamic Tracking allows you to select certain points in the video that assist the software in tracking the object you want, masking and adding the filter for you automatically, speeding up the process of censoring an object.
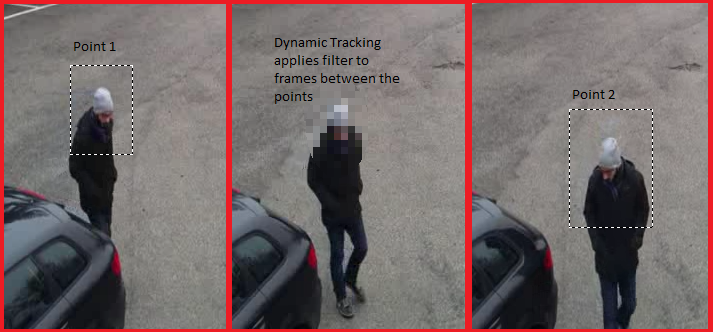
Here we have selected two points at different stages of the video and Dynamic Tracking applies the filter to the frames between and including those two points.
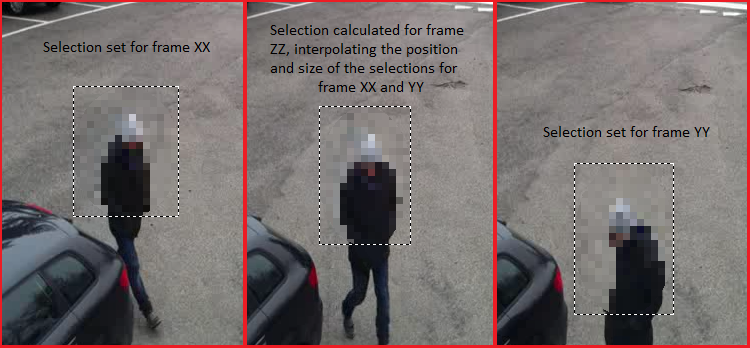
We add our reference points individually in order to point the software at the object we want to track, surrounding the object with the Selection tool and clicking Add (or pressing ‘U’ as a keyboard shortcut). We can choose when to start the filter by navigating to the first frame where our object is visible and then clicking Set. Points can be removed from the selection by clicking Remove.

The more points included, the more accurate the Dynamic Tracking will be in masking the object.
Manual Tracking
We can also manually point the software to the frames we want masked using Manual Tracking. This means the user can define which points to apply the filter should the subject pass other objects in the video that aren’t to be masked, for example, if a person walks behind a car for a moment before reappearing.
Similar in technique to Dynamic Tracking, it involves using the selection tool to select the object to be masked before clicking Add or pressing the shortcut key ‘U’.
Select points that represent the movement of the subject. In the example shown above, we want to make sure the person’s face is masked with each change in position around the car (which may or may not require selection of points on every frame). FIVE will interpolate between the selections until no further points can be found. The selection will be disabled after the last reference frame.
Whilst this may take more time than Dynamic Tracking it does allow for more user control when applying the Hide Selection filter.
We can add multiple instances of the filter if we have multiple objects to redact. In this instance I’ve been able to mask both the face and the license plate in the same chain using different settings.
Following the use of Hide Selection, I can use the Video Write tool to write my video to the desired output whilst incorporating the filters and keeping the original footage unaltered.
Hide Selection allows for the precise, customizable and professional-looking masking of objects that need to be censored in a video. The quick selection and point adding tools cut the time it takes to produce a video needed to be shared publicly, meaning you have a quality redacted video in no time!


