
When we talk about Amped Authenticate, you may automatically think of its use in detecting forged and manipulated images such as those created using editing software to portray a different scenario or message from that of the original purpose of the image, and you’re certainly right about that (particularly in the age of the ever-prevalent ‘fake news’). The great thing about Amped Authenticate is that it’s also so much more on top of forgery detection – identify image processing history from capture to publish, extract images from documents, provide camera ballistics, but, in my view most importantly, add more weight to your child sexual exploitation, or CSE, investigations with all these tools and ultimately safeguard vulnerable children.
I always think of Authenticate as the tool I wish I’d had during my time examining mobile devices and computers, now realizing its potential to further solidify my cases and digital evidence, least of all because of the seamless integration with Griffeye Analyze. As digital forensics investigators, the majority of our work involves CSE material and recovering evidence from a multitude of devices to prove or disprove the offense in question, and the more evidence we can provide the more likely we are to achieve a successful prosecution or clear an innocent party – we keep an open and unbiased mind as forensics professionals, as always.
The PRNU, or photo response non-uniformity (also known as camera ballistics), capabilities of Authenticate are often under-utilized by law enforcement digital forensics professionals – I admit, I didn’t realize it had such a tool and how useful it could be in my work at the start of my career! Let’s take a safeguarding investigation as an example, often unpleasant cases in which a child has been exploited. We know law enforcement and governments around the world have similar methods of tracking illegal images and videos, usually through databases, in order to identify such material quickly and to avoid unnecessary exposure of traumatic material to investigators, but these safeguarding cases often involve newly generated images, not stored in any database.
In these instances, proving the origins of an image can be vital to building a case and securing a prosecution. Let’s say a case has identified newly generated images sent from another suspect. This new suspect is traced and the victim is safeguarded, but all traces of EXIF data from the sent images has been lost by methods used to share the images, and the suspect is forensically aware and has used anti-forensics software on their devices. Proving where those images came from would otherwise be difficult if it were not for Authenticate and the PRNU Identification filter.

For those of you who don’t know, the PRNU Identification filter in Authenticate compares the sensor noise pattern from the evidence image with a reference pattern created with reference images from a suspect camera. If the correlation between the two is above a certain threshold, the images are likely to have been taken from the same camera. The sensor noise is completely unique to that individual camera – so, while it’s often easy to identify that, yes, this image was taken by a particular make or model, using the PRNU Identification filter we can say it was likely taken by that exact, specific exemplar.
In this case, we know the suspect has a mobile device and a digital camera, both of which have been seized and are positive for illegal material. At this point, sample set images from either device can be loaded into Authenticate to create a Camera Reference Pattern, or CRP. The PRNU Reference Pattern contains the noise statistics extracted from this set of specific images, allowing us to compare images and say that an image has likely been taken from that camera.
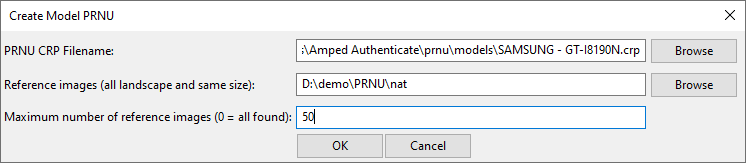
So in our case, we’re going to choose our sample set of images. The default number in Authenticate is 50, although a user may wish to use more if they don’t mind the extra computation time. The maximum amount of images allowed during the creation of a reference pattern can easily be altered in the CRP creation dialog.
We should ensure our images meet the following criteria for building a reference pattern:
- They must be original images coming from the device with any modification applied;
- They must all have the same resolution (width and height);
- They must all be shot in landscape mode (width bigger than height);
- They must all have same make and model (if available in the EXIF data);
- They must be shot with the camera in the same orientation (not upside down);
- They must be shot without any kind of digital zoom;
- It is better if they have very little detail, and they are not saturated (neither too dark nor too bright); ideally, it’s best to use pictures of the sky or of a uniform gray wall. In this case usually 20-30 images should be enough to provide good results. If it is not possible to acquire images of this type, usually at least 40-50 images are needed to get good results.
- It is better if they have the same resolution as the image under analysis.
The reference pattern file, or CRP, will then be created alongside a log file, should you need to keep it for your notes. Once we have our reference pattern, we can use it to perform our PRNU Identification on our suspect images, with Authenticate reporting back a Positive or Negative match against a set recommended threshold. Now for some of the more ‘sciency’ bit…

The analysis of our suspect image using the PRNU Identification filter consists of the extraction of the PRNU noise component from the image and the comparison between such component and the CRP. As a measure of matching score, Authenticate uses the Peak-to-Correlation Energy (PCE), which is more robust than the simple correlation. Typically, if the PCE is higher than the threshold the compatibility will be positive, otherwise, it will be negative. This result must not be interpreted as a definitive answer, since it is based on statistics and allows for a certain margin of error, especially if the value of PCE is of the same order of magnitude as the threshold, however, it does allow us to say the image is likely to have come from that particular device – strengthening our case with further digital evidence. We carried out a large experimental validation, and the results are very promising.
The PRNU Identification filter will even work if the image has been subjected to minor manipulations such as cropping, scaling or rotation, which is ideal should you need to deal with images that have been shared with messaging apps.
Following this and proving that the image has likely come from the suspect’s device, when added to the case alongside web history, chat communication and other operating system artifacts, a case can become even stronger than before and assist in securing either an admission of guilt or a verdict by a jury, a conviction and, ultimately, helping to safeguard and further protect vulnerable children.
And the great thing about Authenticate? This is only a brief look at one of the features – there’s a tonne more in the way of image analysis tools and techniques built in to reconstruct the history of a digital image. Truly, a tool I wish I had to begin with and glad I have now.


