

Digital videos are constantly getting more and more bulky. Nowadays it is not uncommon to work on CCTV footage with resolution above Full-HD, sometimes even 4k. Unfortunately, this huge gain in resolution is often frustrated by extremely aggressive compression (at the end of the day, the video must fit into a DVR hard drive). And there is one more collateral effect of working with hi-res videos: the processing time increases.
Even if you are running Amped FIVE on a powerful computer, you may experience a significant slow-down when applying some filters to your footage. Remember that Amped FIVE processes your video in “live mode”: all filters in the chain are applied on-the-fly, and the result is rendered on the screen. If you feel the video is not playing fast enough, today’s Tuesday Tip is here to help you!
Our suggestion is to focus your analysis on the portion of footage that really matters, both in time and space.
Focusing in space basically means cropping. As we all know (alas!), the object of interest often occupies a tiny percentage of the frame, with the rest of pixels acting as a ‘useless background’. You can use the Crop filter to select a portion of the video and work only with that for the rest of the workflow. This simple trick can save you a lot of processing time, because all successive filters in the chain will run on a smaller amount of data (usually, much smaller).
If the object is moving, you have many options: you may crop the whole region spanned by its path, if it’s not too large. Otherwise, you can set the cropped region to track the object, as shown below. (If you’re wondering which kind of tracking method you should use,
take a look at this past Tip Tuesday!)

Focusing in time means that if your object of interest stays in the video for 10 seconds, you just “limit” the video to those 10 seconds. Amped FIVE gives you several simple ways of doing that:
- Range selector: using this filter will make so that every filter occurring later in the chain will be only applied to the frames you selected.

- Lossless Trim: after you have selected your range, you may even want to create a new video file containing just the piece of footage that you’re interested in. Lossless trim is the tool for that: it will simply “take out” from the original stream the smallest possible portion that covers your range. Since it is designed to be a lossless operation, Lossless Trim can be only applied right after a Video Loader filter. The trim is not exact at the frame level for a reason: in order to cut the video without having to re-encode it we need to start from the first key-frame preceding the beginning of the selected Range. Avoiding re-encoding is the key for lossless trimming, so you will not change a single pixel.
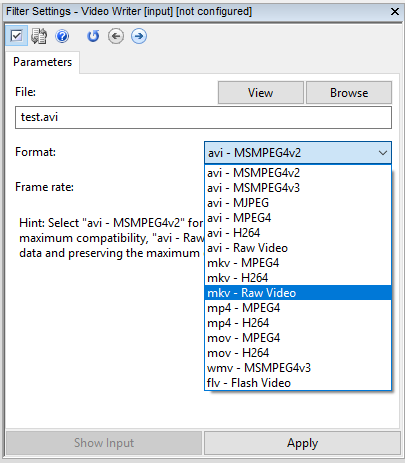
- Video Writer: if you applied several filters to your video and the playback speed has reduced a lot, and cropping did not help enough, then you may consider writing part of the video to an uncompressed video file. To do so, just select “Raw video” as the output format in the Video Writer parameters. (Remember that uncompressed video takes a lot of hard drive space, so be sure to properly focus in space and time before running this step!) Then, load the produced in another “auxiliary” chain and continue working on that. This is a forensically sound step, since no pixel information is lost. The advantage is that your processed video runs just as fast as the original, or even more if you also applied cropping before writing the video. When your work is done, to simplify the workflow for presentation, you may consider copying the filters from your auxiliary chain to the original chain, removing the “video writer”. Nobody will know that you saved a lot of time, reaching exactly the same result!
Reducing the computational load has two main advantages:
- You can view the video at its original frame rate, or even faster;
- When tuning filter parameters, you will see the impact of your adjustment in a much more responsive way, which can help a lot to find the best settings (as in the case of tuning parameters of the Motion Deblurring filter).
Before concluding, an important remark: remember that some filters must be applied before cropping or trimming the video! To cite the most important: Undistort should be applied before cropping, because it assumes that the optical center of the image is close to central pixels; Deinterlace is better applied before trimming the video, so to avoid switching the order of fields.
This week’s take-away is: focus your work and process only what you really need! We hope you enjoyed this week’s Tuesday Tip, stay tuned and don’t miss the next ones!


