
One of the biggest problems during investigations on CCTV footage is the fact that most of the systems records in some proprietary format. Although usually encoding algorithms employs the standard mpeg-like algorithms, you won’t be able to view them on common media players. Some are providing a DirectShow or VideoForWindows codec. But most of them allow to view the recorded material on some custom media player.
If you want to try to process the video with Amped FIVE (or some other editing software, I hope not), you’ll need to capture directly what’s happening on screen and encode it back with a more standard codec. Some of these players have some options to save the frames of the video in image files or to export it in the avi format. Quite often, however, you have to save manually all the single frames one by one (what will you do for hours of video?). The avi file exported will be very badly compressed, further damaging footage that probably was having a bad quality.
CamStudio
Here it comes in help a beautiful free tool, called CamStudio. A very important thing to note is that you need also to recompress the captured video (your hard drive won’t be big enough if you need to record more than few minutes) with the minimum loss of quality. In the last days the website wasn’t accessible because of traffic limits, but you can still access it by SourceForge.
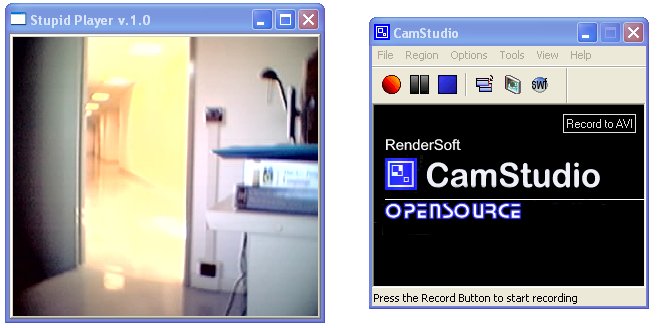
CamStudio is quite straightforward to use, but I can help you providing the following steps.
- Open the video you need to capture with its proprietary player. Usually these players will open to fit the image without interpolation at the beginning. Be sure not to resize the window to avoid interpolation artifacts. Or, if possible, verify that the pixel size set being 1:1 on the screen.
- Disable all eventual built-in filters, such as deblocking, brightness correction, etc, in order to save the video without any processing.
- Start CamStudio, select from menu Region and then Fixed Region, then push the button Select. Drag a rectangle around the proprietary player. You don’t need to be very precise. You can include even the window borders, since you can also crop out later the unwanted regions.
- Select from menu Options the entry Cursor Options and then select Hide Cursor.
- Select from menu Options the entry Video Options. Select as compressor CamStudio Lossless Codec v1.0. Then set the Quality to 100.
- At this point you have to set the frame rate. If you set the maximum, the software will try to save as fast as possible the different frames (70 fps on my 2 years old laptop). You’ll be sure not to loose any frame. But the frames will be probably replicated many times before they effectively change (and the saved file will be bigger). You can make a couple of tests to set the optimal frame rate. If you know it from the player or from the system producer you can set it exactly. If you have replicated frames you can remove it later with FIVE, but this will be explained later.
- Start capturing by pressing the big red button. Start your player and, when the part of the video of interest is finished stop the recording. Then a dialog to save your file will appear. Save it wherever you want.
- At this point, you can see the encoded video in Windows Media Player. Note that this is possible because you installed on the system the CamStudio Lossless Codec. If you try to open with another program which does not rely on system codecs, such as VLC, you won’t be able lo load it.
- Now you can import the video in Amped FIVE. Start a Video Loader from the Filters panel. Usually you can simply load the video and process it. In some cases (I suppose in files encoded with the older version of CamStudio Lossless Codec), you will need to set the Decoder to DirectShow (for a reason similar to the fact that the video is loaded in Windows Media Palyer but not in VLC). If you played already enough with FIVE you should now that when you open a video with DirectShow you need to transcode to work on it. So check the Transcode option. The other settings should be fine, since de default codec is set to avi – JPEG lossless. This is another lossless codec to convert to, suggested to avoid again any loss of quality. But, I repeat, usually yhe transcoding is not needed.
- If you want you can crop out only a desired part of the video (for example if you set a too big area in point 3) with the filter Crop in the Edit category.
- If at the point 6 you set a too high frame rate you can avoid multiple replicas of the same frame putting a Range Selector (from Select Frames). Just set the first and the last frames in the From position and To position field. Check the underlying box and select the appropriate step to retrieve only one frame every n (depending on how faster has been your capturing with respect to the actual frame rate). I should tell you that we are currently implementing a filter that should automatically do this, removing identical frames in a smarter and automatic way. But this is not ready yet.
- Process and enhance!


